The Ground-First Golf Blueprint: Table of Contents & Structure
This publication presents the complete biomechanical foundation, setup geometry, and dynamic motor sequencing of the Ground-First Golf Blueprint. Explore the individual parts and chapters below.
Publication Parts & Reading Modules
| Part | Title | Core Focus & Subject Matter | Reading Section |
|---|---|---|---|
| PART I | Theoretical & Biomechanical Foundations | Offset illusion, lie angle geometry, dynamic droop, and Lag & Whip double pendulum physics. | Read Part I ➔ |
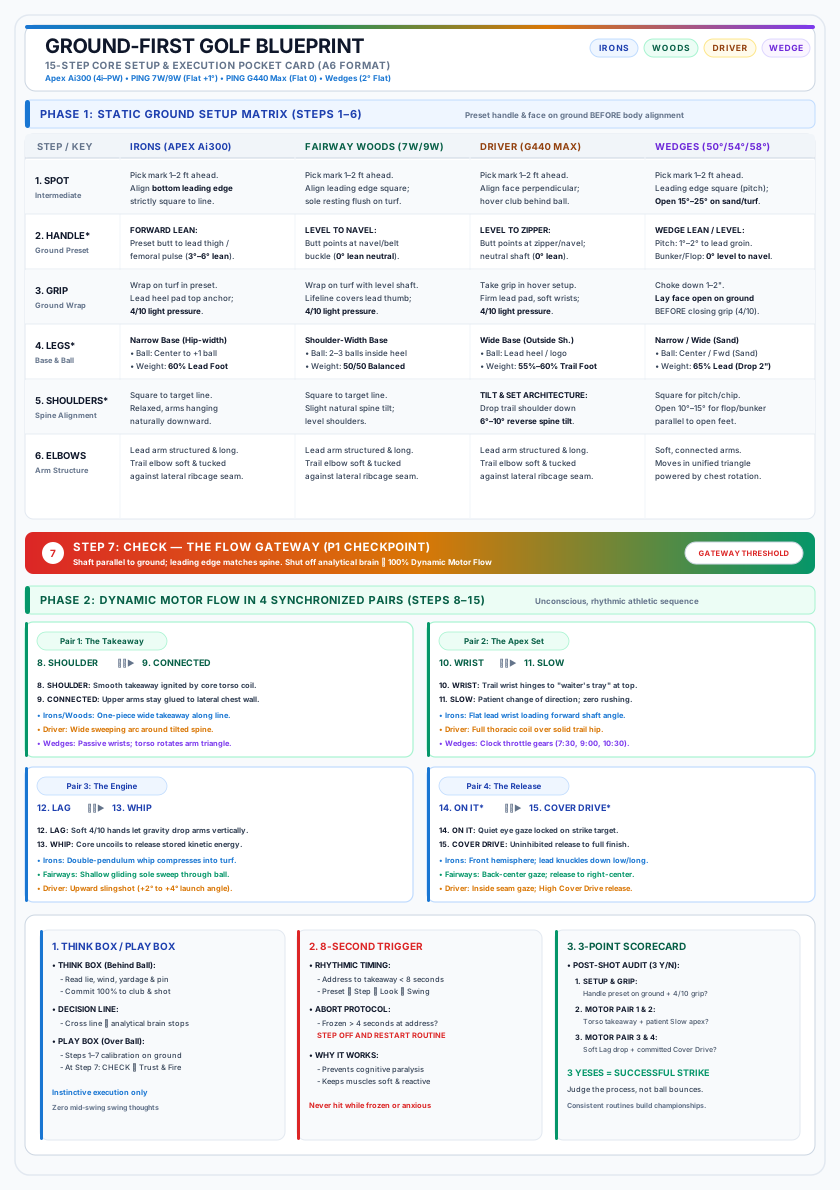
| PART II | The 15-Step Core Setup & Execution Routine | Phase 1: Static Calibration (Steps 1–6) • Flow Gateway (Step 7) • Phase 2: 4 Dynamic Motor Pairs (Steps 8–15). | Read Part II ➔ |
| PART III | Full-Bag Execution Playbooks | Iron grip architecture & forward lean • Fairway Woods sweep • Driver upward launch • Wedges & bounce matrix. | Read Irons ➔ Read Woods & Driver ➔ Read Wedges ➔ |
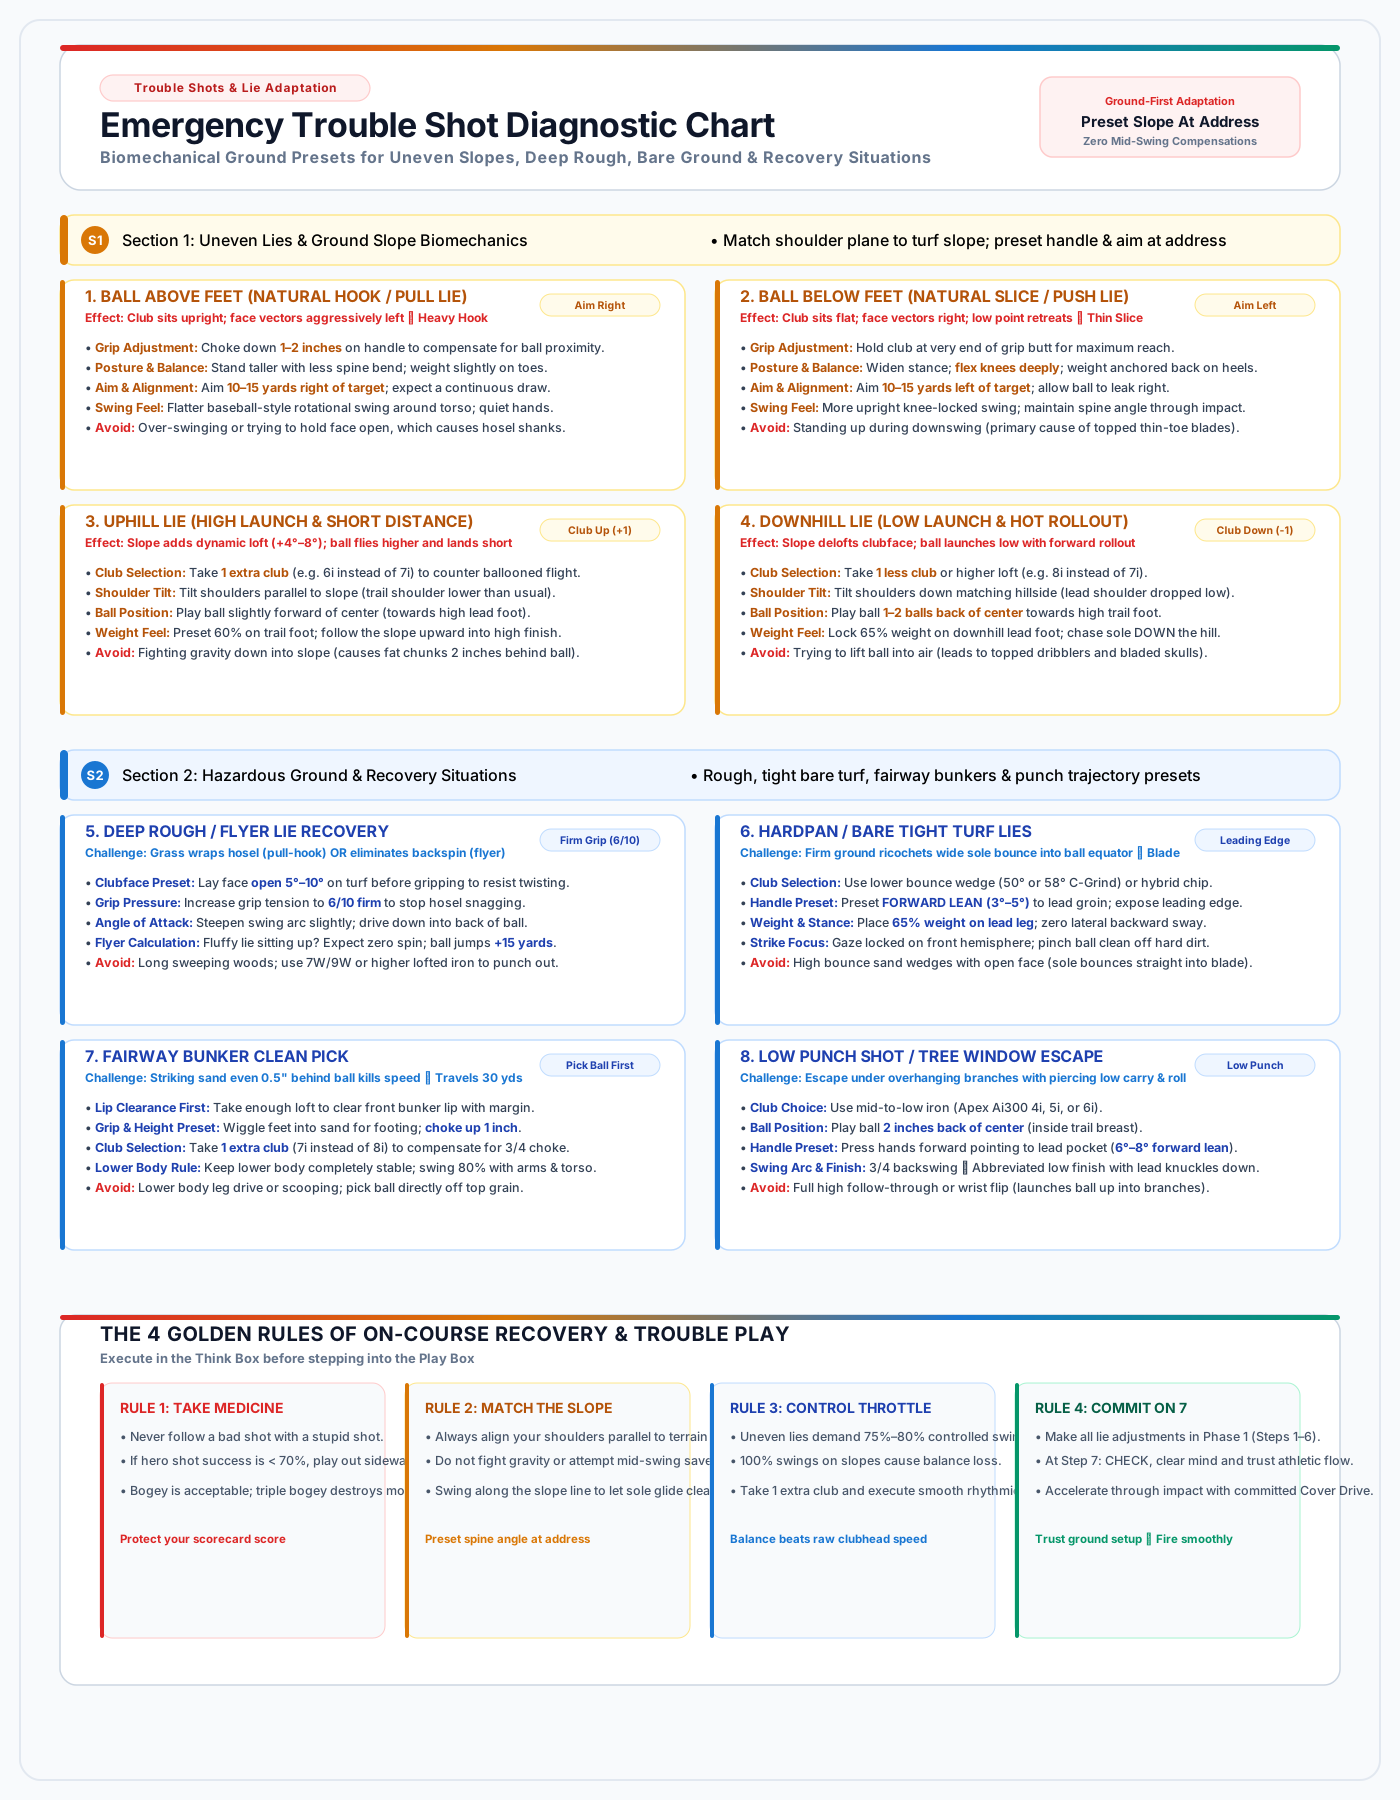
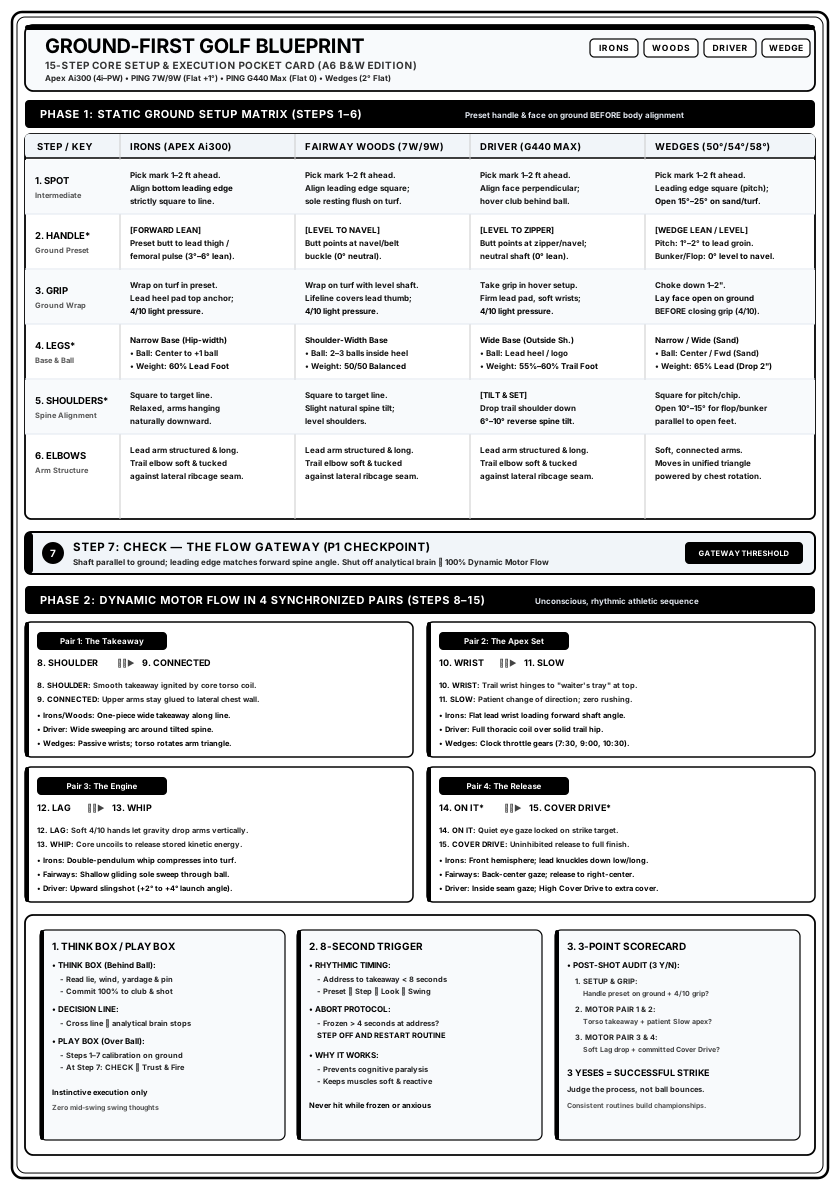
| PART IV | Visual Infographics & Pocket Reference Atlas | High-DPI vector infographics, setup geometry diagrams, and printable A6 on-course reference cards. | Read Part IV ➔ |
| PART V | On-Course Mental Protocols, Diagnostics & Drills | Think Box vs. Play Box, 3-point scorecard, 8-second trigger, and the emergency mid-round diagnostic tree. | Read Part V ➔ |
Detailed Chapter Guide
Part I: Theoretical & Biomechanical Foundations
- Chapter 1: The "Range-to-Course" Disconnect & Cognitive Illusion
Why driving range mats mask alignment faults, artificial parallel lines create visual crutches, and progressive hosel offset distorts target perception on open turf. - Chapter 2: Ball Flight Dynamics & The Dual Miss Mechanism
The mechanics behind the thin-toe slice and straight pull; forward low-point control; double-pendulum physics of centrifugal Lag and Whip release. - Chapter 3: Equipment Geometry & Hosel Optimization
Lie angle tuning (Flatter hosel geometry to prevent toe droop misses); club length progression; matching iron lies with fairway woods and driver.
Part II: The 15-Step Core Setup & Execution Routine
- Chapter 4: The Two-Phase Neurological Framework
Separating static ground calibration (conscious left-brain setup) from dynamic motor flow (subcortical right-brain execution). - Chapter 5: Phase 1 — Static Ground Calibration (Steps 1–6)
The sequential chain: Step 1 SPOT (Intermediate target) ➔ Step 2 HANDLE (Club lean preset) ➔ Step 3 GRIP (Ground wrap) ➔ Step 4 LEGS (Width & pressure) ➔ Step 5 SHOULDERS (Level hang) ➔ Step 6 ELBOWS (Structure & connection). - The Flow Gateway: Step 7 CHECK (P1 Checkpoint)
The mental firewall. Shaft parallel to target, clubface matching spine angle. Once validated, conscious mechanical thinking is permanently terminated. - Chapter 6: Phase 2 — Dynamic Execution Flow in 4 Motor Pairs (Steps 8–15)
- Pair 1 (Takeaway):
Step 8 SHOULDER(Lead shoulder down into trail heel) $\rightarrow$Step 9 CONNECTED(Glued to chest). - Pair 2 (Apex):
Step 10 WRIST(Waiter's Tray lag load) $\rightarrow$Step 11 SLOW(Patient apex transition). - Pair 3 (Engine):
Step 12 LAG(Soft 4/10 gravity drop) $\rightarrow$Step 13 WHIP(Body uncoils strike). - Pair 4 (Release):
Step 14 ON IT(Gaze locked on strike point) $\rightarrow$Step 15 COVER DRIVE(Corridor extension).
- Pair 1 (Takeaway):
Part III: Full-Bag Execution Playbooks
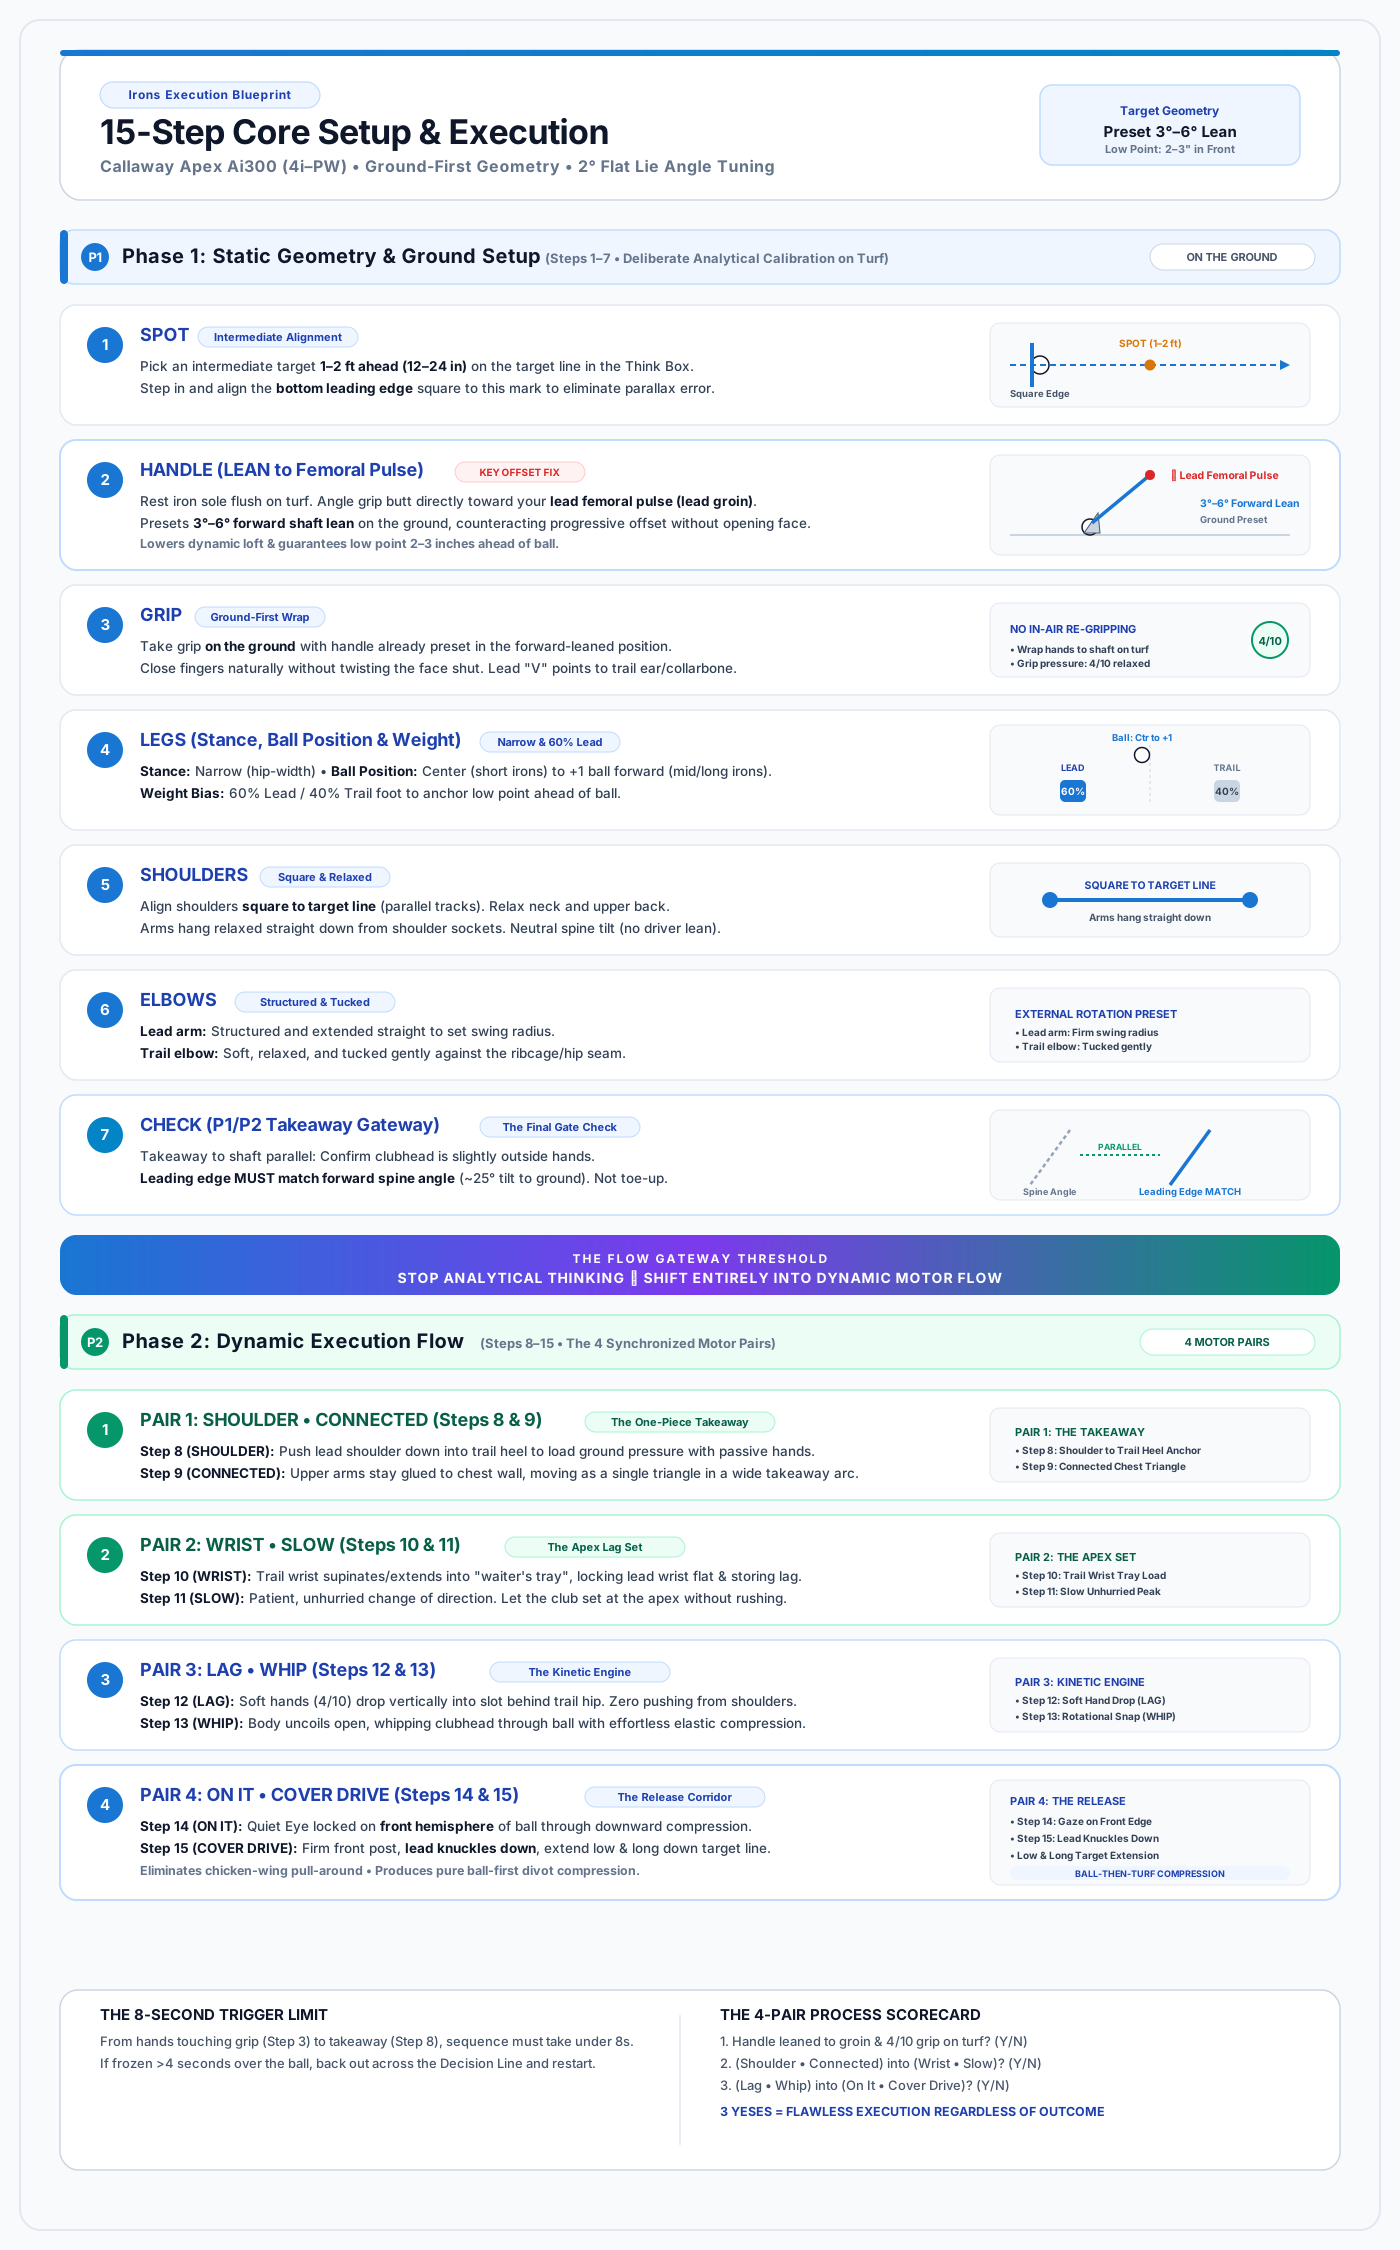
- Chapter 7: Iron Grip Architecture & Striking Precision
Diagonal finger channel wrap, heel pad top anchor, 2.5 knuckles visible, 4/10 pressure dynamics, and forward lean to the lead femoral pulse. - Chapter 8: Fairway Woods Blueprint
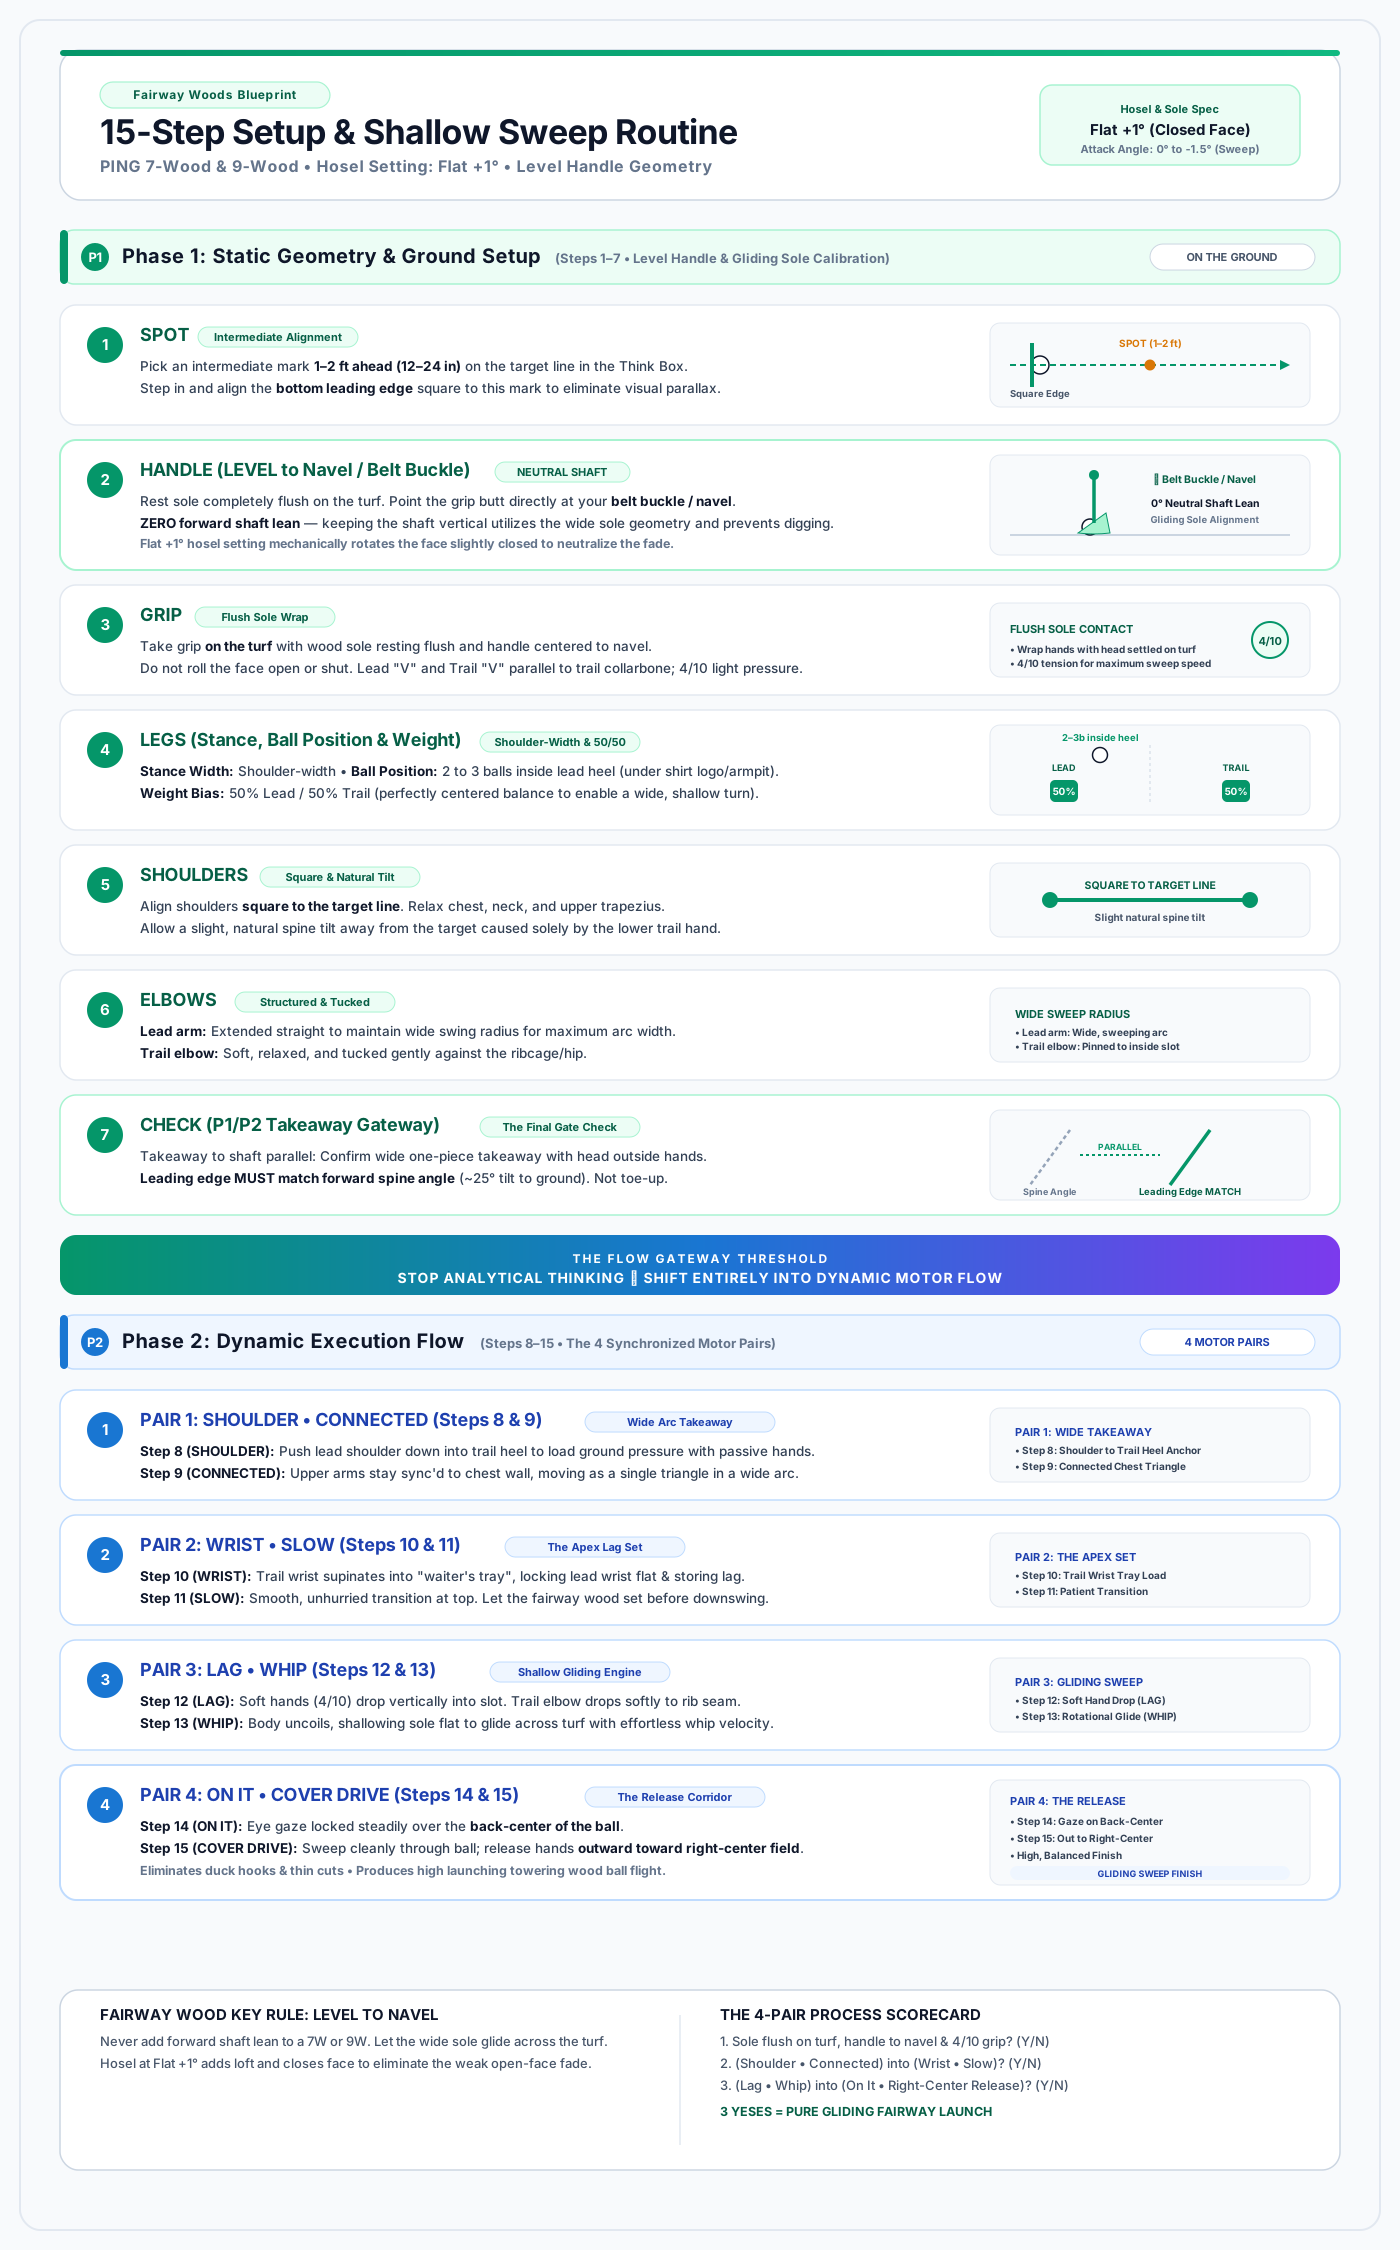
Level handle geometry to navel ($0^\circ$ lean), 50/50 balance, wide shallow arc, and sweeping grass tips out toward right-center field. - Chapter 9: Driver Launch Blueprint
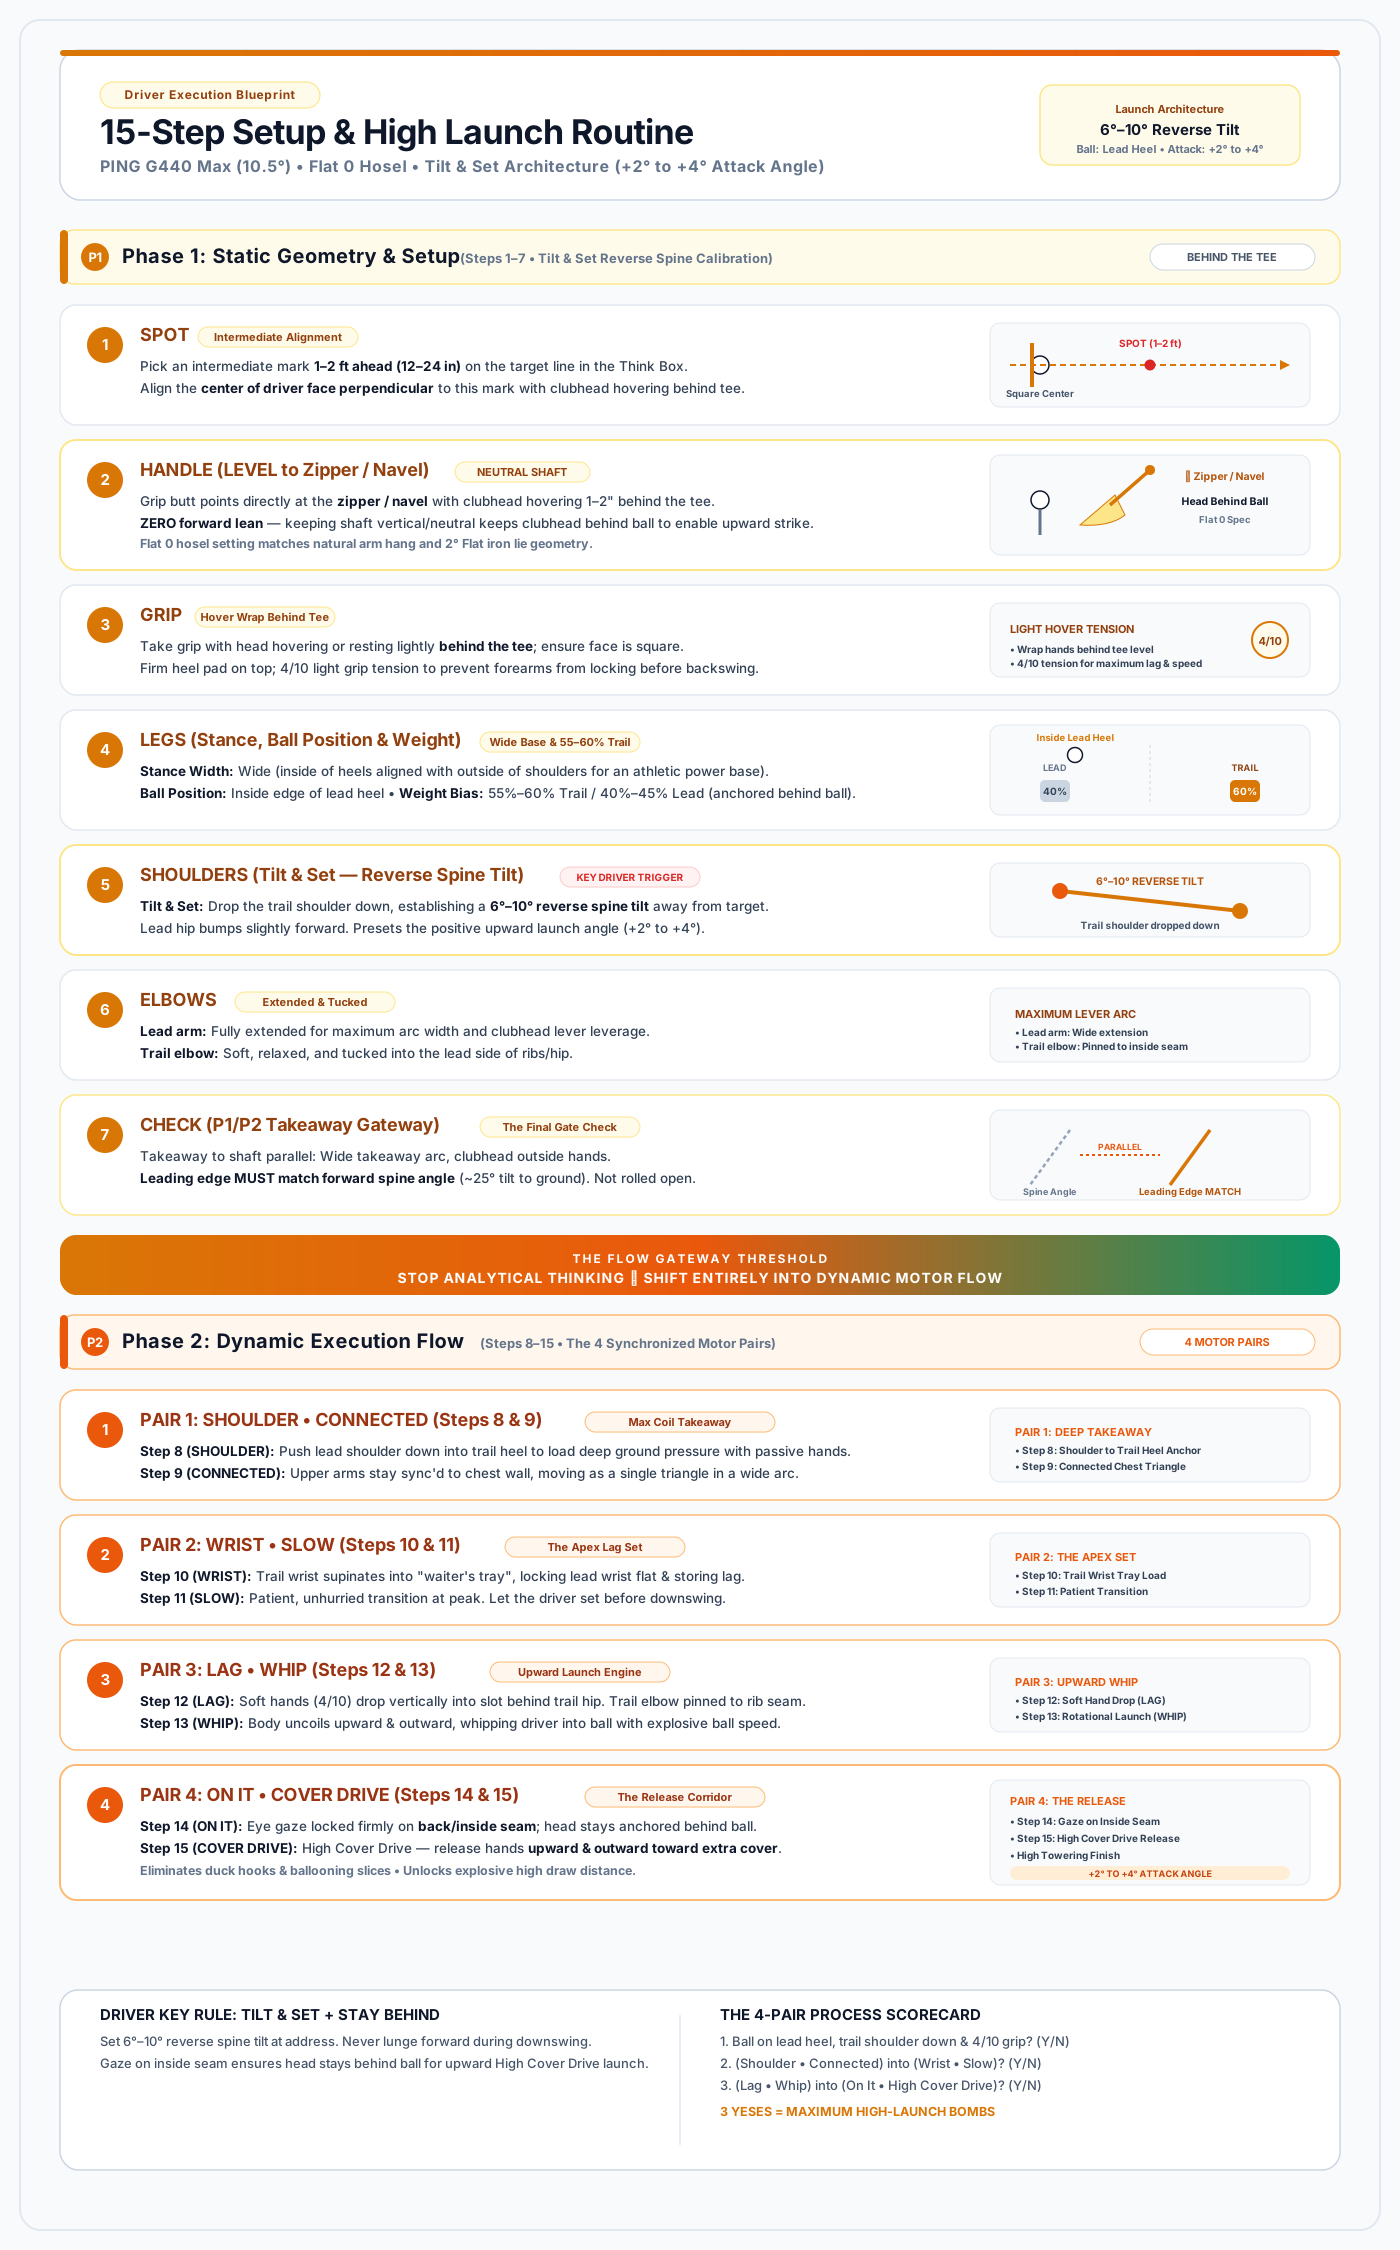
Hover setup, Tilt & Set reverse spine tilt ($6^\circ\text{–}10^\circ$), lead heel ball placement, 60% trail bias, and upward High Cover Drive launch ($+2^\circ\text{ to }+4^\circ$). - Chapter 10: Wedges & The Scoring Game Matrix
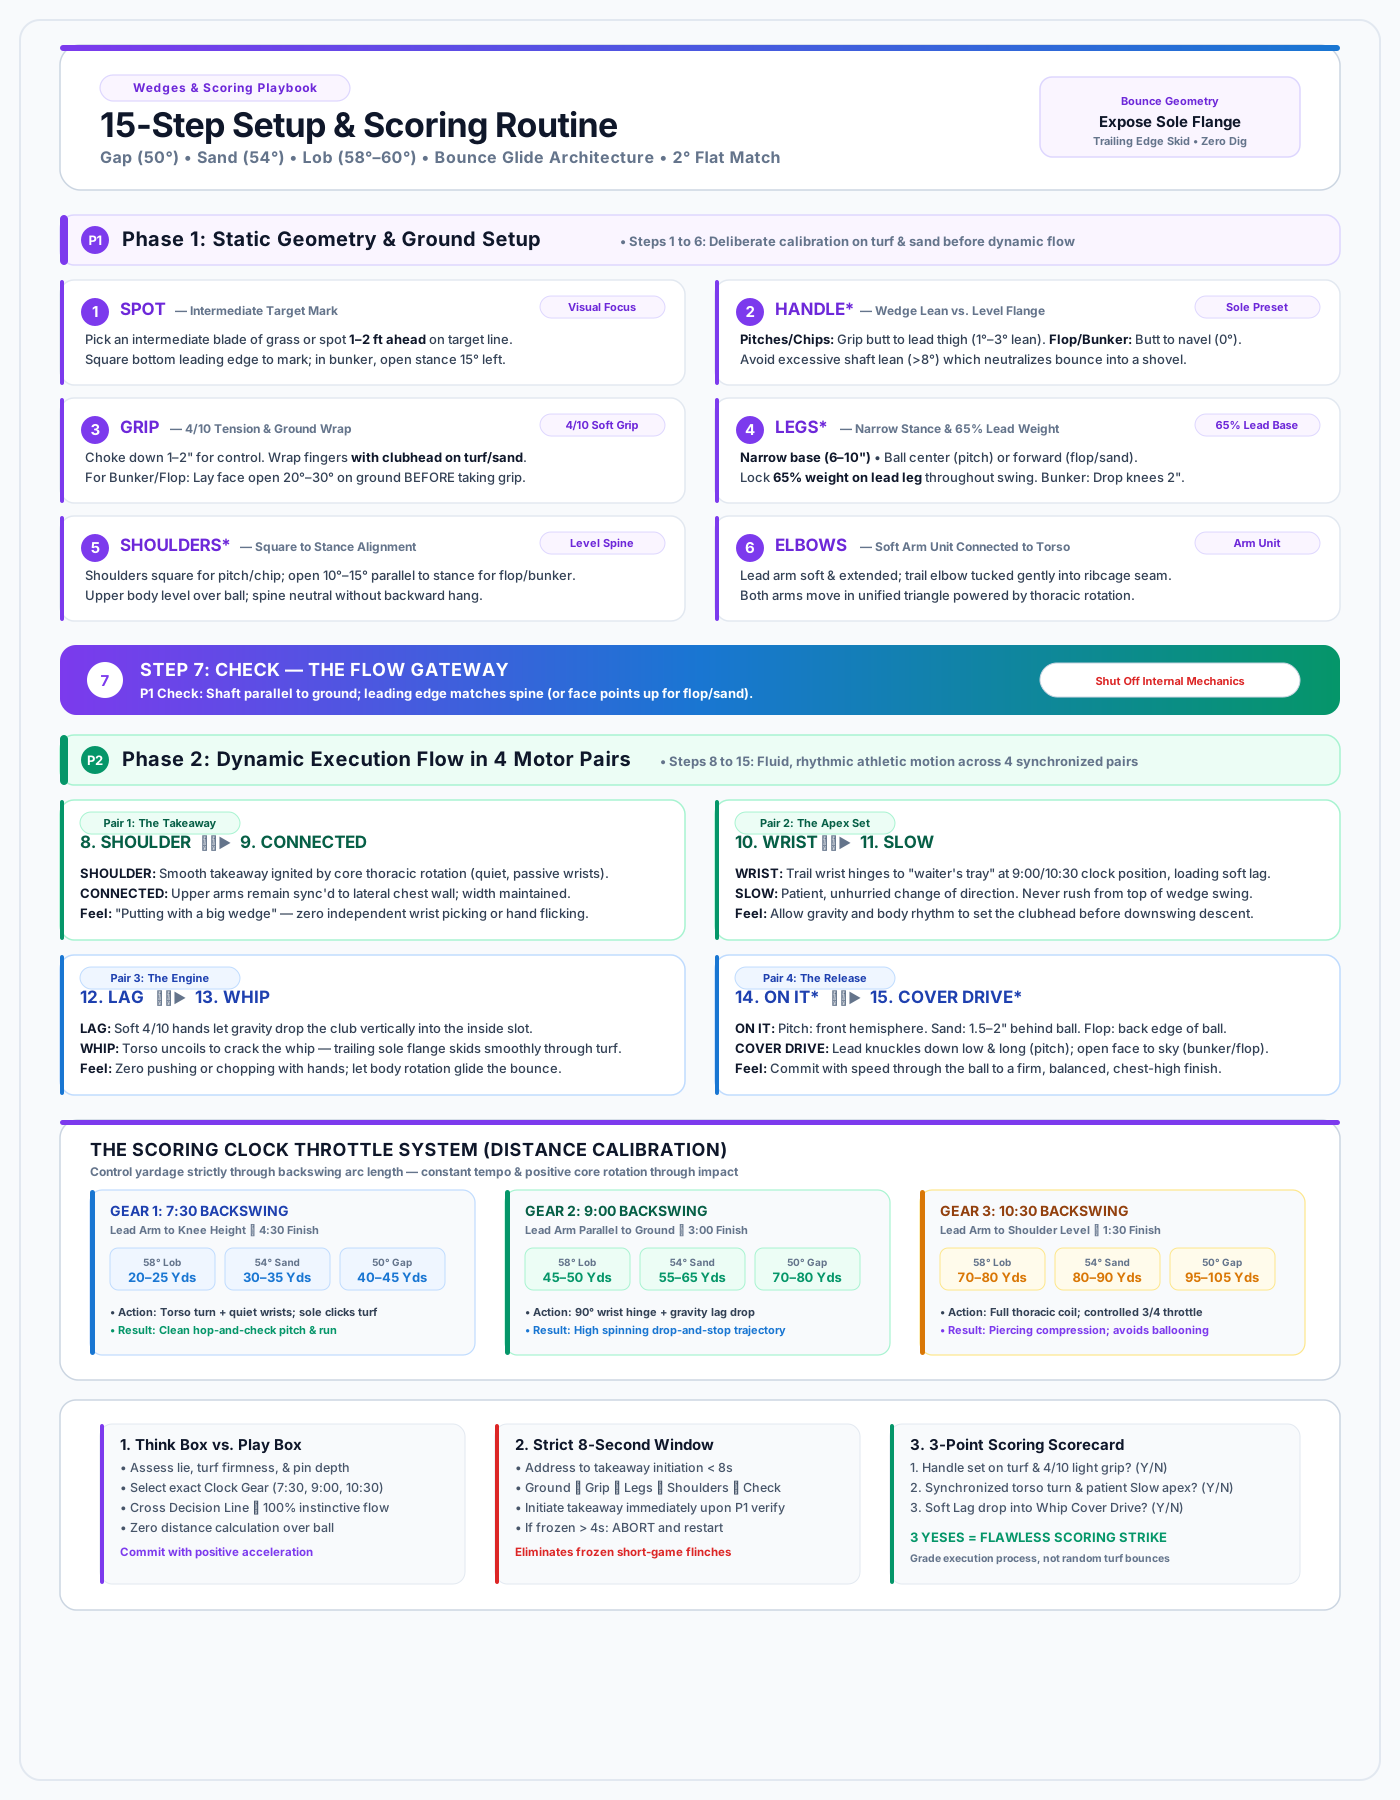
Bounce utilization without digging, 3-gear clock throttle system (7:30, 9:00, 10:30) for yardage control, and committed greenside bunker explosion mechanics.
Part IV: Visual Infographics & Pocket Reference Atlas
- Vector infographics for high-resolution inspection:
- Printable Pocket Cards:

Part V: On-Course Mental Protocols, Diagnostics & Drills
- Chapter 13: Think Box vs. Play Box & The Pre-Shot Rehearsal Protocol
Spatial discipline: Exactly three rehearsals in the Think Box (Direction ➔ Turf Brush ➔ Motor Feel) before crossing the decision line into the Play Box. - Chapter 14: The Process Scorecard & The 8-Second Trigger Rule
Evaluating rounds purely by setup and commitment adherence; executing within 5–8 seconds of stepping in to prevent paralysis by analysis. - Chapter 15: Emergency Mid-Round Diagnostic Decision Tree
Rapid on-course remedies for toe-shanks, slices, fat chunks, thin tops, and pull-hooks without changing fundamental swing mechanics.