The Wedge & Scoring Game Blueprint: Bounce Utilization, Ground Glide Mechanics & Partial Throttle Control
Book Title: The Ground-First Golf Blueprint: Precision Setup Geometry, Progressive Offset & Dynamic Flow
Volume / Section: Part III — The Wedge & Scoring Game Matrix (Chapter 10)
Target Equipment:
• Gap Wedge ($50^\circ / 10^\circ\text{–}12^\circ\text{ Bounce}$)
• Sand Wedge ($54^\circ / 12^\circ\text{–}14^\circ\text{ High Bounce}$)
• Lob Wedge ($58^\circ\text{–}60^\circ / 08^\circ\text{–}10^\circ\text{ C-Grind Bounce}$)
• Lie Angle Specification: $2^\circ$ Flat (Orange Dot Match)
Cross-References: book_index.md • part_1_foundations_and_biomechanics.md • part_2_11_step_core_routine.md • part_3_iron_grip_and_striking.md
Visual Assets:
• ch10_fig01_wedge_bounce_skid_vs_dig.svg • ch10_fig01_wedge_bounce_skid_vs_dig.png
• ch10_fig02_scoring_game_clock_throttle_matrix.svg • ch10_fig02_scoring_game_clock_throttle_matrix.png
• ch10_fig03_bunker_ground_bounce_geometry.svg • ch10_fig03_bunker_ground_bounce_geometry.png
1. Executive Summary: The Bounce Paradox & The Scoring Disconnect
The scoring game (shots from 100 yards and in, pitch shots, greenside chips, and bunker play) accounts for over 60% of all golf strokes. Yet it is where the vast majority of amateur golfers surrender the most strokes through catastrophic mishits: heavy chunks that travel five feet, or bladed skulls that rocket over the green into hazards.
This scoring crisis stems from a fundamental misunderstanding of wedge bounce geometry:
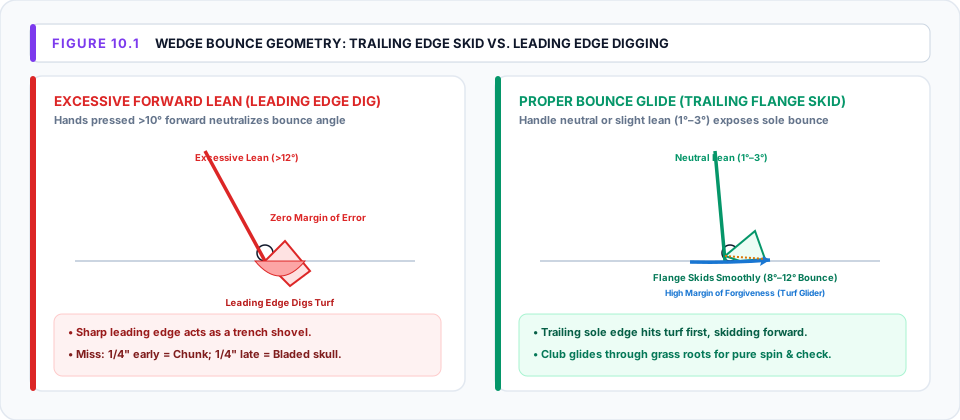
- The Over-Leaning Error: Golfers who learn to press their hands forward for full iron compression often carry that excessive forward shaft lean ($>10^\circ$) into their wedge game.
- Elimination of Effective Bounce: Forward shaft lean lowers the leading edge directly into the turf. Every degree of forward shaft lean removes one degree of effective bounce ($12^\circ\text{ Bounce} - 10^\circ\text{ Forward Lean} = 2^\circ\text{ Effective Bounce}$).
- The Shovel vs. The Skier: When effective bounce is eliminated, the sharp leading edge acts as a trenching shovel. If the club enters the turf even $1/4$ inch behind the ball, the leading edge digs deep, completely stopping the clubhead (the chunk). To avoid digging, the player reflexively stands up or pulls the hands up through impact, catching the ball with the leading edge on the equator (the bladed skull).
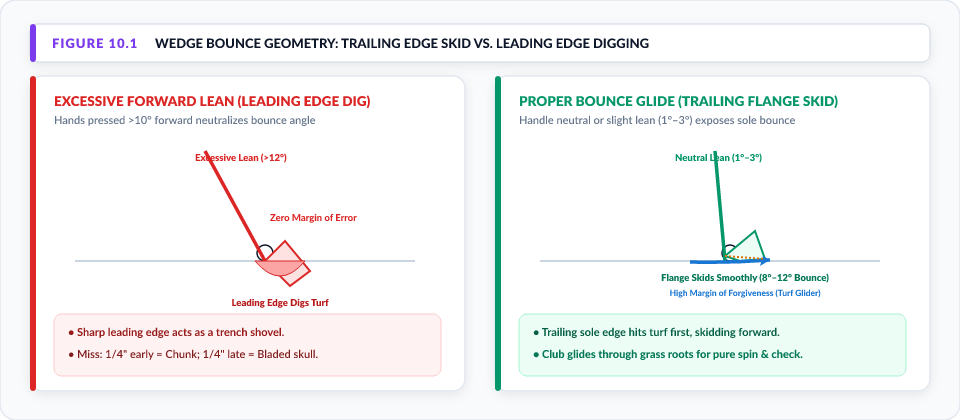
Figure 10.1: Wedge Bounce Geometry: Trailing Edge Skid vs. Leading Edge Digging. View Vector SVG
By grounding the wedge sole correctly, matching handle lean to shot trajectory, and letting the trailing sole flange skid through the turf, the wedge gains enormous forgiveness.
2. Equipment Specifications & Bounce Calibration
To build a seamless transition from the Callaway Apex Ai300 irons into the scoring wedges, the wedge setup must follow precise loft, bounce, and lie configurations:
| Club | Loft | Bounce Angle | Grind Profile | Strategic Purpose | Ground Handle Setup |
|---|---|---|---|---|---|
| Gap Wedge (GW) | $50^\circ$ | $10^\circ\text{–}12^\circ$ | Standard / Mid-Sole (S-Grind) | Full approach shots (90–105 yds) & standard pitch-and-runs | WEDGE LEAN ($2^\circ\text{–}3^\circ$ to lead thigh) |
| Sand Wedge (SW) | $54^\circ$ | $12^\circ\text{–}14^\circ$ | High Bounce / Dual-Sole (D-Grind) | Soft turf pitches, deep rough extraction, standard bunker blast | LEVEL to WEDGE LEAN ($0^\circ\text{–}2^\circ$) |
| Lob Wedge (LW) | $58^\circ\text{–}60^\circ$ | $08^\circ\text{–}10^\circ$ | Relief Heel/Toe Grind (C-Grind) | Tight lies, flop shots, high soft landing, firm sand bunkers | LEVEL ($0^\circ$ to navel / belt buckle) |
Lie Angle Matching: The $2^\circ$ Flat (Orange Dot) Rule for Wedges
Because wedges feature the highest static lofts in the bag ($50^\circ\text{ to }60^\circ$), lie angle errors are magnified exponentially.
- If a $58^\circ$ lob wedge is even $1^\circ\text{–}2^\circ$ too upright at impact, the face vector points drastically left of the target, resulting in aggressive pull-hooks on full shots and pulled chips around the green.
- Setting all wedges to $2^\circ$ Flat ensures the center sole and trailing bounce flange sit perfectly level with the turf throughout the swing arc.
3. The Ground-First Wedge Setup Matrix
Wedge play requires distinct setup variations depending on the desired trajectory, spin, and turf condition:
| Setup Parameter | Standard Chip & Run (GW/SW) | Pitch Shot (50–75 yds) (GW/SW/LW) | High Soft Flop (LW $58^\circ\text{–}60^\circ$) | Greenside Bunker Blast (SW $54^\circ$) |
|---|---|---|---|---|
| 1. SPOT | Intermediate mark 1–2 ft ahead; align leading edge | Intermediate mark 1–2 ft ahead; align leading edge | Intermediate mark 1–2 ft ahead; face points at target | Intermediate mark 1–2 ft ahead; stance open $15^\circ$ |
| 2. HANDLE* | WEDGE LEAN: Butt points at lead groin/pulse ($2^\circ\text{–}4^\circ$ lean) |
SLIGHT LEAN: Butt points at lead inner thigh ($1^\circ\text{–}2^\circ$ lean) |
LEVEL: Butt points directly at navel / belt buckle ($0^\circ$ lean) |
LEVEL: Butt points directly at navel ($0^\circ$ lean) |
| 3. GRIP | Choked down 1–2 inches; 4/10 tension; square face | Choked down 1 inch; 4/10 tension; square face | Standard length; Face laid open $20^\circ$ ON GROUND before gripping | Face laid open $20^\circ\text{–}30^\circ$ ON GROUND before gripping |
| 4. LEGS* | Narrow (6–8 inches between heels) • Ball: Back-center • Weight: 70% Lead |
Narrow-Mid (8–10 inches) • Ball: Exact Center • Weight: 60%–65% Lead |
Shoulder-width • Ball: Forward (Lead heel) • Weight: 60% Lead |
Wide (Shoulder+ width, knees bent) • Ball: 1–2 balls inside lead heel • Weight: 60% Lead |
| 5. SHOULDERS | Square to slightly open ($5^\circ$ left) | Square to intermediate line | Open parallel to stance line ($10^\circ$ left) | Open parallel to stance line ($15^\circ$ left) |
| 6. ELBOWS | Soft, connected to chest ribcage | Soft, structured lead arm, relaxed trail elbow | Soft, flexible arms for wide shallow arc | Soft arms, trail elbow tucked close to ribs |
| 7. CHECK | P1 Check: Leading edge matches spine angle | P1 Check: Shaft parallel, face square | P1 Check: Clubface stays pointing up to sky | P1 Check: Clubface stays pointing up to sky |
* Indicates category-specific variable adjustments.
4. The Partial Swing Throttle Matrix: The Clock System
Distance control inside 100 yards must never be controlled by swinging harder or softer. Altering swing tempo causes deceleration, inconsistent strike points, and erratic spin rates.
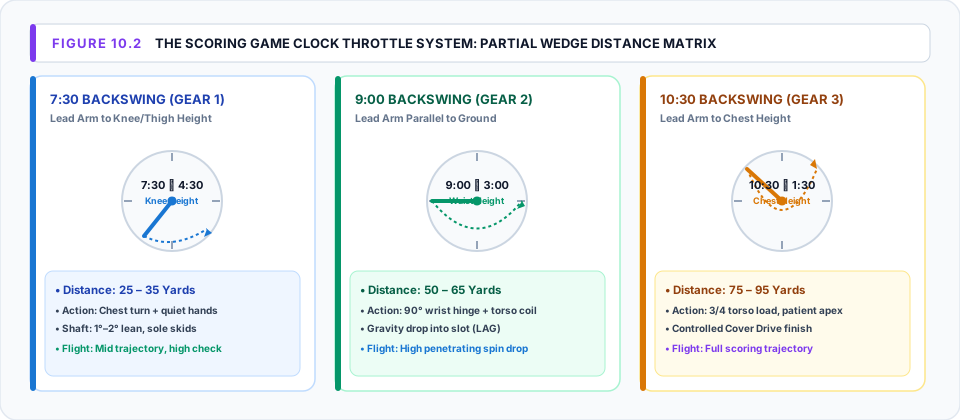
Instead, distance control is governed by Backswing Arc Length (The Clock System) while maintaining a constant, rhythmic tempo and positive core rotation through impact:
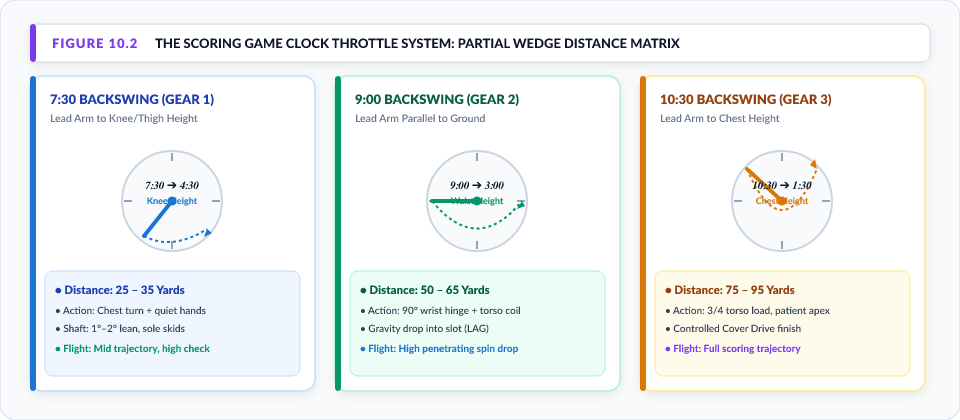
Figure 10.2: The Scoring Game Clock Throttle System: Partial Wedge Distance Matrix. View Vector SVG
The Three Throttle Gears:
1. Gear 1: 7:30 Backswing (Knee/Thigh Height) $\rightarrow$ 4:30 Finish
- Mechanics: The lead arm swings back until hands reach knee/mid-thigh height. Wrists remain quiet with minimal hinge. The swing is powered by a synchronized chest rotation away from and through the ball.
- Target Yardages:
- $58^\circ\text{ Lob Wedge}$: $20\text{–}25\text{ Yards}$
- $54^\circ\text{ Sand Wedge}$: $30\text{–}35\text{ Yards}$
- $50^\circ\text{ Gap Wedge}$: $40\text{–}45\text{ Yards}$
- Ground Feel: Trailing bounce flange brushes the top of the turf with a gentle "click" sound.
2. Gear 2: 9:00 Backswing (Waist/Chest Height) $\rightarrow$ 3:00 Finish
- Mechanics: The lead arm reaches parallel to the ground (waist-to-chest height). The wrists hinge smoothly to a $90^\circ$ angle (WRIST: Waiter's Tray). On the downswing, gravity drops the hands into the slot (LAG), and the chest uncoils to deliver a crisp Cover Drive release.
- Target Yardages:
- $58^\circ\text{ Lob Wedge}$: $45\text{–}50\text{ Yards}$
- $54^\circ\text{ Sand Wedge}$: $55\text{–}65\text{ Yards}$
- $50^\circ\text{ Gap Wedge}$: $70\text{–}80\text{ Yards}$
- Ground Feel: Shallow, dollar-bill-sized divot that starts just under the front edge of the ball.
3. Gear 3: 10:30 Backswing (Three-Quarter Shoulder Height) $\rightarrow$ 1:30 Finish
- Mechanics: The lead arm reaches shoulder height with a full thoracic core coil. This represents the maximum controlled scoring swing (avoid swinging $100%$ full with scoring wedges, which creates excessive ballooning and unpredictable spin).
- Target Yardages:
- $58^\circ\text{ Lob Wedge}$: $70\text{–}80\text{ Yards}$
- $54^\circ\text{ Sand Wedge}$: $80\text{–}90\text{ Yards}$
- $50^\circ\text{ Gap Wedge}$: $95\text{–}105\text{ Yards}$
- Ground Feel: Full compression with controlled ball flight and high one-hop-and-stop backspin.
5. Greenside Bunker Ground Geometry: The Water-Ski Sand Blast
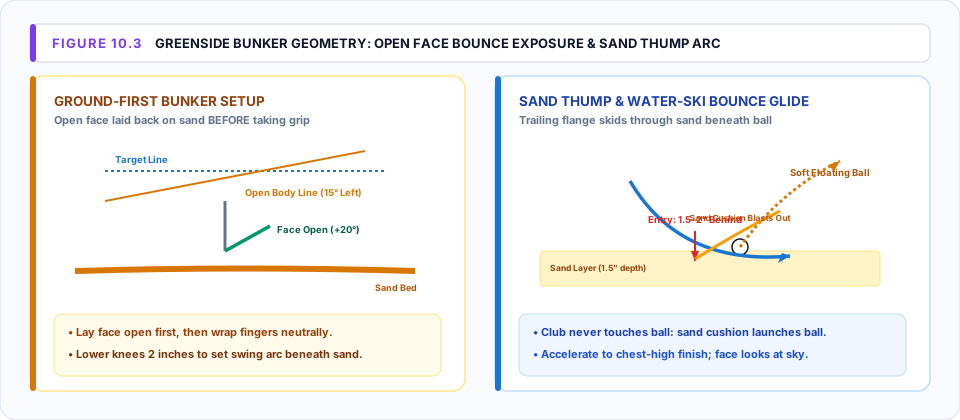
Greenside bunker play is governed by a singular physical rule: the clubhead must never strike the golf ball directly. The ball is propelled out of the bunker on a displaced cushion of sand:

Figure 10.3: Greenside Bunker Geometry: Open Face Bounce Exposure & Sand Thump Arc. View Vector SVG
Step-by-Step Bunker Blast Execution Protocol:
- Step 1: Lay Face Open on the Sand BEFORE Gripping
- Lay the $54^\circ$ or $58^\circ$ wedge flat on the sand, rotating the clubface open $20^\circ\text{–}30^\circ$.
- Biomechanical Rule: Never take your grip and then twist your wrists open. Always lay the open sole flush on the sand first, then wrap your fingers with a neutral 4/10 grip. This exposes the high trailing bounce flange (turning $12^\circ$ of bounce into nearly $20^\circ$ of effective bounce).
- Step 2: Stance & Center of Gravity Drop
- Open stance $15^\circ$ left of target line.
- Wiggle feet 1 inch into the sand to establish stable footing.
- Flex knees deeply to lower your center of gravity by 2 inches. This automatically presets the bottom of your swing arc beneath the sand bed without needing to chop down.
- Place 60%–65% of weight on the lead foot and keep it there throughout the swing.
- Step 3: Pick the Sand Entry Target (1.5–2 Inches Behind Ball)
- Lock your Quiet Eye gaze on a grain of sand 1.5 to 2 inches behind the ball (never look at the ball itself).
- Step 4: Accelerate and Keep the Clubface Looking at the Sky
- Swing along the open stance line with smooth, unhurried rhythm (SLOW).
- Let the clubhead enter the sand 1.5–2 inches behind the ball. The wide bounce flange acts like a water ski, skimming beneath the ball without digging into the underlying dirt.
- Accelerate through to a high, balanced finish. The clubface should finish pointing straight up toward the sky (never roll the wrists over).
6. The Scoring Game Diagnostic Tree
Use this quick diagnostic tree when facing scoring difficulties on the course:
┌─────────────────────────────────────────────────────────────────────────────┐
│                    SCORING GAME EMERGENCY DIAGNOSTIC TREE                   │
└──────────────────────────────────────┬──────────────────────────────────────┘
                                       │
         ┌─────────────────────────────┼─────────────────────────────┐
         ▼                             ▼                             ▼
┌──────────────────┐          ┌──────────────────┐          ┌──────────────────┐
│   THE CHUNK /    │          │   THE BLADE /    │          │  BUNKER STRUGGLE │
│   FAT PITCH      │          │   SKULLED SHOT   │          │  (STUCK / SKULL) │
├──────────────────┤          ├──────────────────┤          ├──────────────────┤
│ Cause:           │          │ Cause:           │          │ Cause:           │
│ Excessive shaft  │          │ Hanging back on  │          │ Square face      │
│ lean (>8°) digs  │          │ trail leg; hands │          │ digs leading     │
│ leading edge.    │          │ scoop upward.    │          │ edge; or decel.  │
├──────────────────┤          ├──────────────────┤          ├──────────────────┤
│ Immediate Fix:   │          │ Immediate Fix:   │          │ Immediate Fix:   │
│ Set handle to    │          │ Lock 65% weight  │          │ Open face 25° ON │
│ LEVEL or slight  │          │ on lead leg;     │          │ SAND first; drop │
│ lean (1°–2°).    │          │ Keep chest over  │          │ knees 2"; thump  │
│ Feel bounce skid │          │ ball & lead      │          │ sand 2" behind   │
│ through turf.    │          │ knuckles down.   │          │ with acceleration│
└──────────────────┘          └──────────────────┘          └──────────────────┘
7. Summary Scoring Rules to Carry on the Course
- Let the Bounce Be Your Shield: Never force forward shaft lean on delicate touch shots. Trust the trailing flange to glide.
- Preset Weight Forward at Address (65% Lead): Keep weight anchored on the lead side throughout the entire short game swing—zero lateral sway.
- Control Distance with Clock Arc, Not Muscle: Dial in your 7:30, 9:00, and 10:30 gears for predictable yardages.
- Commit with Speed in Sand: Never decelerate into the sand. The sand provides massive resistance; swing with positive velocity to the chest-high finish.