⬅ Return to Playbook

Part IV: The Visual Infographic & Pocket Reference Atlas

Book Title: The Ground-First Golf Blueprint: Precision Setup Geometry, Progressive Offset & Dynamic Flow
Volume / Section: Part IV — Visual Infographics & Reference Suite
Cross-References: book_index.mdpart_2_11_step_core_routine.mdpart_3_iron_grip_and_striking.md


Executive Overview: High-Fidelity Visual Training

Translating complex biomechanical concepts into athletic muscle memory requires clear, high-contrast visual models. The Visual Infographics & Pocket Reference Atlas provides visual reference assets designed for on-course quick-reference pocket cards, home practice stations, and digital review in the local studio.


Comprehensive Figures Catalog (In-Book Visual Asset Suite)

All in-book figures follow the standardized naming convention: ch<NN>_fig<NN>_<title_with_underscores>.
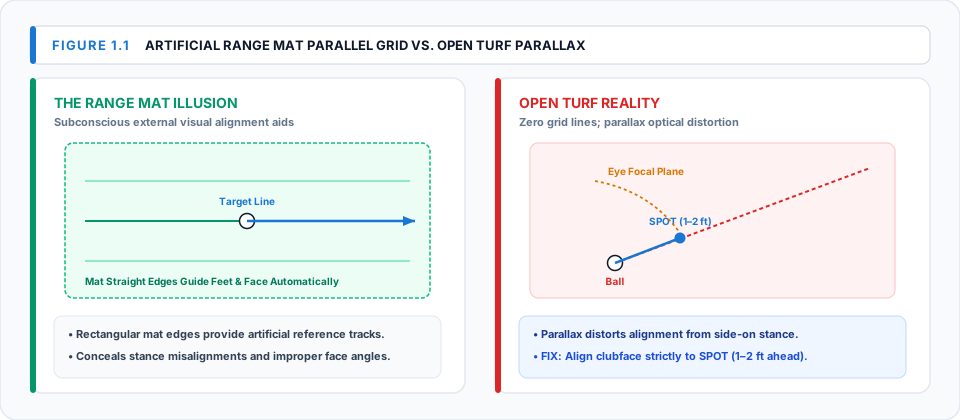
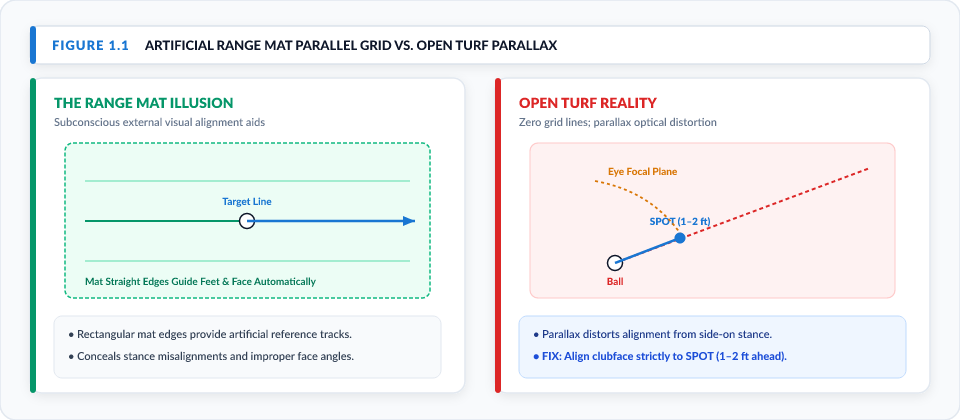
Figure # Chapter & Diagram Title Vector SVG Source 300-DPI PNG Render
Fig 1.1 Range Mat Parallel Grid vs. Open Turf Parallax ch01_fig01_range_mat_vs_open_turf_grid.svg ch01_fig01_range_mat_vs_open_turf_grid.png
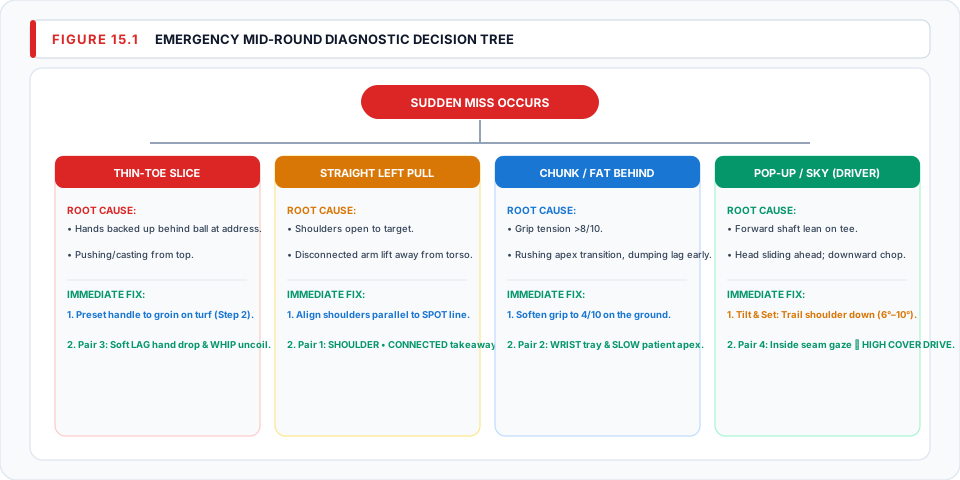
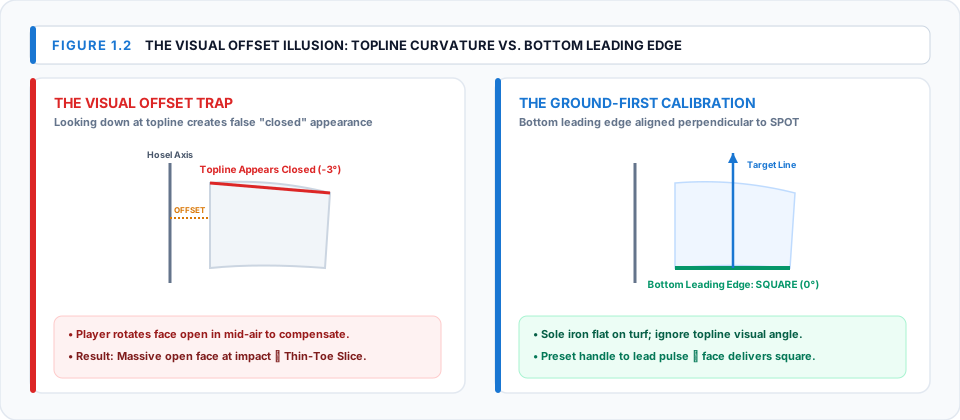
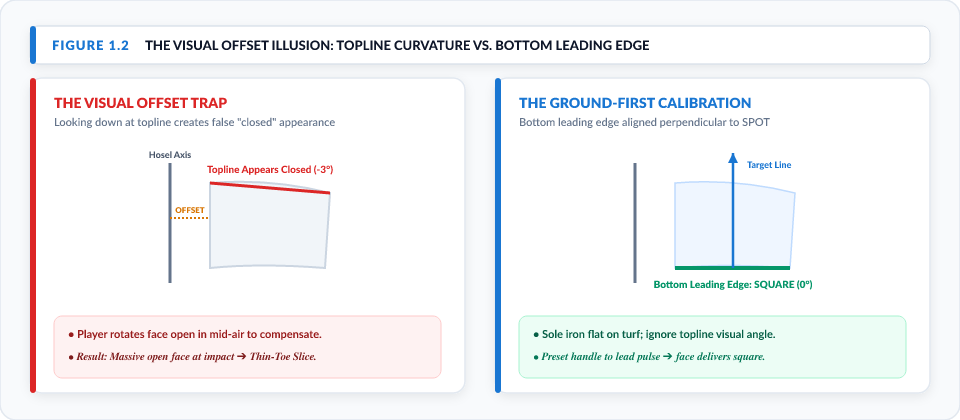
Fig 1.2 Progressive Offset Visual Illusion: Topline vs. Leading Edge ch01_fig02_progressive_offset_visual_illusion.svg ch01_fig02_progressive_offset_visual_illusion.png
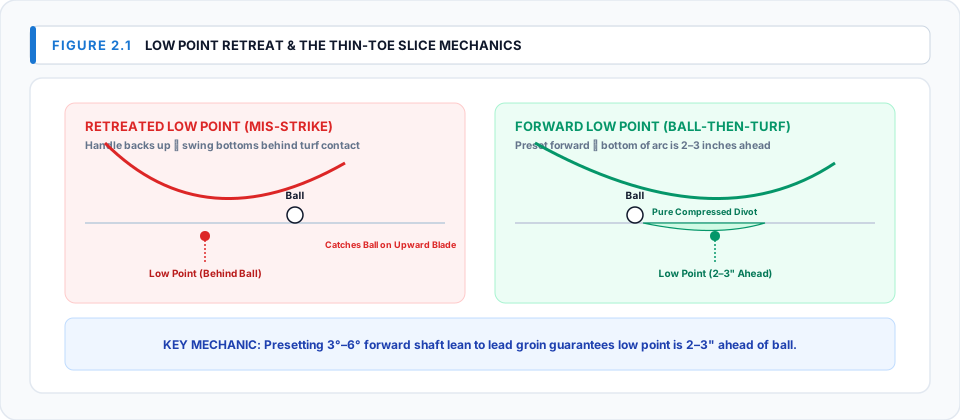
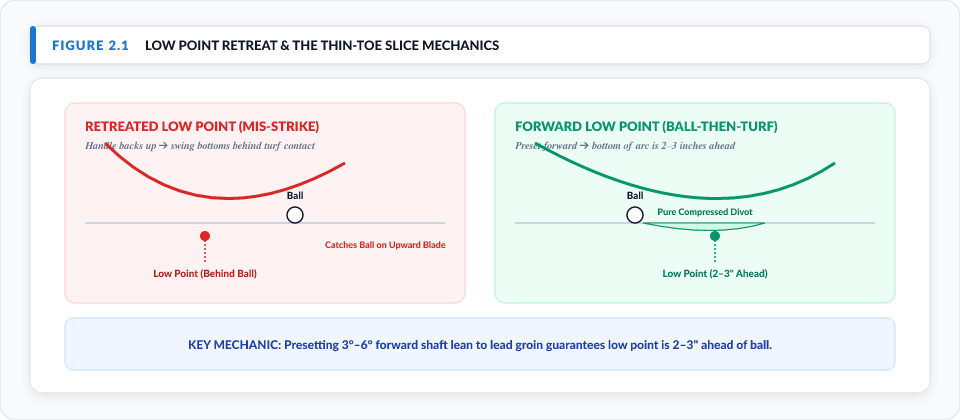
Fig 2.1 Low Point Retreat & Thin-Toe Slice Mechanics ch02_fig01_thin_toe_slice_low_point_retreat.svg ch02_fig01_thin_toe_slice_low_point_retreat.png
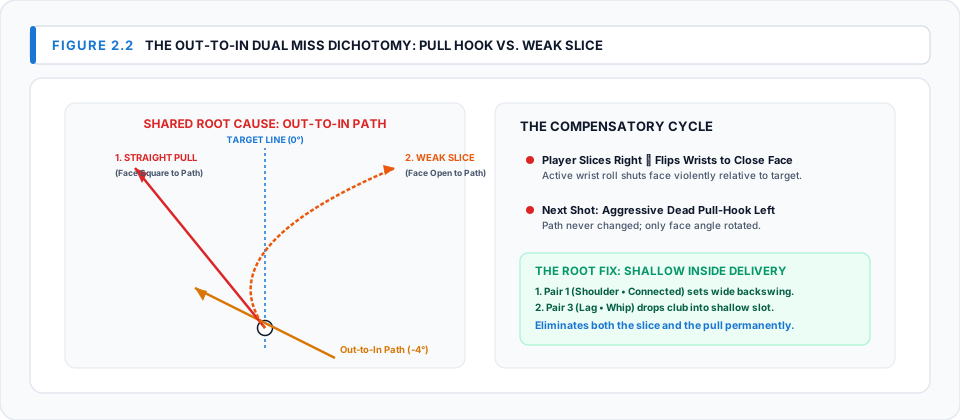
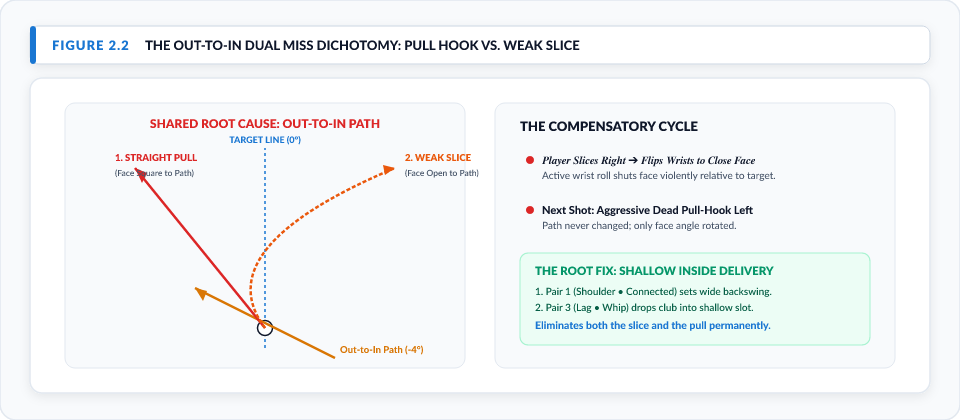
Fig 2.2 Out-to-In Dual Miss Dichotomy: Pull vs. Slice ch02_fig02_out_to_in_dual_miss_dichotomy.svg ch02_fig02_out_to_in_dual_miss_dichotomy.png
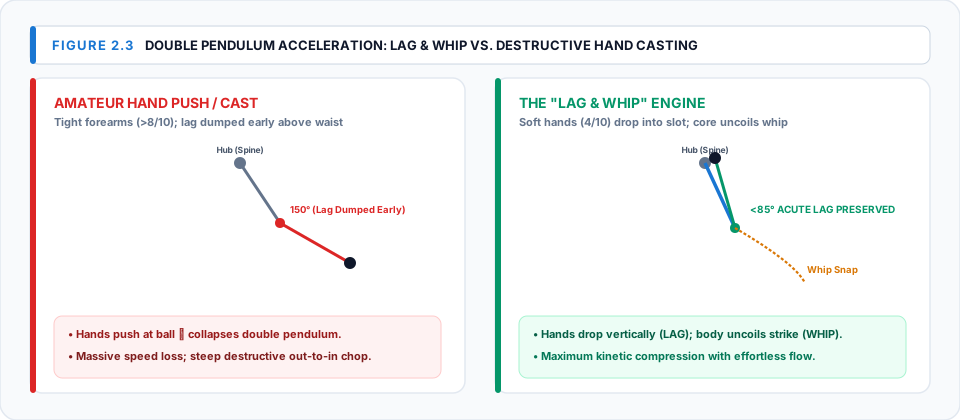
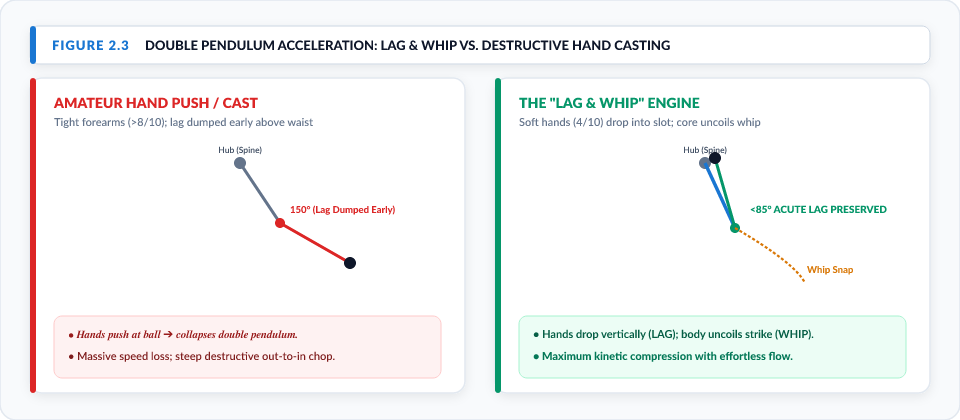
Fig 2.3 Double Pendulum Lag & Whip Physics vs. Hand Casting ch02_fig03_double_pendulum_lag_and_whip_physics.svg ch02_fig03_double_pendulum_lag_and_whip_physics.png
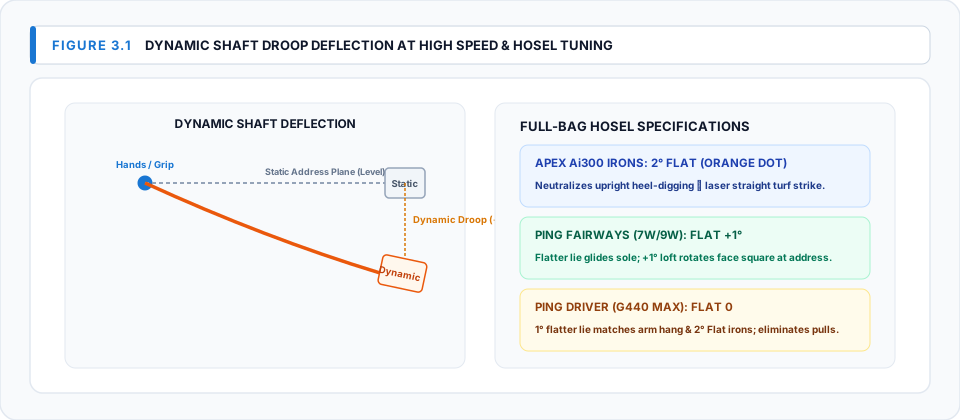
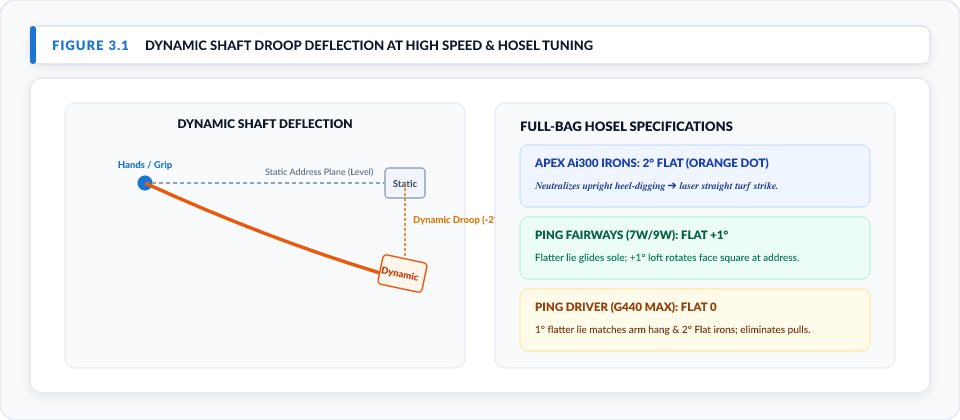
Fig 3.1 Dynamic Shaft Droop Deflection & Equipment Hosel Solutions ch03_fig01_dynamic_shaft_droop_deflection.svg ch03_fig01_dynamic_shaft_droop_deflection.png
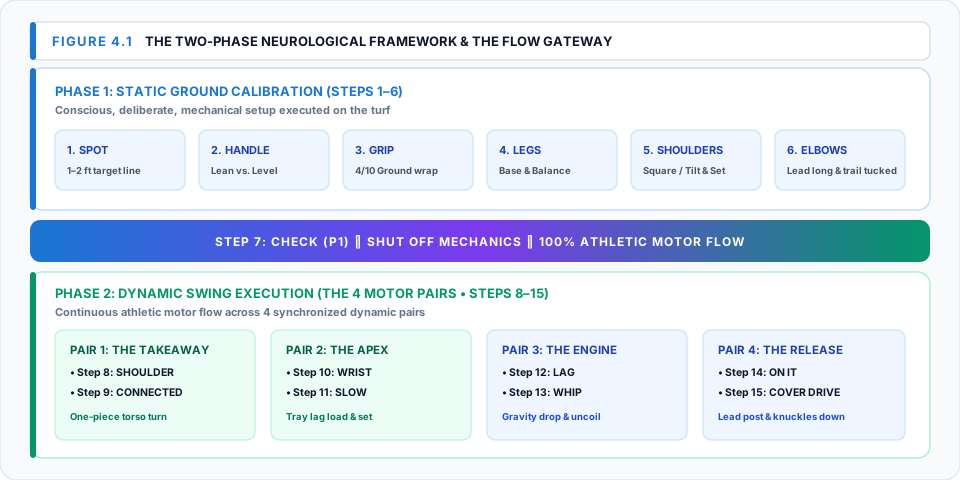
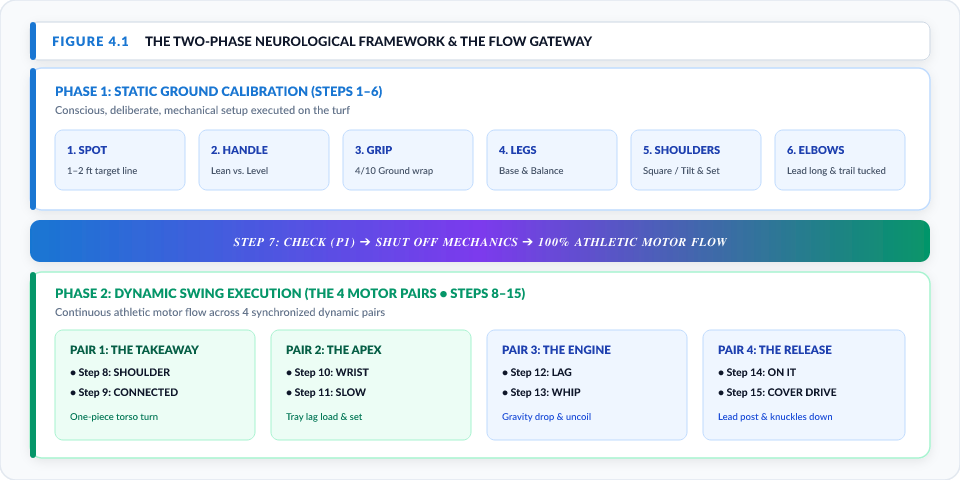
Fig 4.1 Two-Phase Neurological Framework & Flow Gateway ch04_fig01_two_phase_neurological_framework.svg ch04_fig01_two_phase_neurological_framework.png
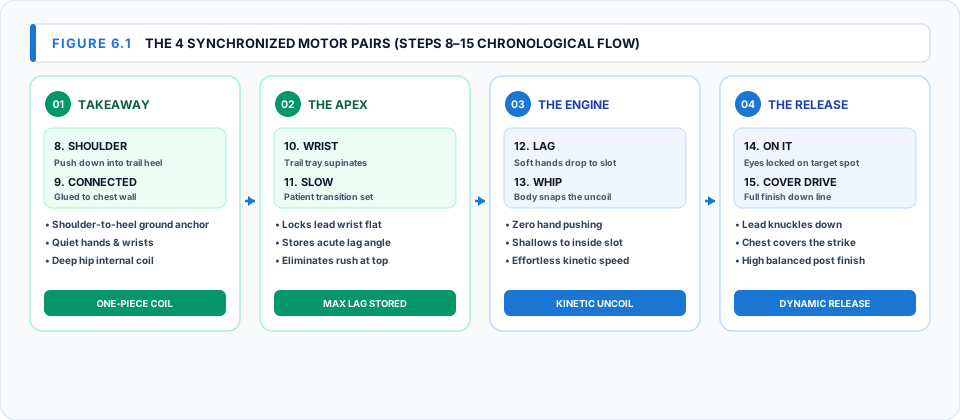
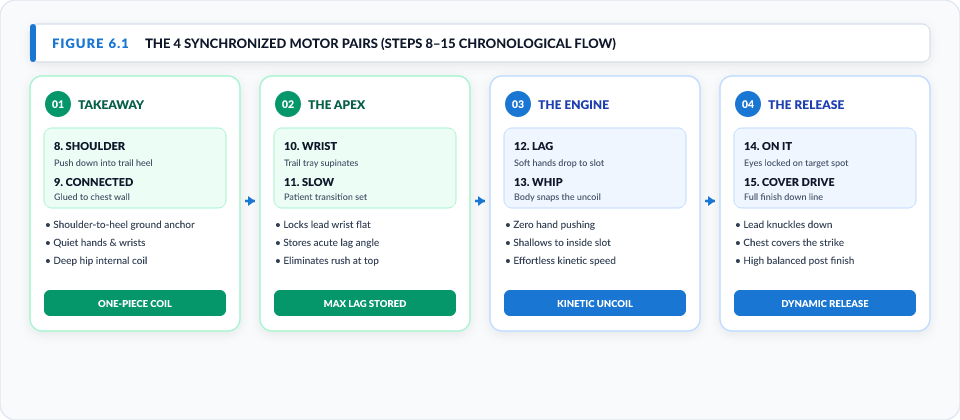
Fig 6.1 The 4 Synchronized Motor Pairs Sequence (Steps 8–15) ch06_fig01_four_dynamic_execution_pairs.svg ch06_fig01_four_dynamic_execution_pairs.png
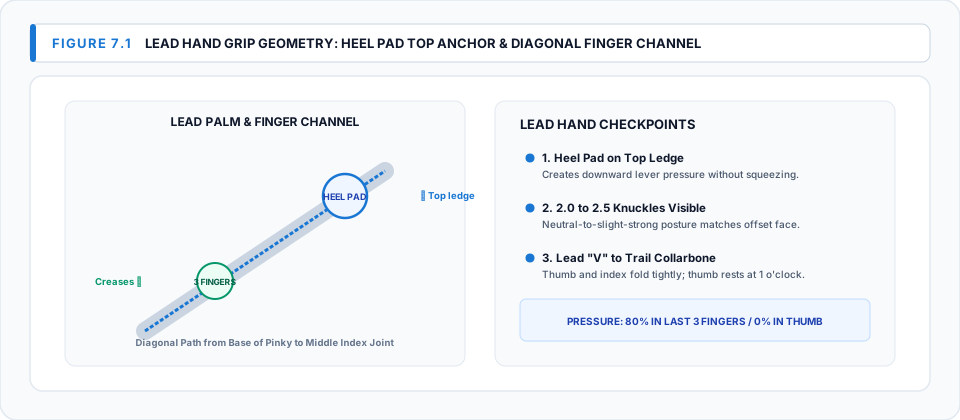
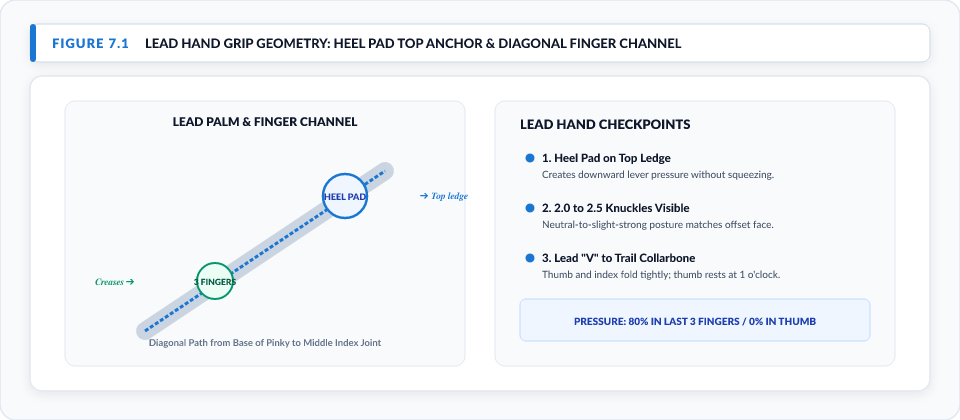
Fig 7.1 Lead Hand Grip: Heel Pad Anchor & Diagonal Finger Channel ch07_fig01_lead_hand_finger_channel_heel_pad.svg ch07_fig01_lead_hand_finger_channel_heel_pad.png
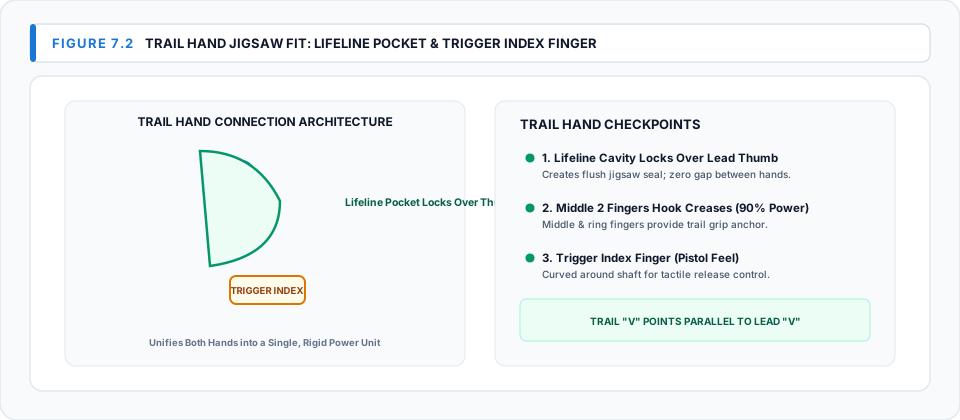
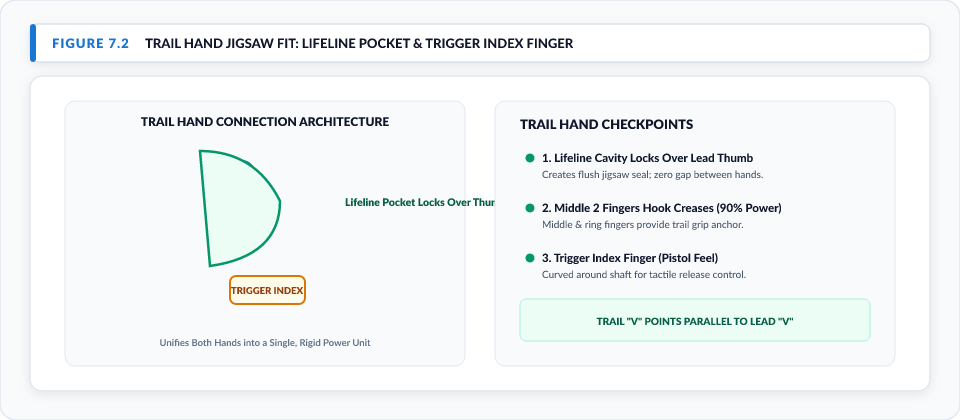
Fig 7.2 Trail Hand Jigsaw Fit: Lifeline Pocket & Trigger Index Finger ch07_fig02_trail_hand_lifeline_jigsaw_fit.svg ch07_fig02_trail_hand_lifeline_jigsaw_fit.png
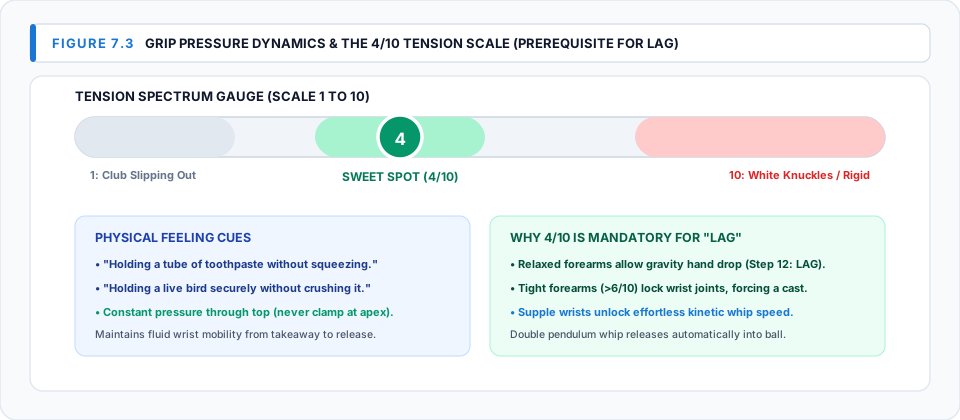
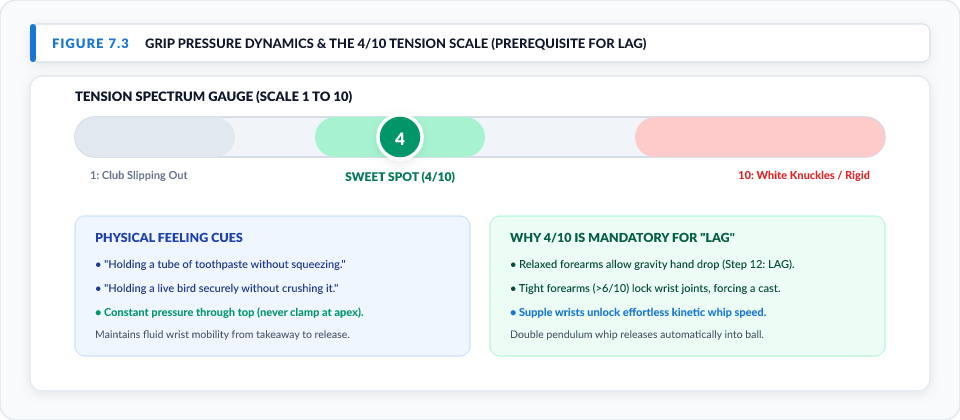
Fig 7.3 Grip Pressure Dynamics & 4/10 Tension Scale ch07_fig03_grip_pressure_tension_spectrum.svg ch07_fig03_grip_pressure_tension_spectrum.png
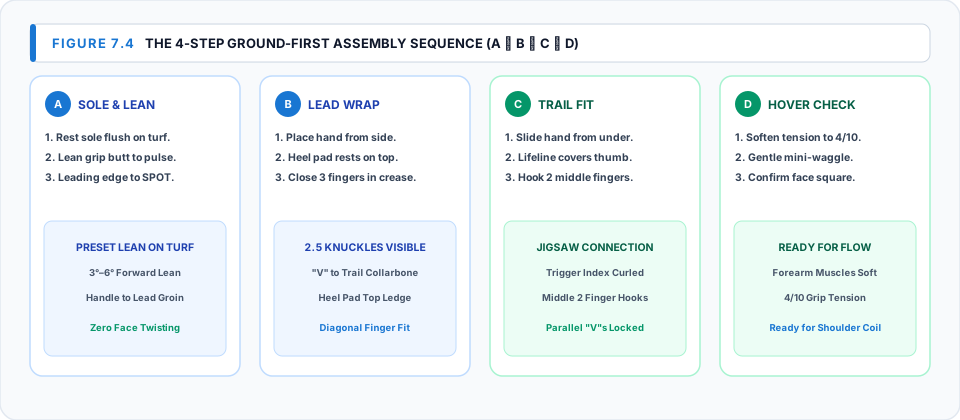
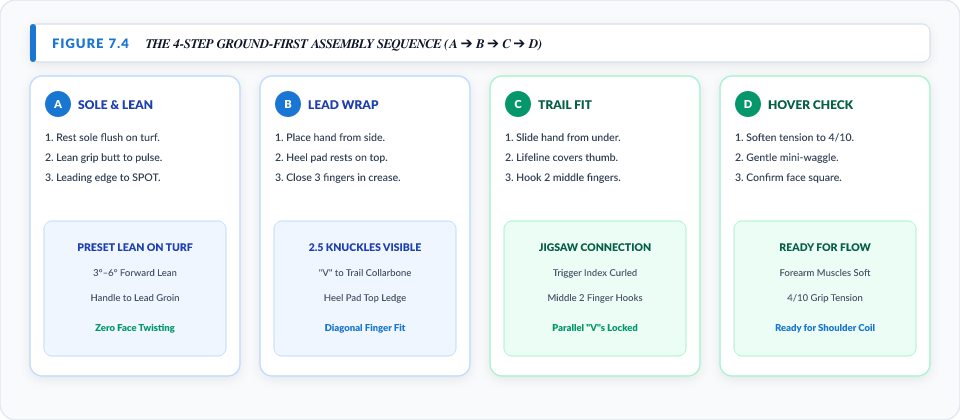
Fig 7.4 The 4-Step Ground-First Assembly Sequence (A ➔ B ➔ C ➔ D) ch07_fig04_ground_first_assembly_sequence.svg ch07_fig04_ground_first_assembly_sequence.png
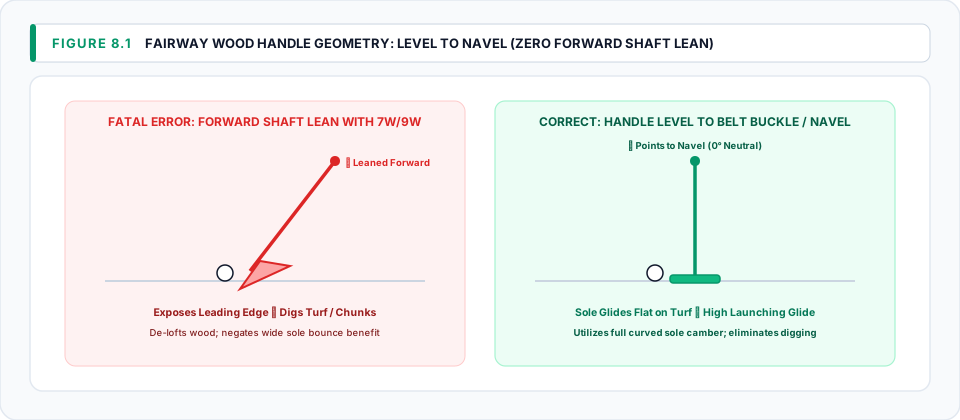
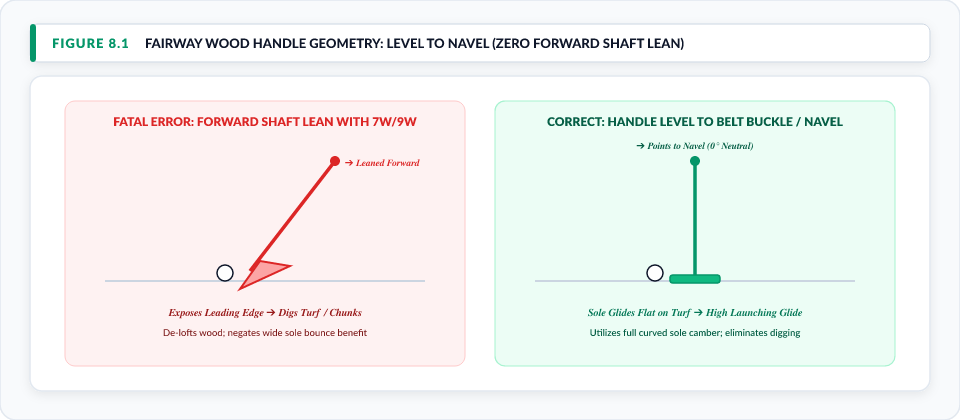
Fig 8.1 Fairway Wood Handle Geometry: Level to Navel ($0^\circ$ Lean) ch08_fig01_fairway_wood_level_navel_geometry.svg ch08_fig01_fairway_wood_level_navel_geometry.png
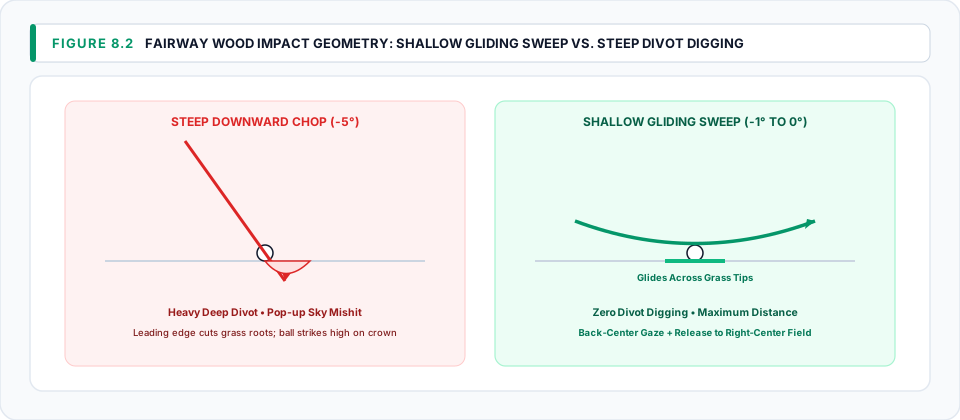
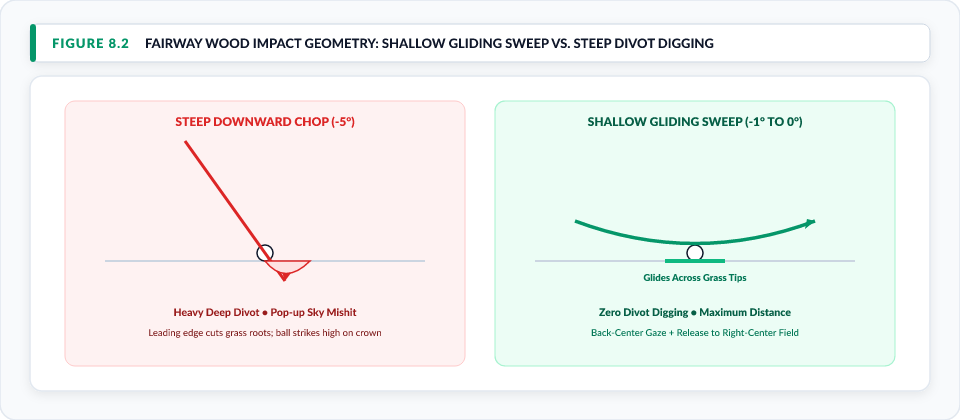
Fig 8.2 Fairway Wood Gliding Sole Sweep vs. Steep Divot Digging ch08_fig02_fairway_wood_gliding_sole_sweep.svg ch08_fig02_fairway_wood_gliding_sole_sweep.png
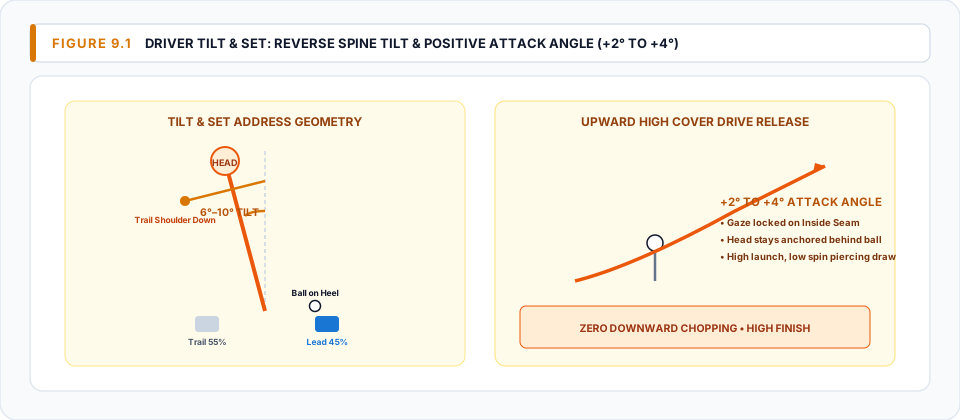
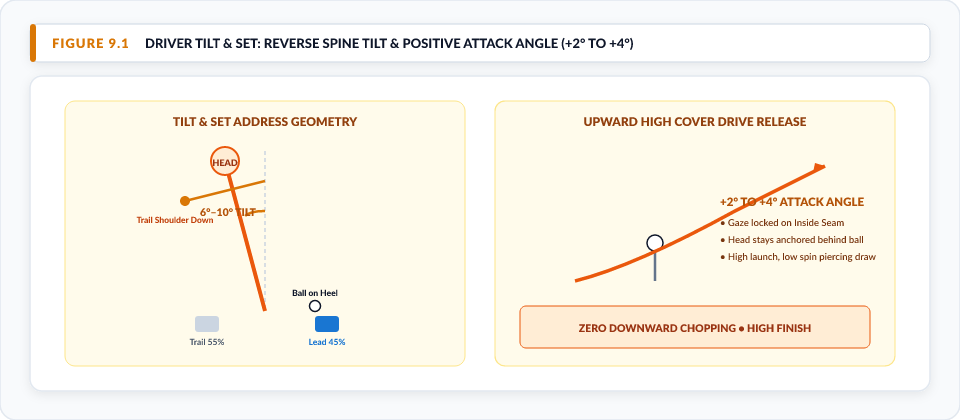
Fig 9.1 Driver Tilt & Set ($6^\circ\text{–}10^\circ$) & Upward Launch ($+2^\circ\text{ to }+4^\circ$) ch09_fig01_driver_reverse_spine_tilt_launch.svg ch09_fig01_driver_reverse_spine_tilt_launch.png
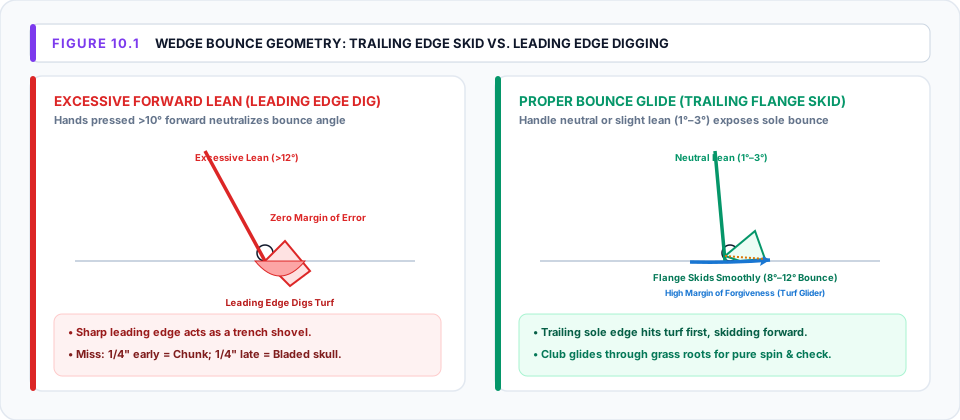
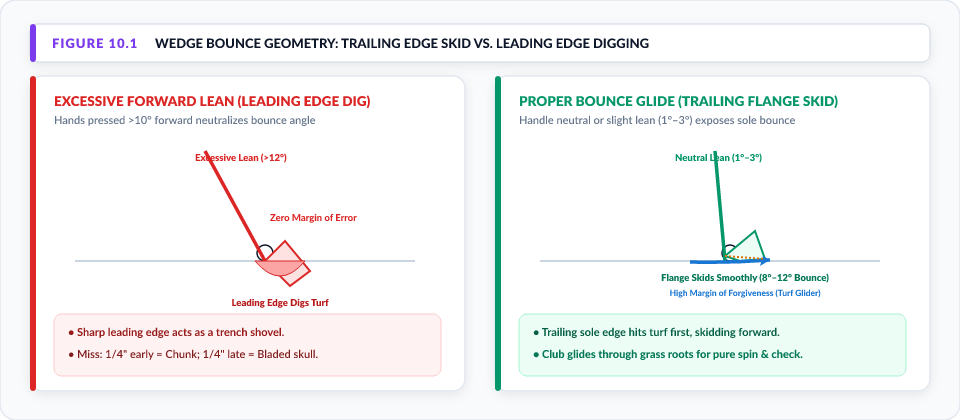
Fig 10.1 Wedge Bounce Geometry: Trailing Edge Skid vs. Leading Edge Dig ch10_fig01_wedge_bounce_skid_vs_dig.svg ch10_fig01_wedge_bounce_skid_vs_dig.png
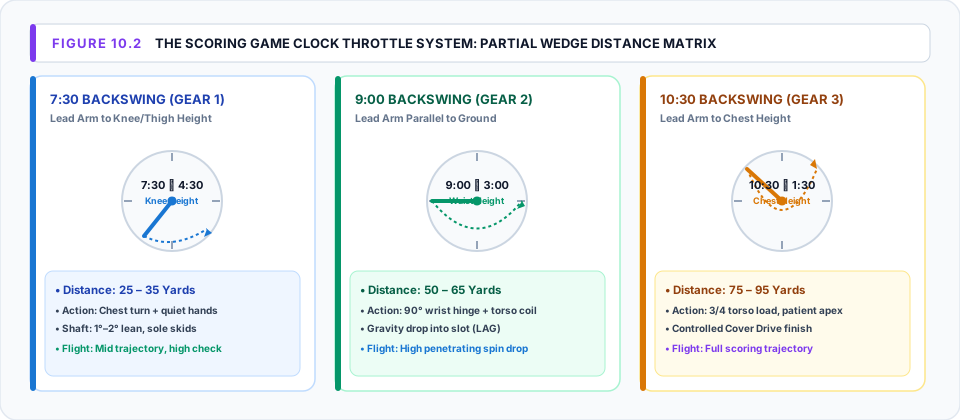
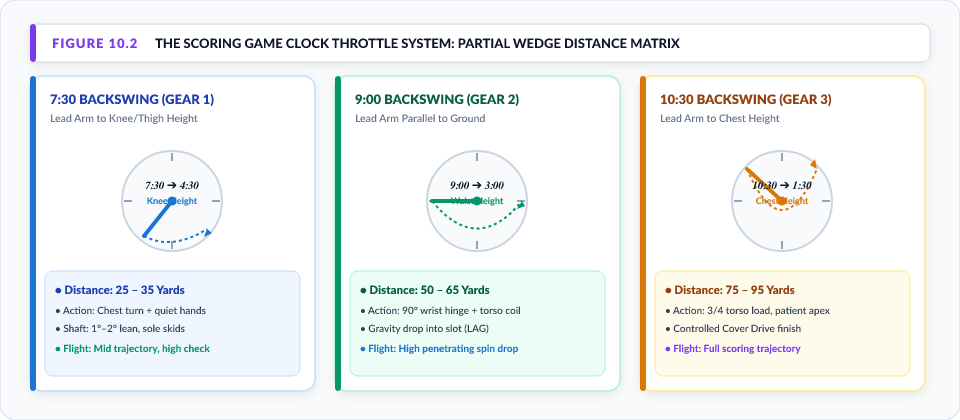
Fig 10.2 The Scoring Game Clock Throttle System (Partial Wedge Matrix) ch10_fig02_scoring_game_clock_throttle_matrix.svg ch10_fig02_scoring_game_clock_throttle_matrix.png
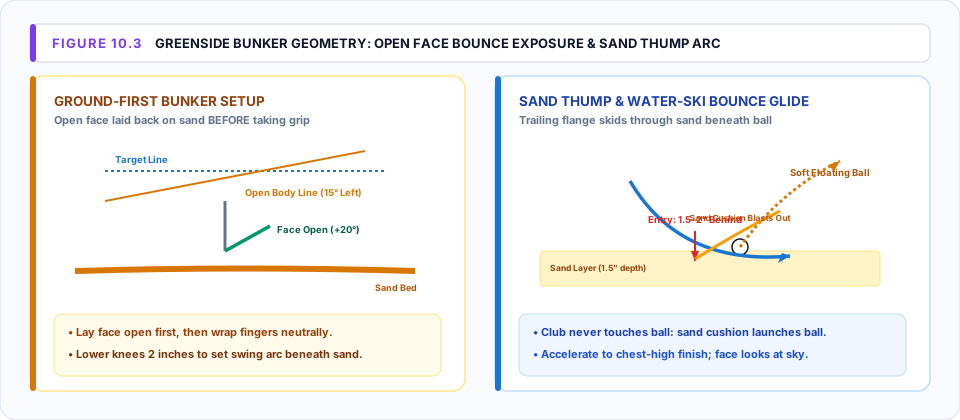
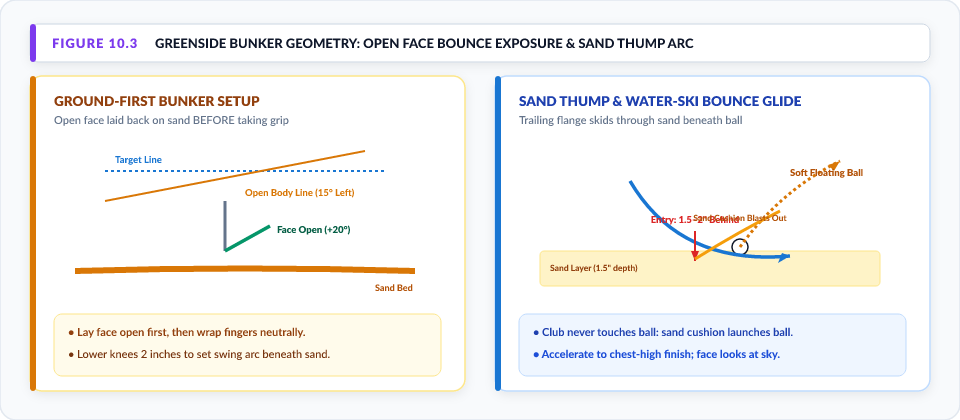
Fig 10.3 Greenside Bunker Geometry: Open Face Bounce & Sand Thump Arc ch10_fig03_bunker_ground_bounce_geometry.svg ch10_fig03_bunker_ground_bounce_geometry.png
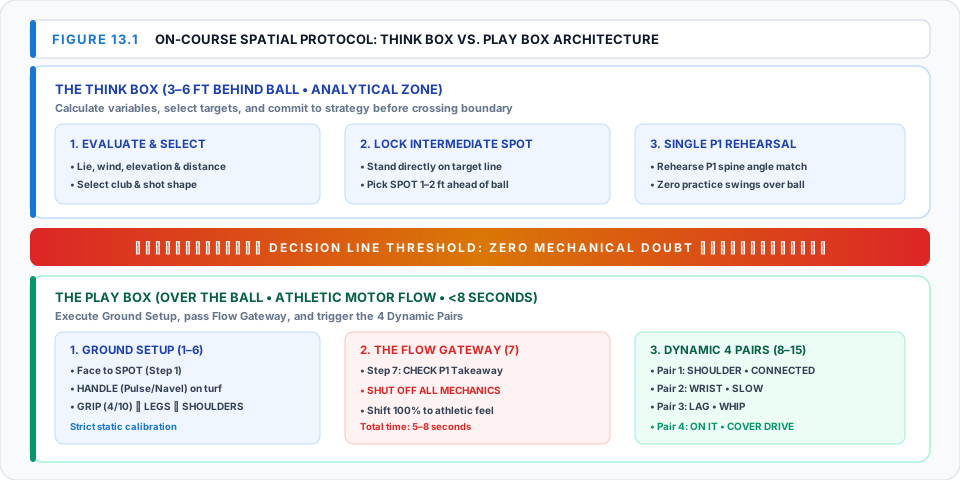
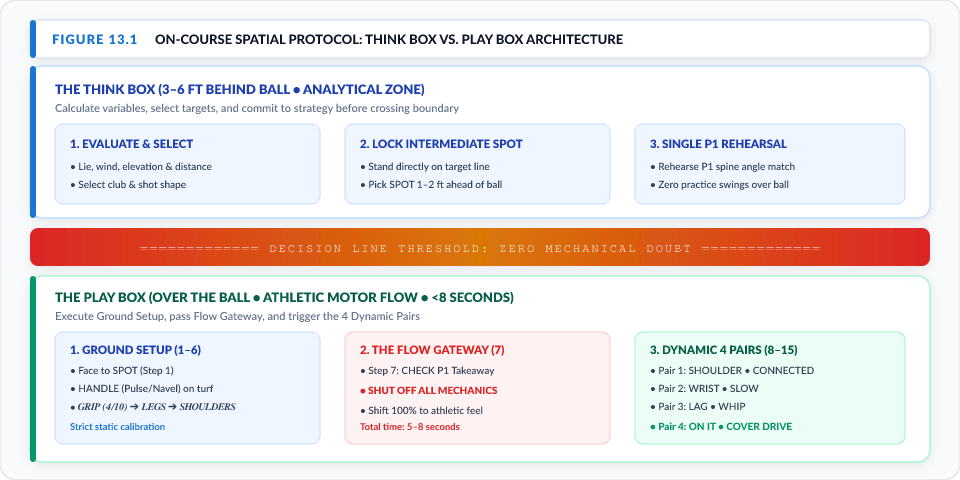
Fig 13.1 On-Course Spatial Protocol: Think Box vs. Play Box ch13_fig01_think_box_vs_play_box_protocol.svg ch13_fig01_think_box_vs_play_box_protocol.png
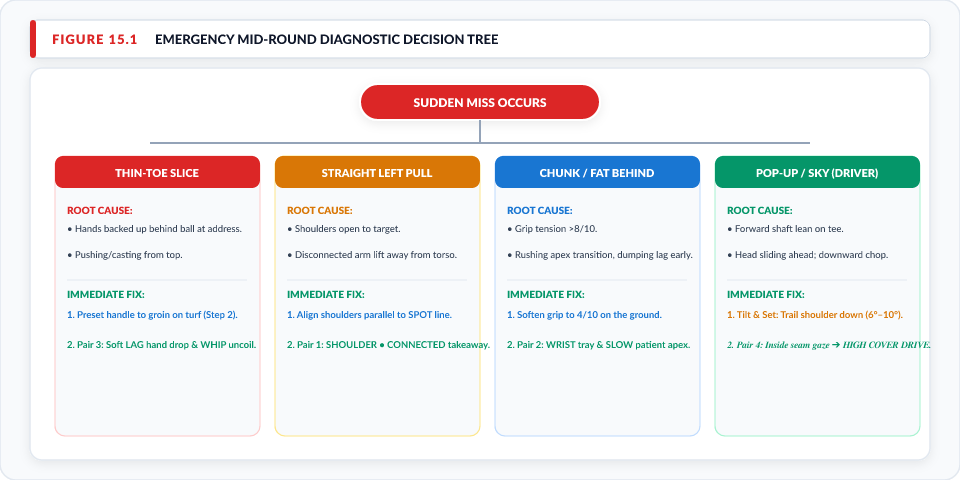
Fig 15.1 Emergency Mid-Round Diagnostic Decision Tree ch15_fig01_emergency_diagnostic_decision_tree.svg ch15_fig01_emergency_diagnostic_decision_tree.png

Core Routine Reference Posters & Pocket Cards

Routine Infographic Subject & Focus Vector SVG 300-DPI PNG Render
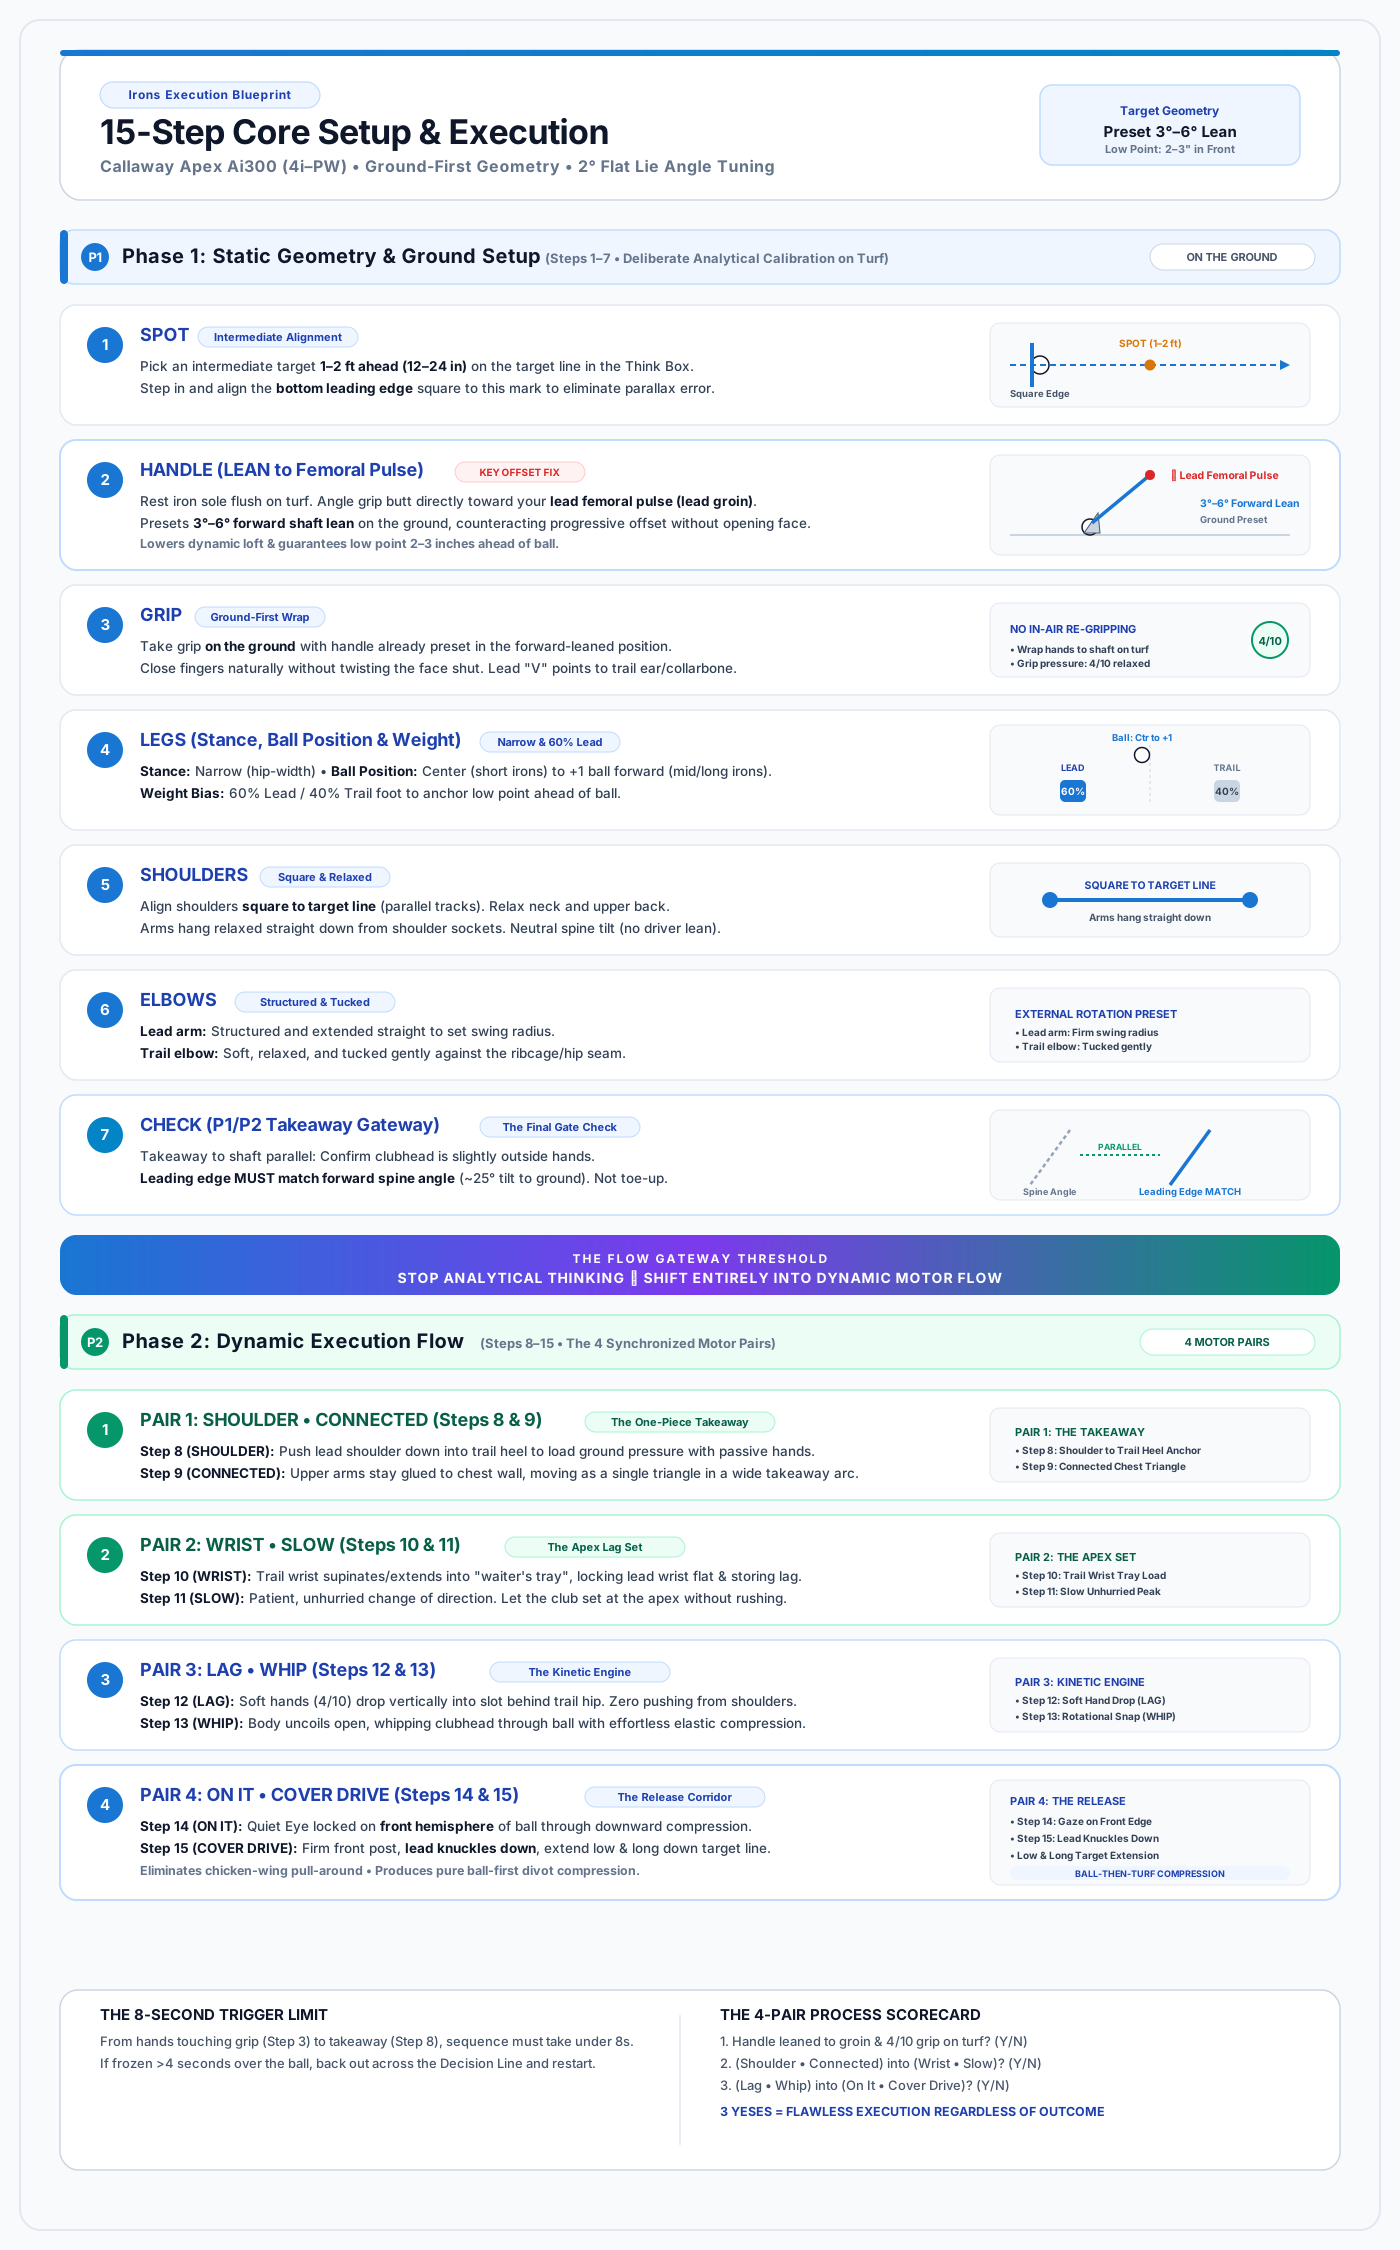
Irons 15-Step Core Routine Apex Ai300 4i–PW • Ground-First Lean & Compression irons_11_step_core_routine.svg irons_11_step_core_routine.png
Iron Grip Comprehensive Guide Finger Channels, Heel Pad Anchor & 4/10 Tension iron_grip_guide.svg iron_grip_guide.png
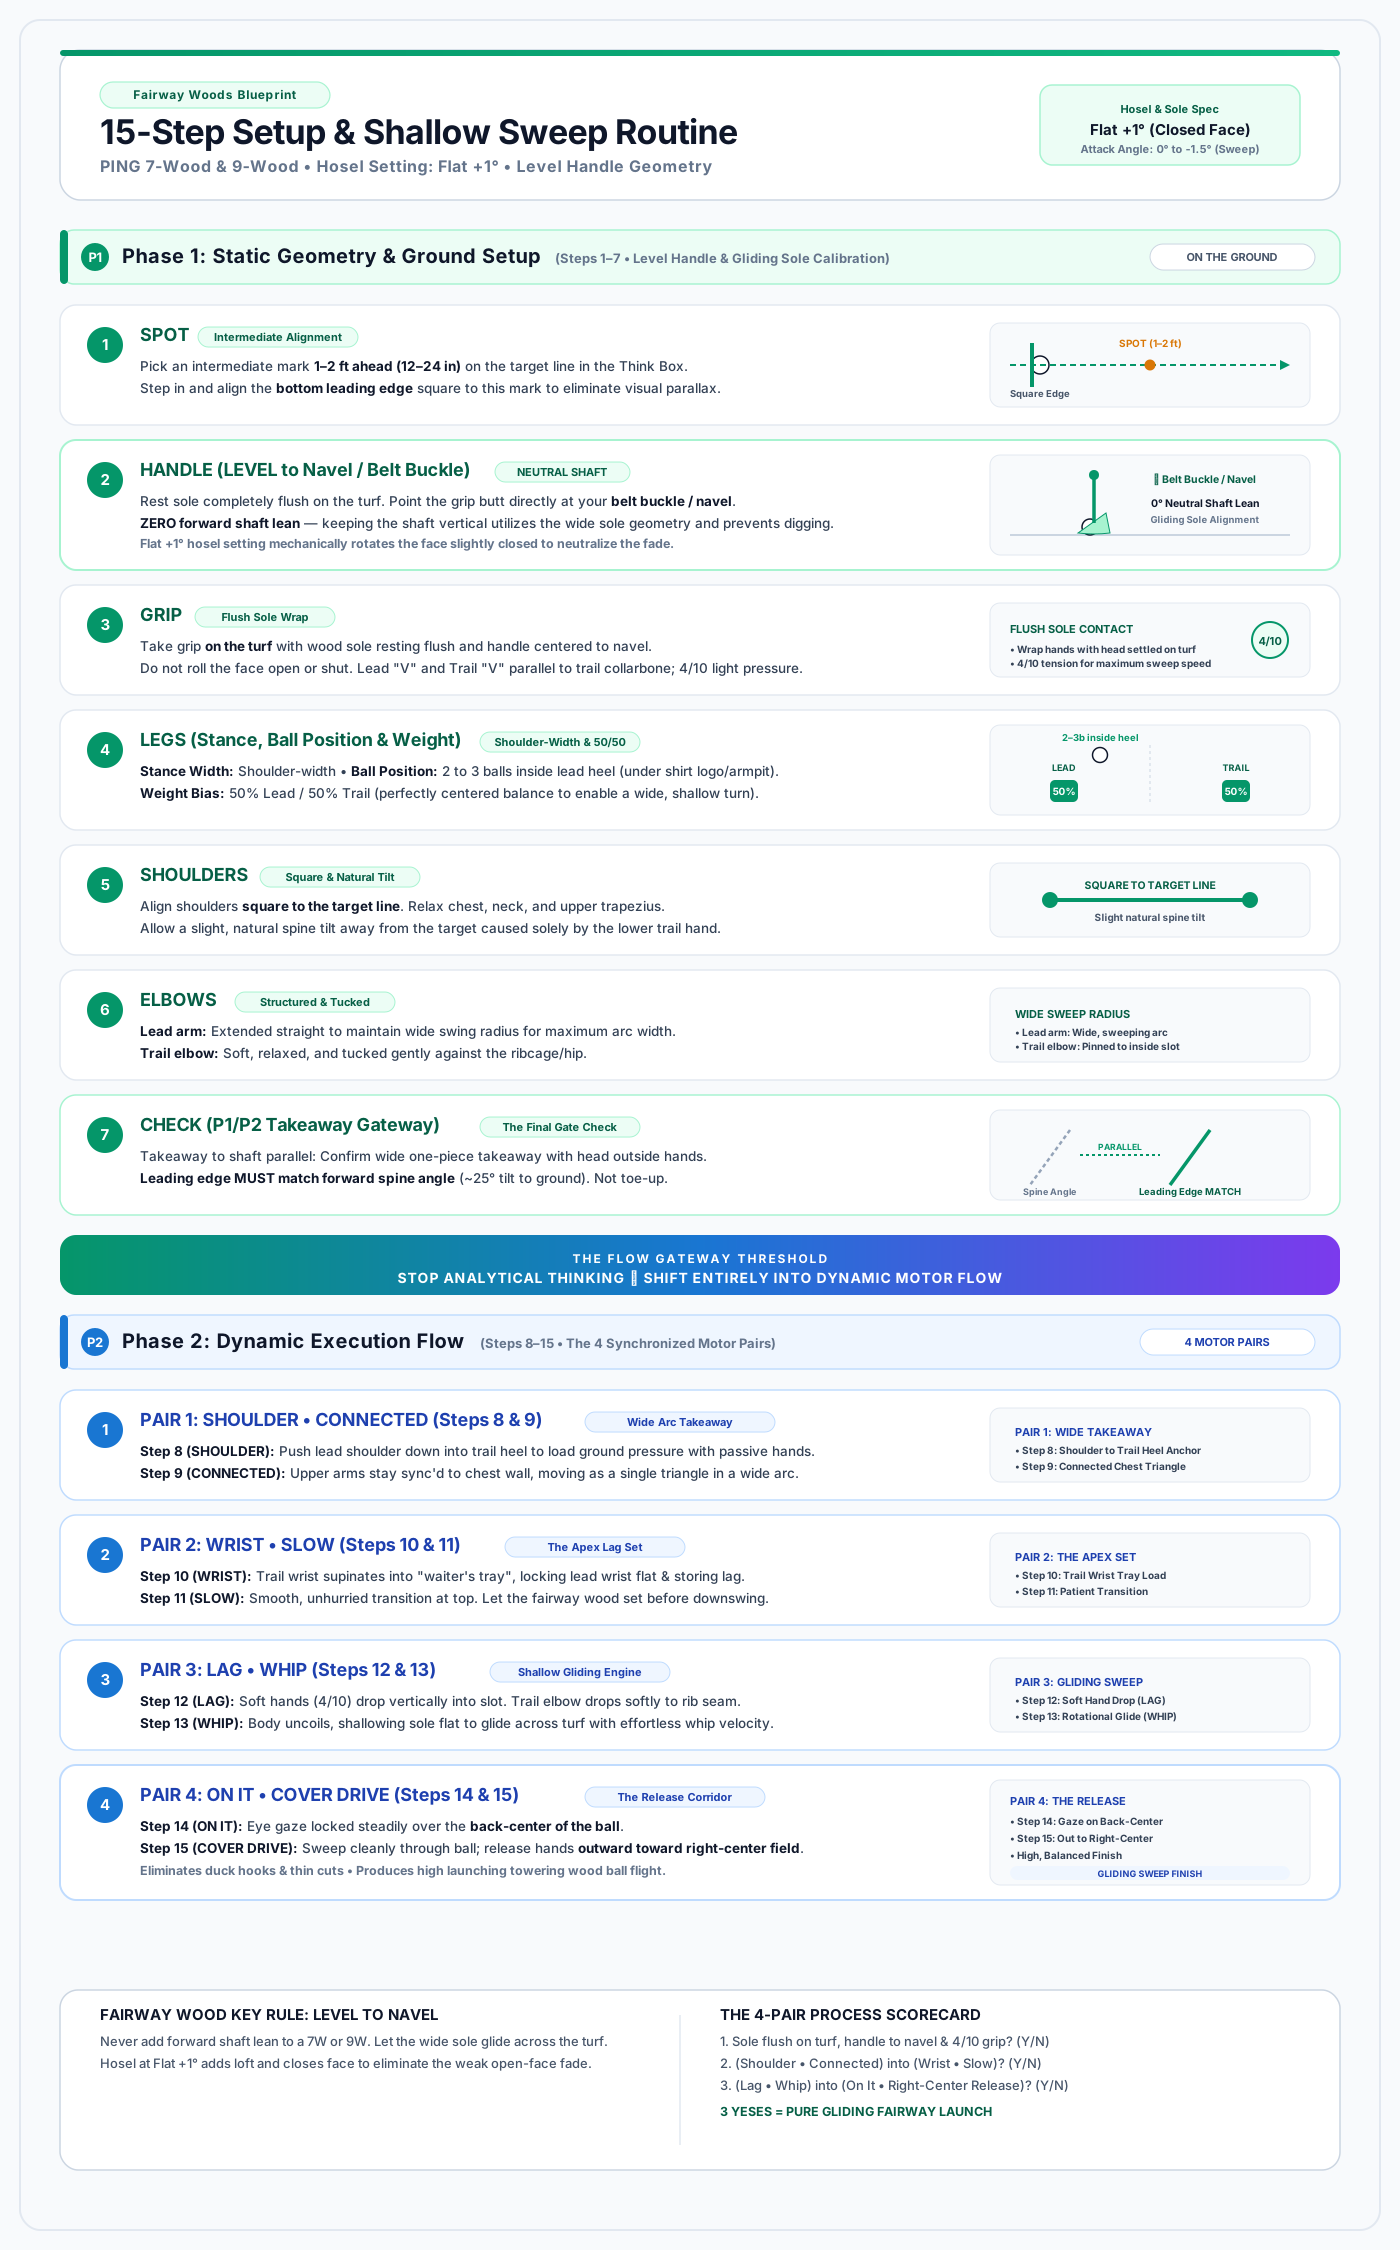
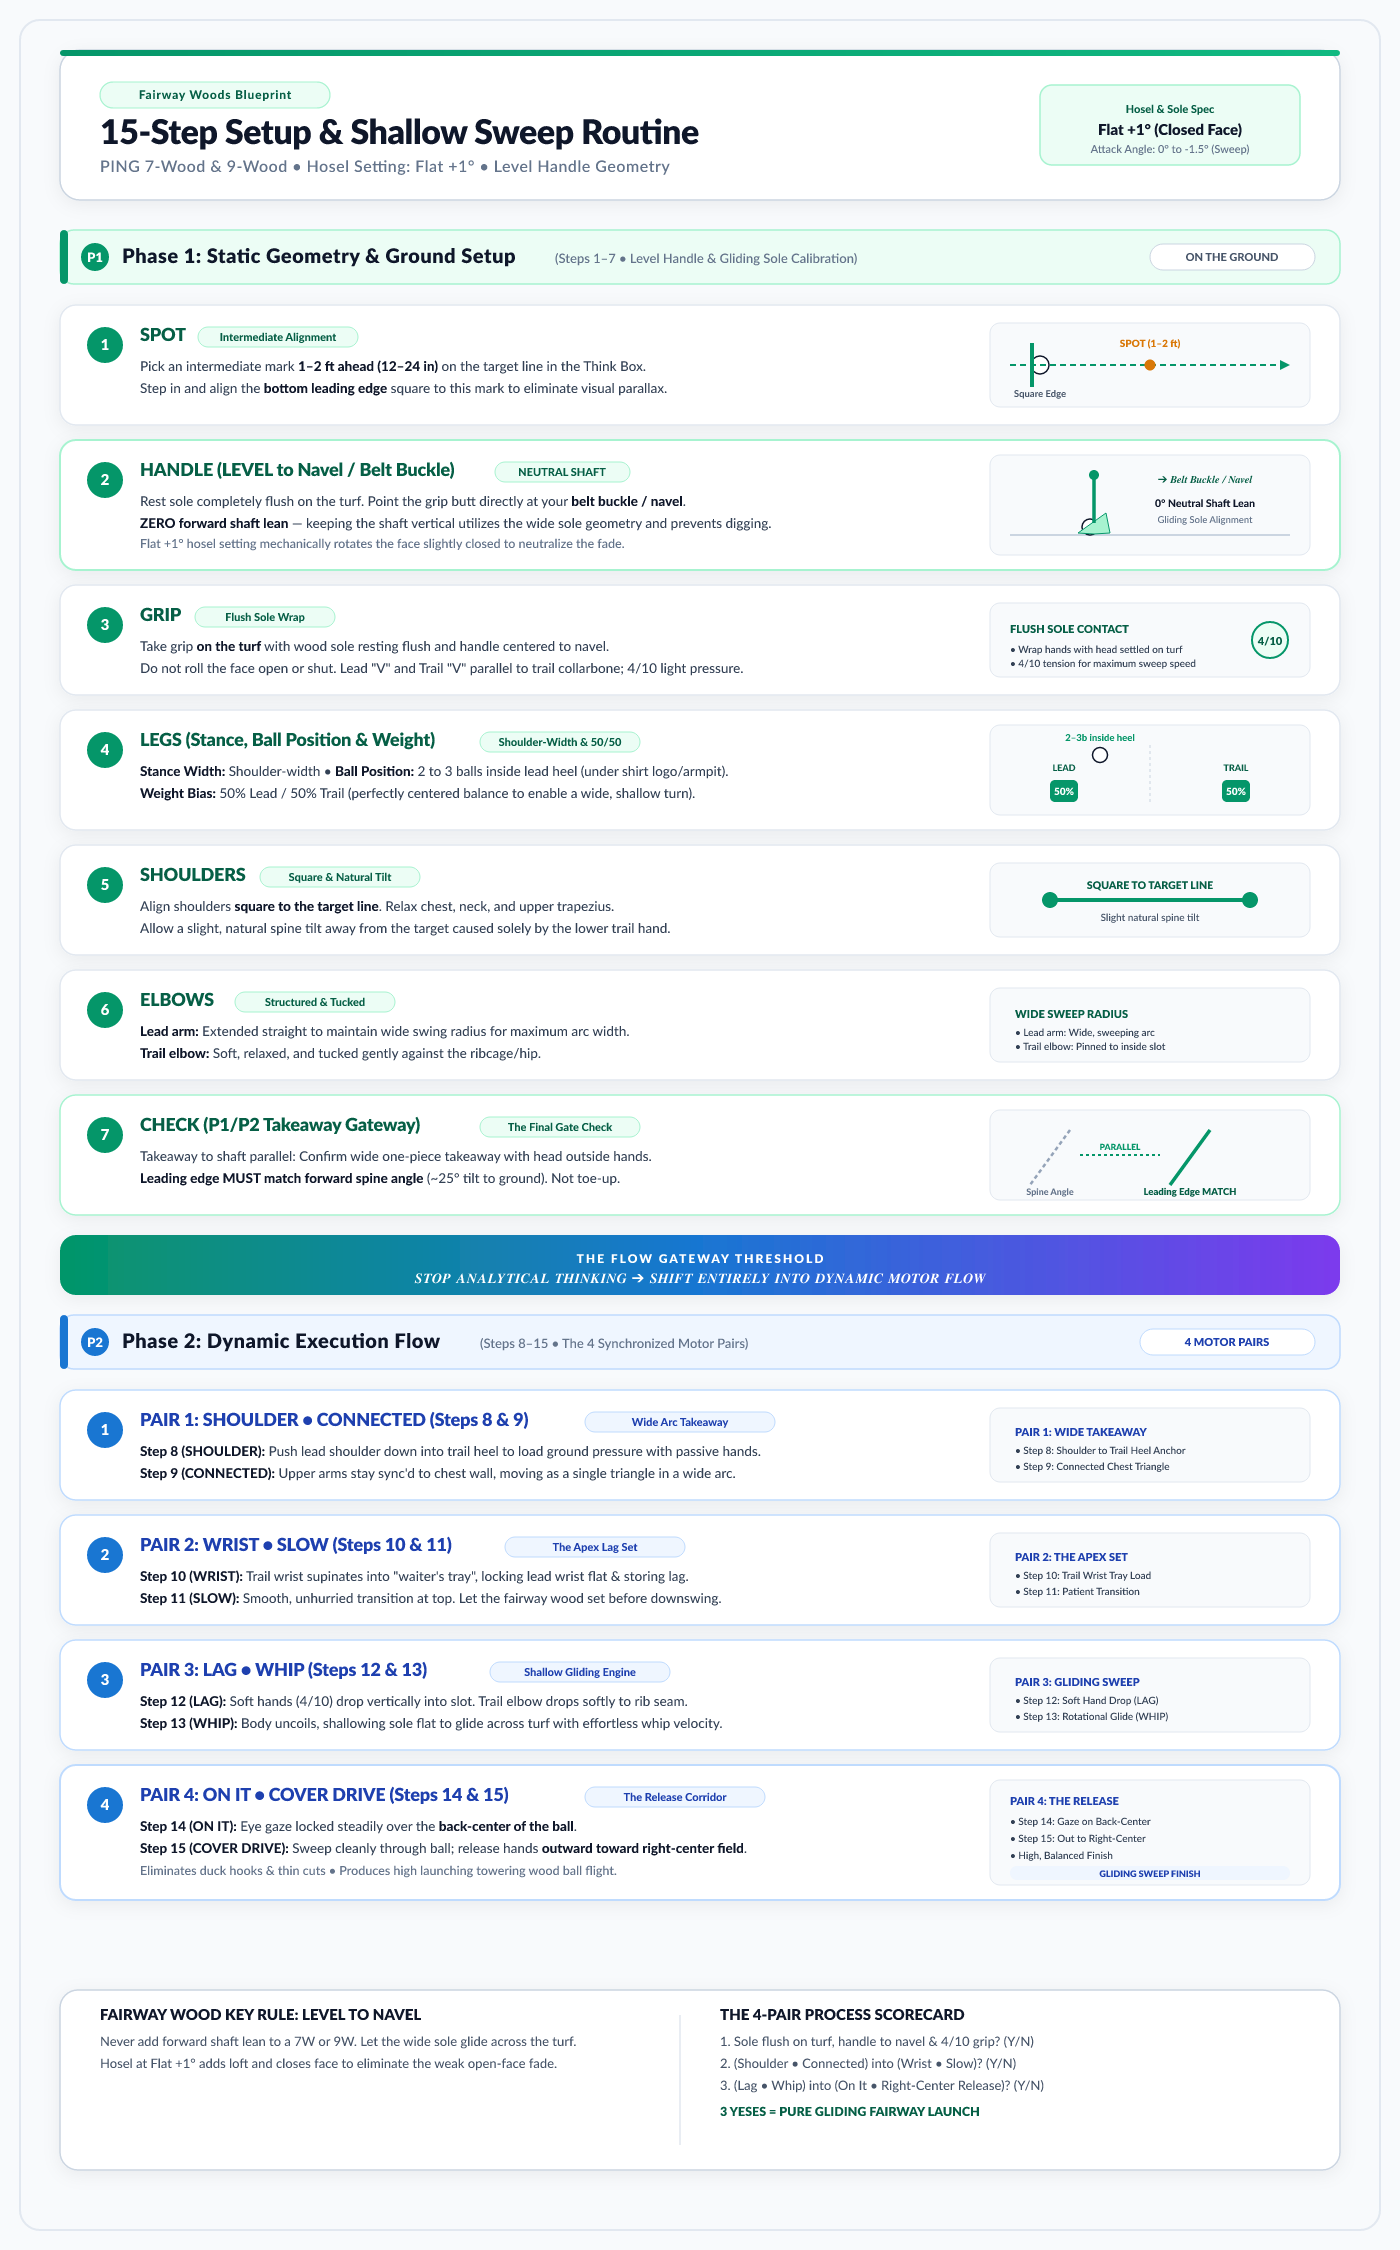
Fairway Woods 15-Step Routine PING 7W & 9W (Flat $+1^\circ$) • Level Handle & Sweep fairway_woods_11_step_routine.svg fairway_woods_11_step_routine.png
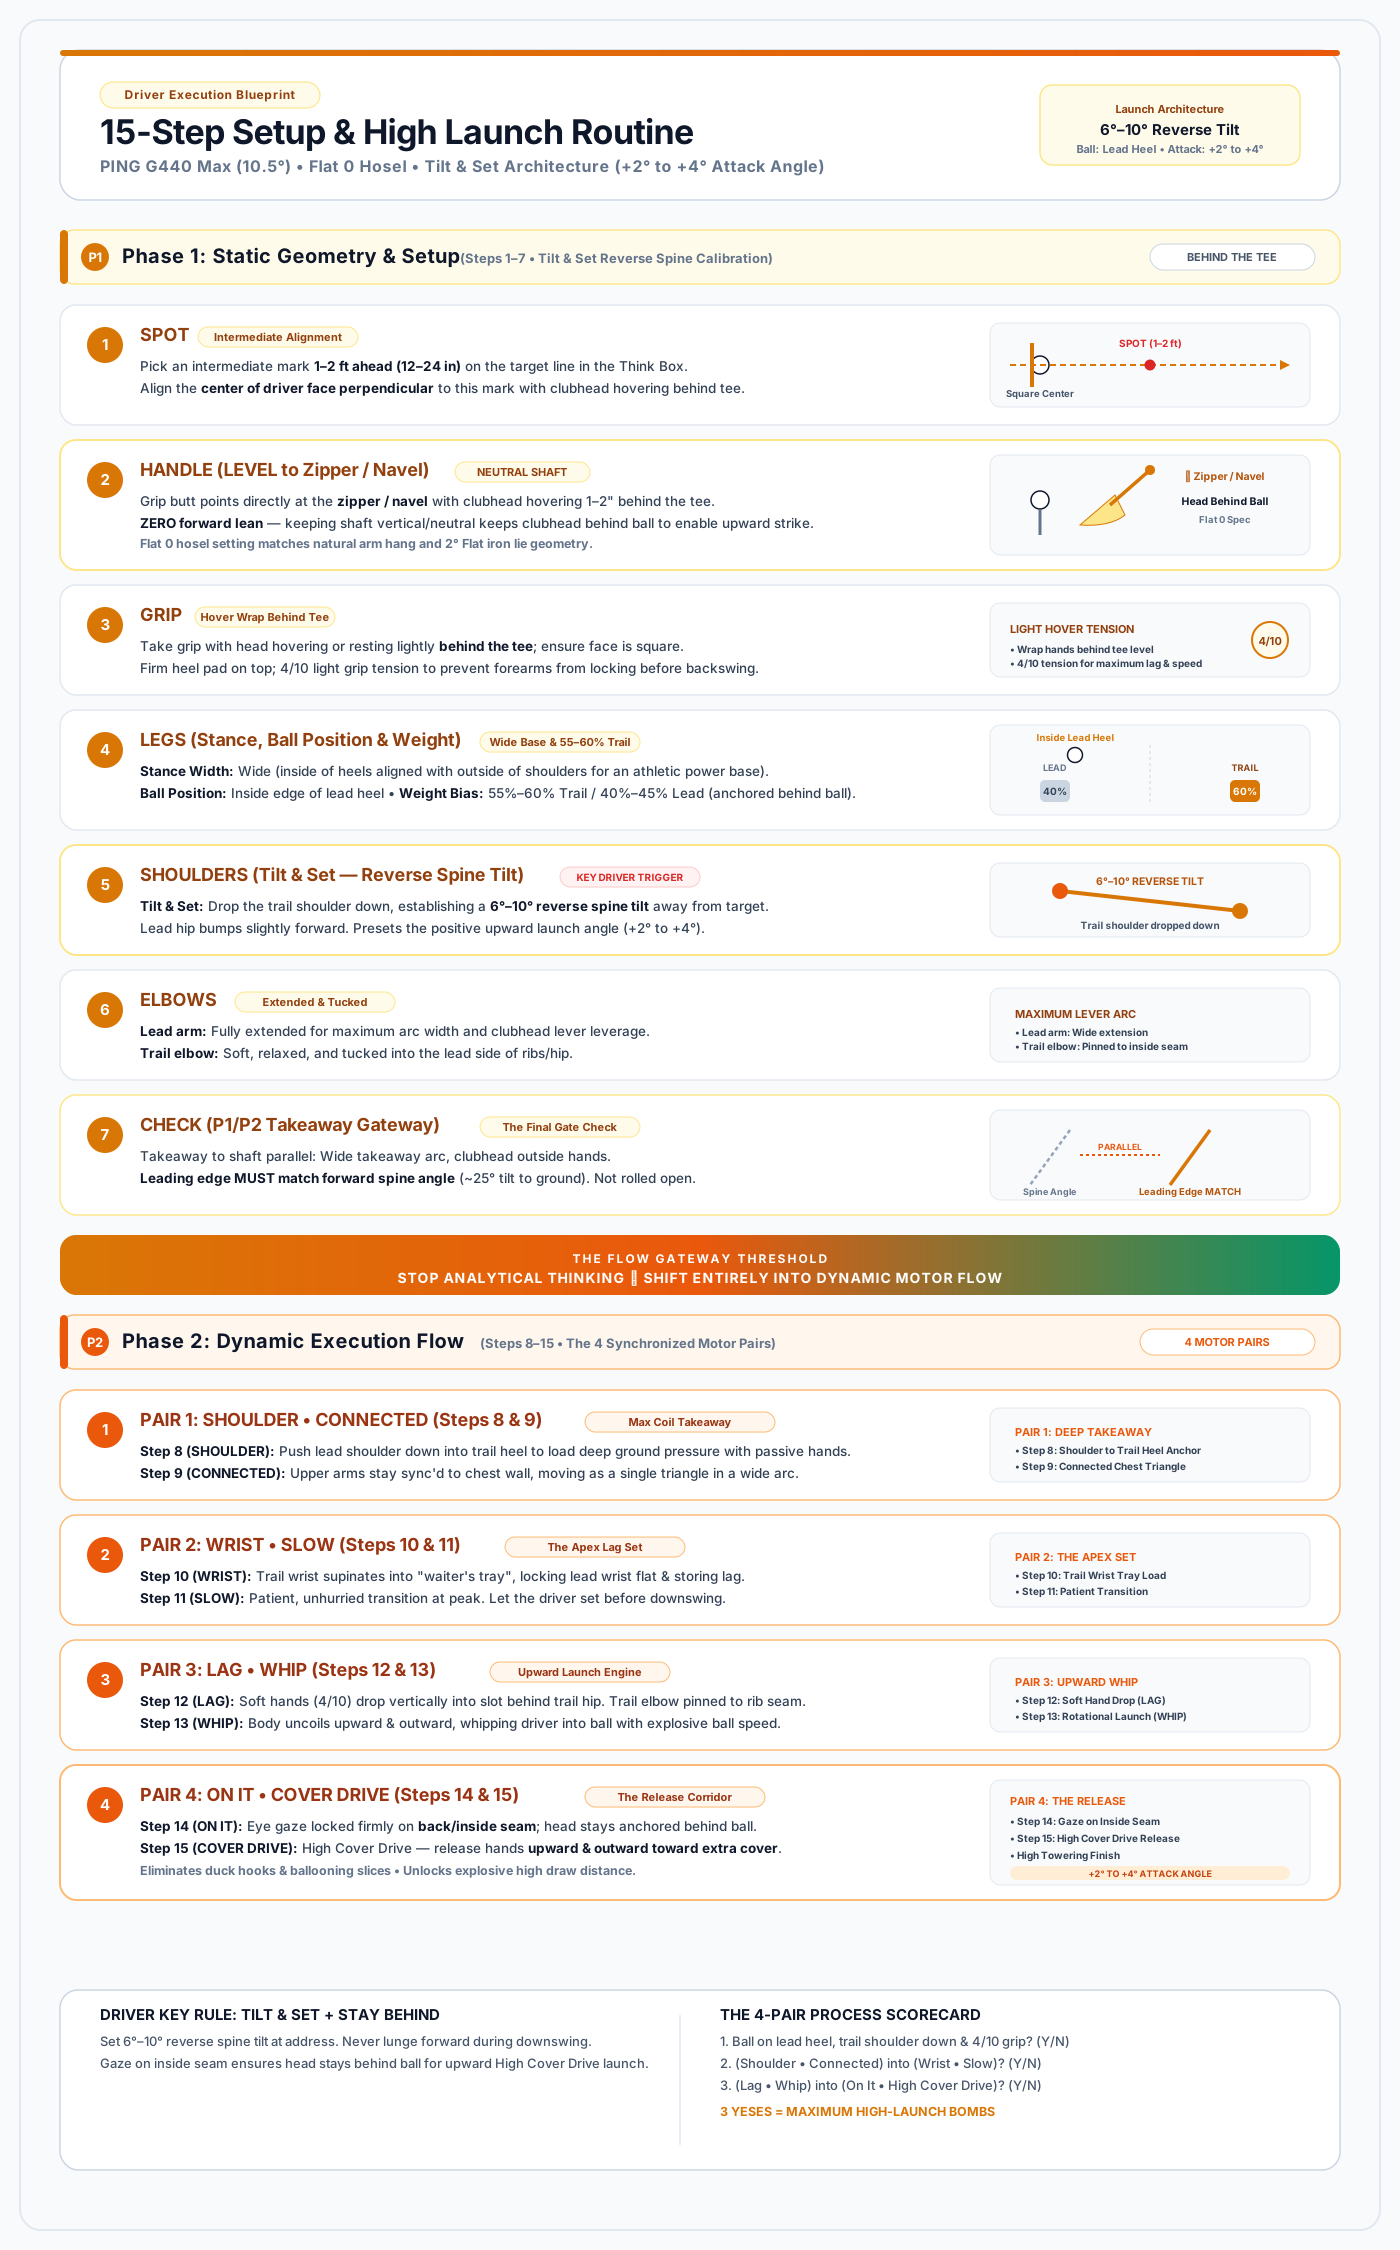
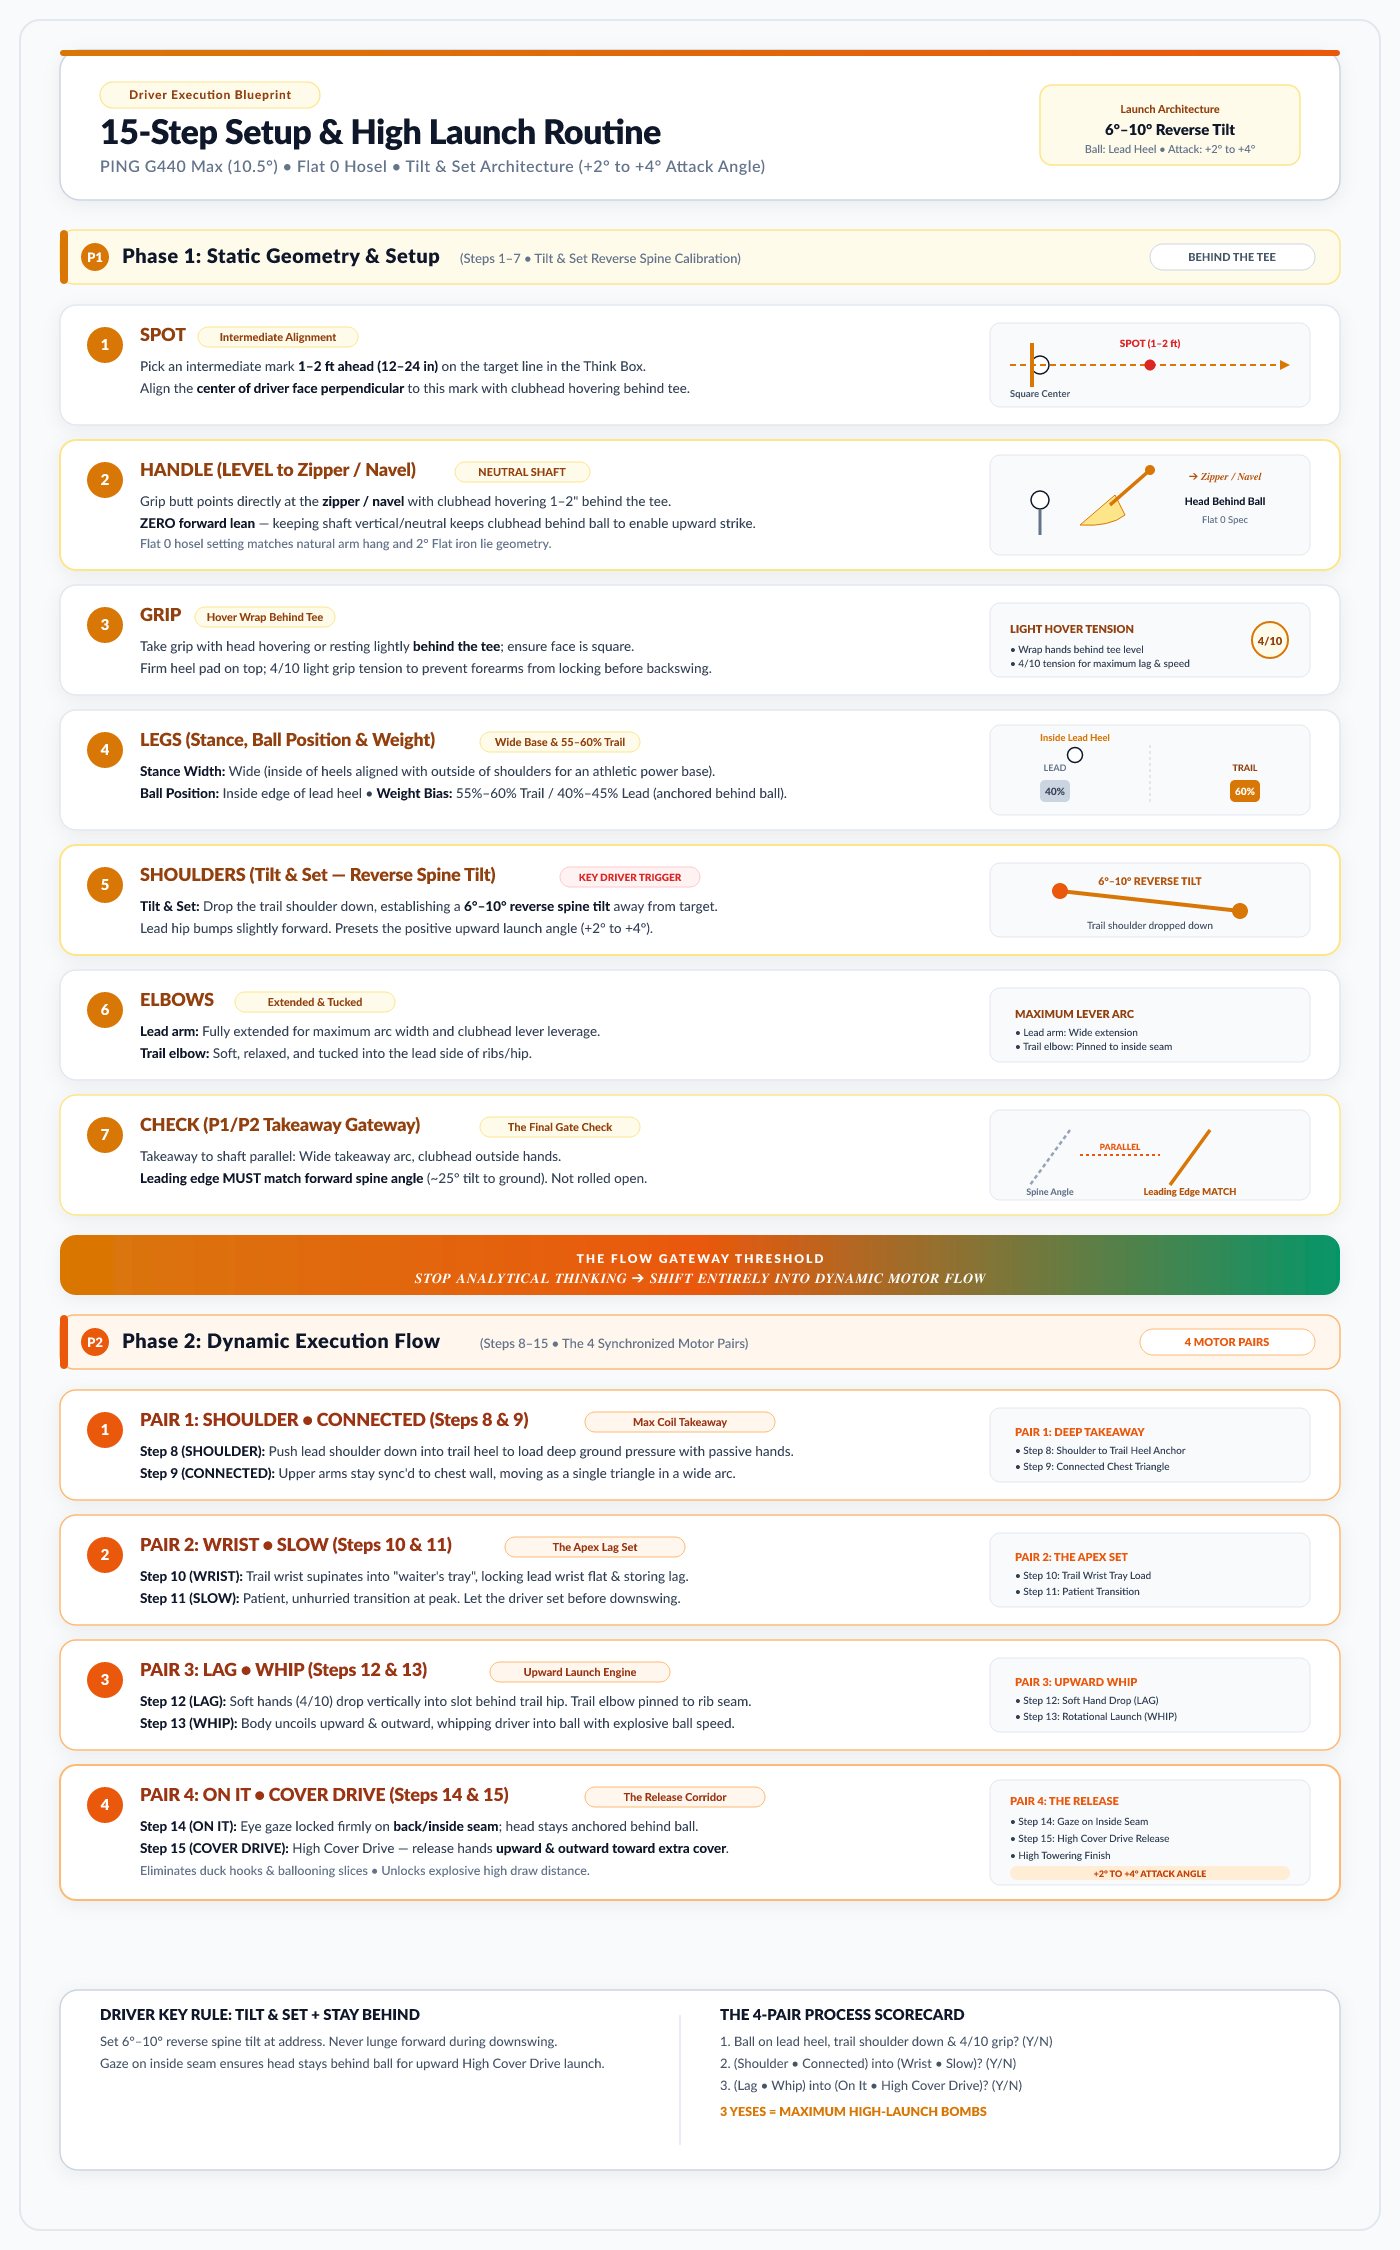
Driver 15-Step Routine PING G440 Max 10.5° • Tilt & Set ($6^\circ\text{–}10^\circ$) driver_11_step_routine.svg driver_11_step_routine.png
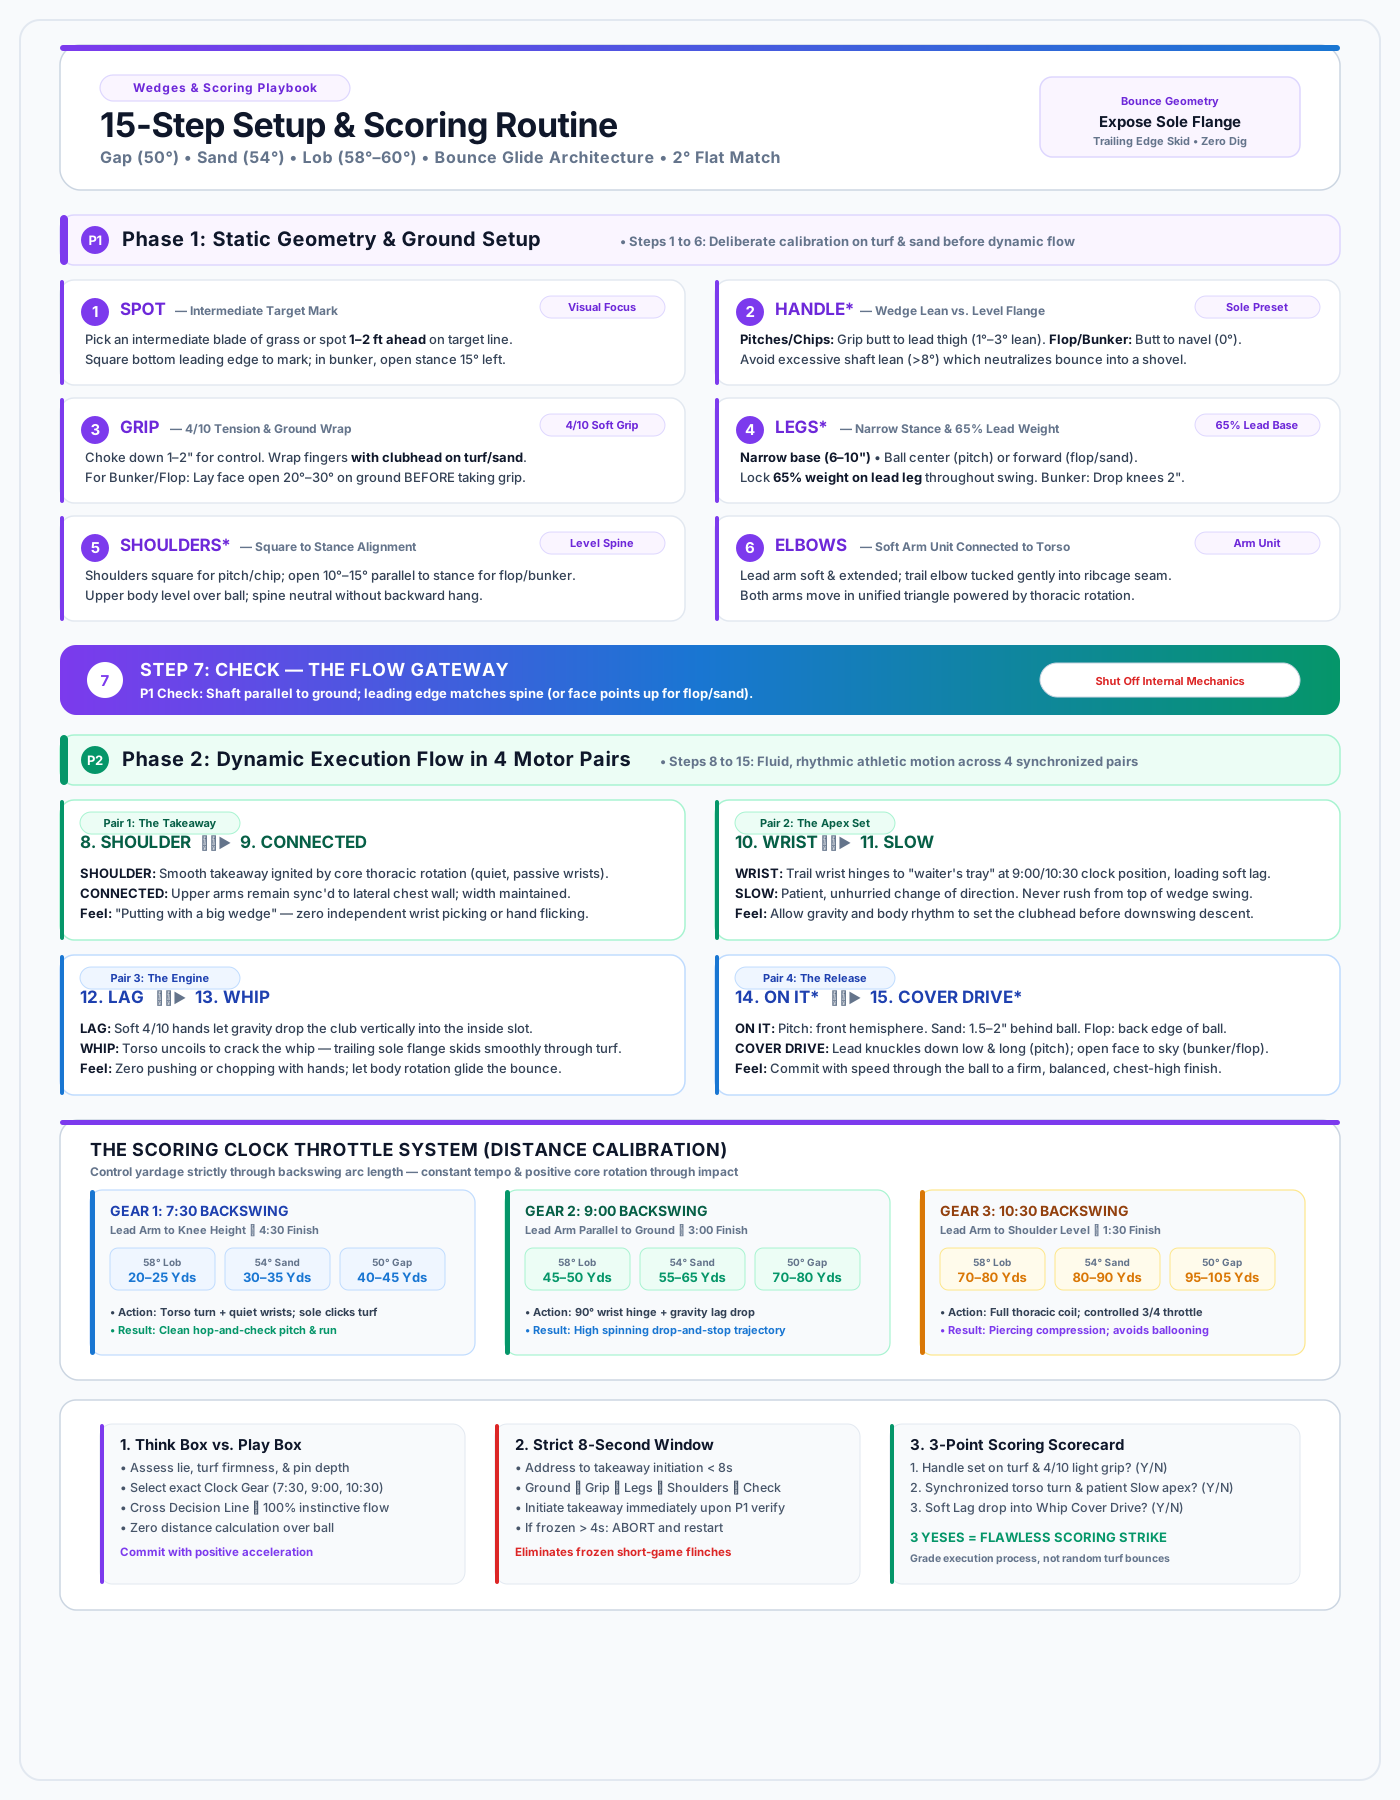
Wedges 15-Step Routine Gap ($50^\circ$) / Sand ($54^\circ$) / Lob ($58^\circ$) • Bounce Glide & Clock Gears wedge_setup_routine.svg wedge_setup_routine.png
Full-Bag Routine Pocket Card (Color) A6 On-Course Flow Checklist (Steps 1–15) • Full Color routine_card_a6_color.svg routine_card_a6_color.png
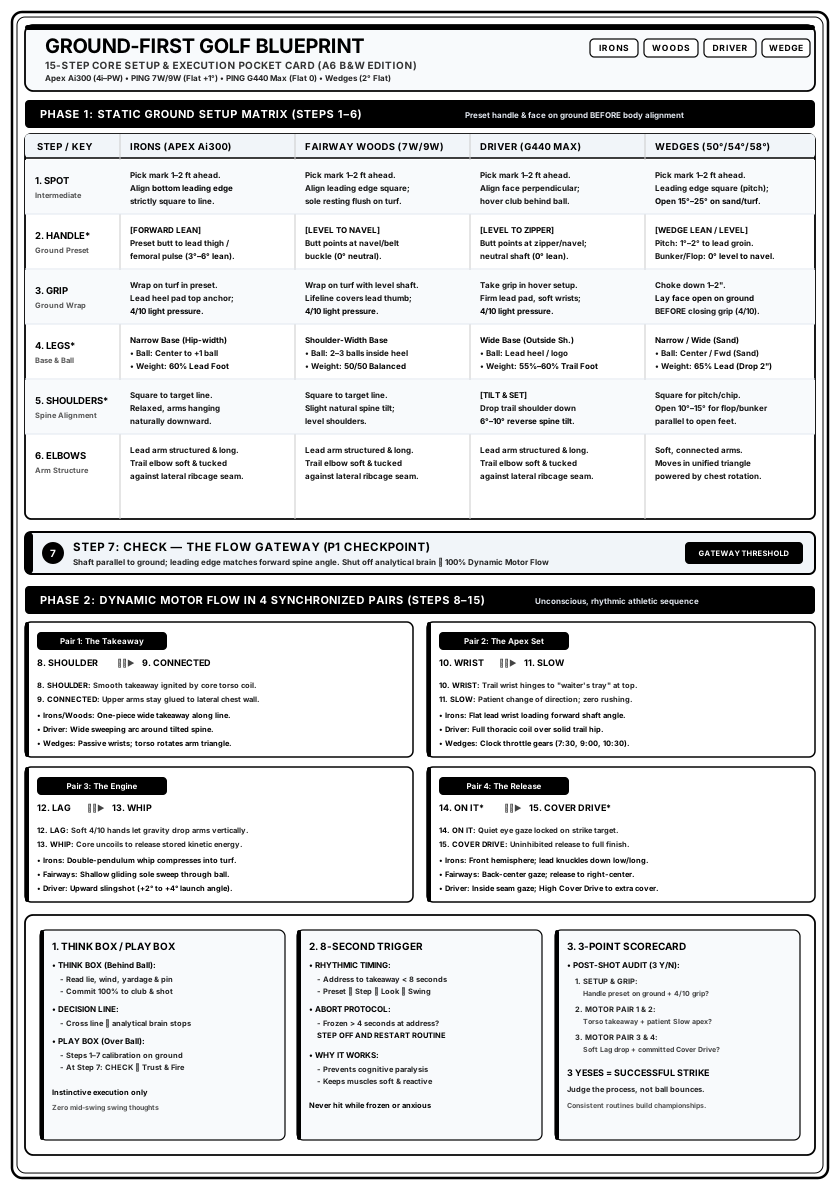
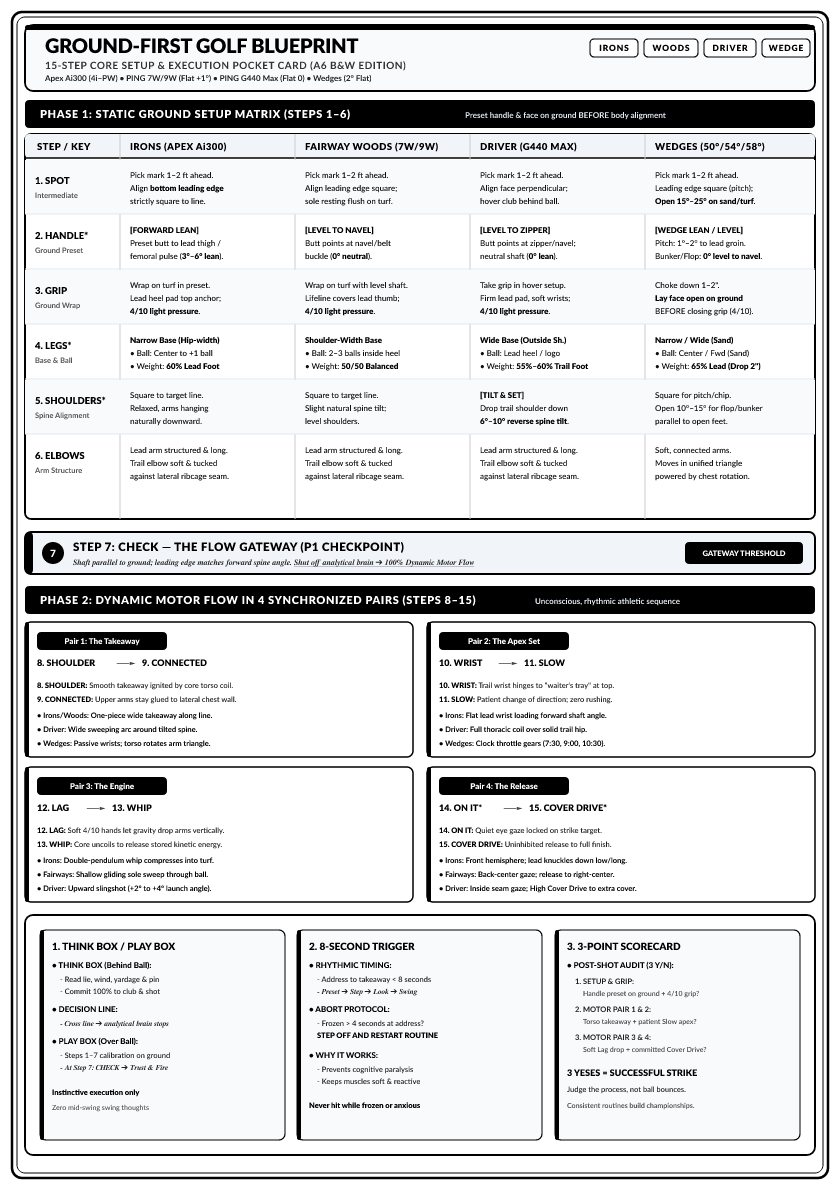
Full-Bag Routine Pocket Card (B&W) A6 High-Contrast Printable Thermal/Laser Checklist routine_card_a6_bw.svg routine_card_a6_bw.png
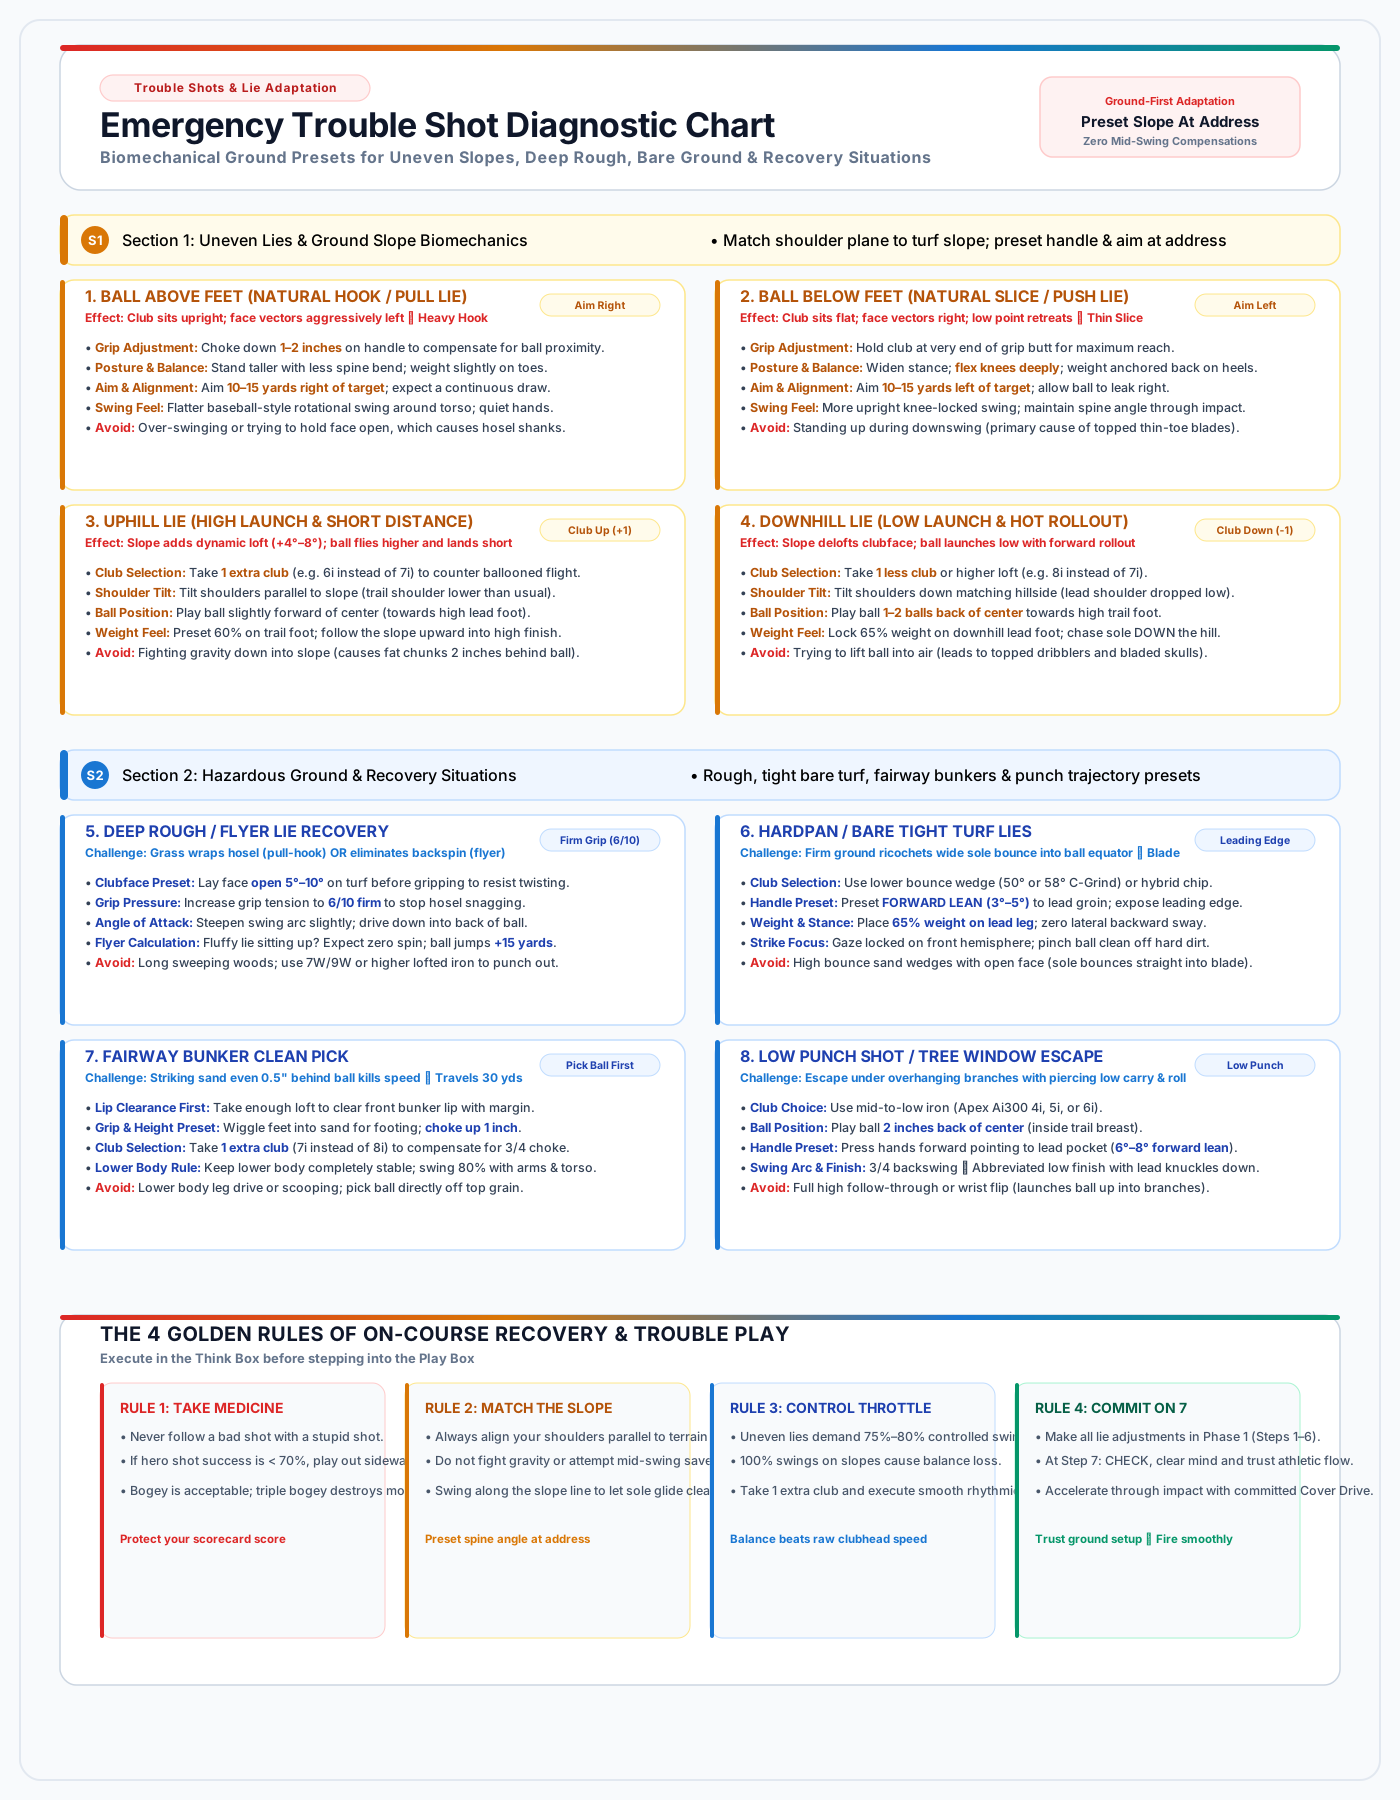
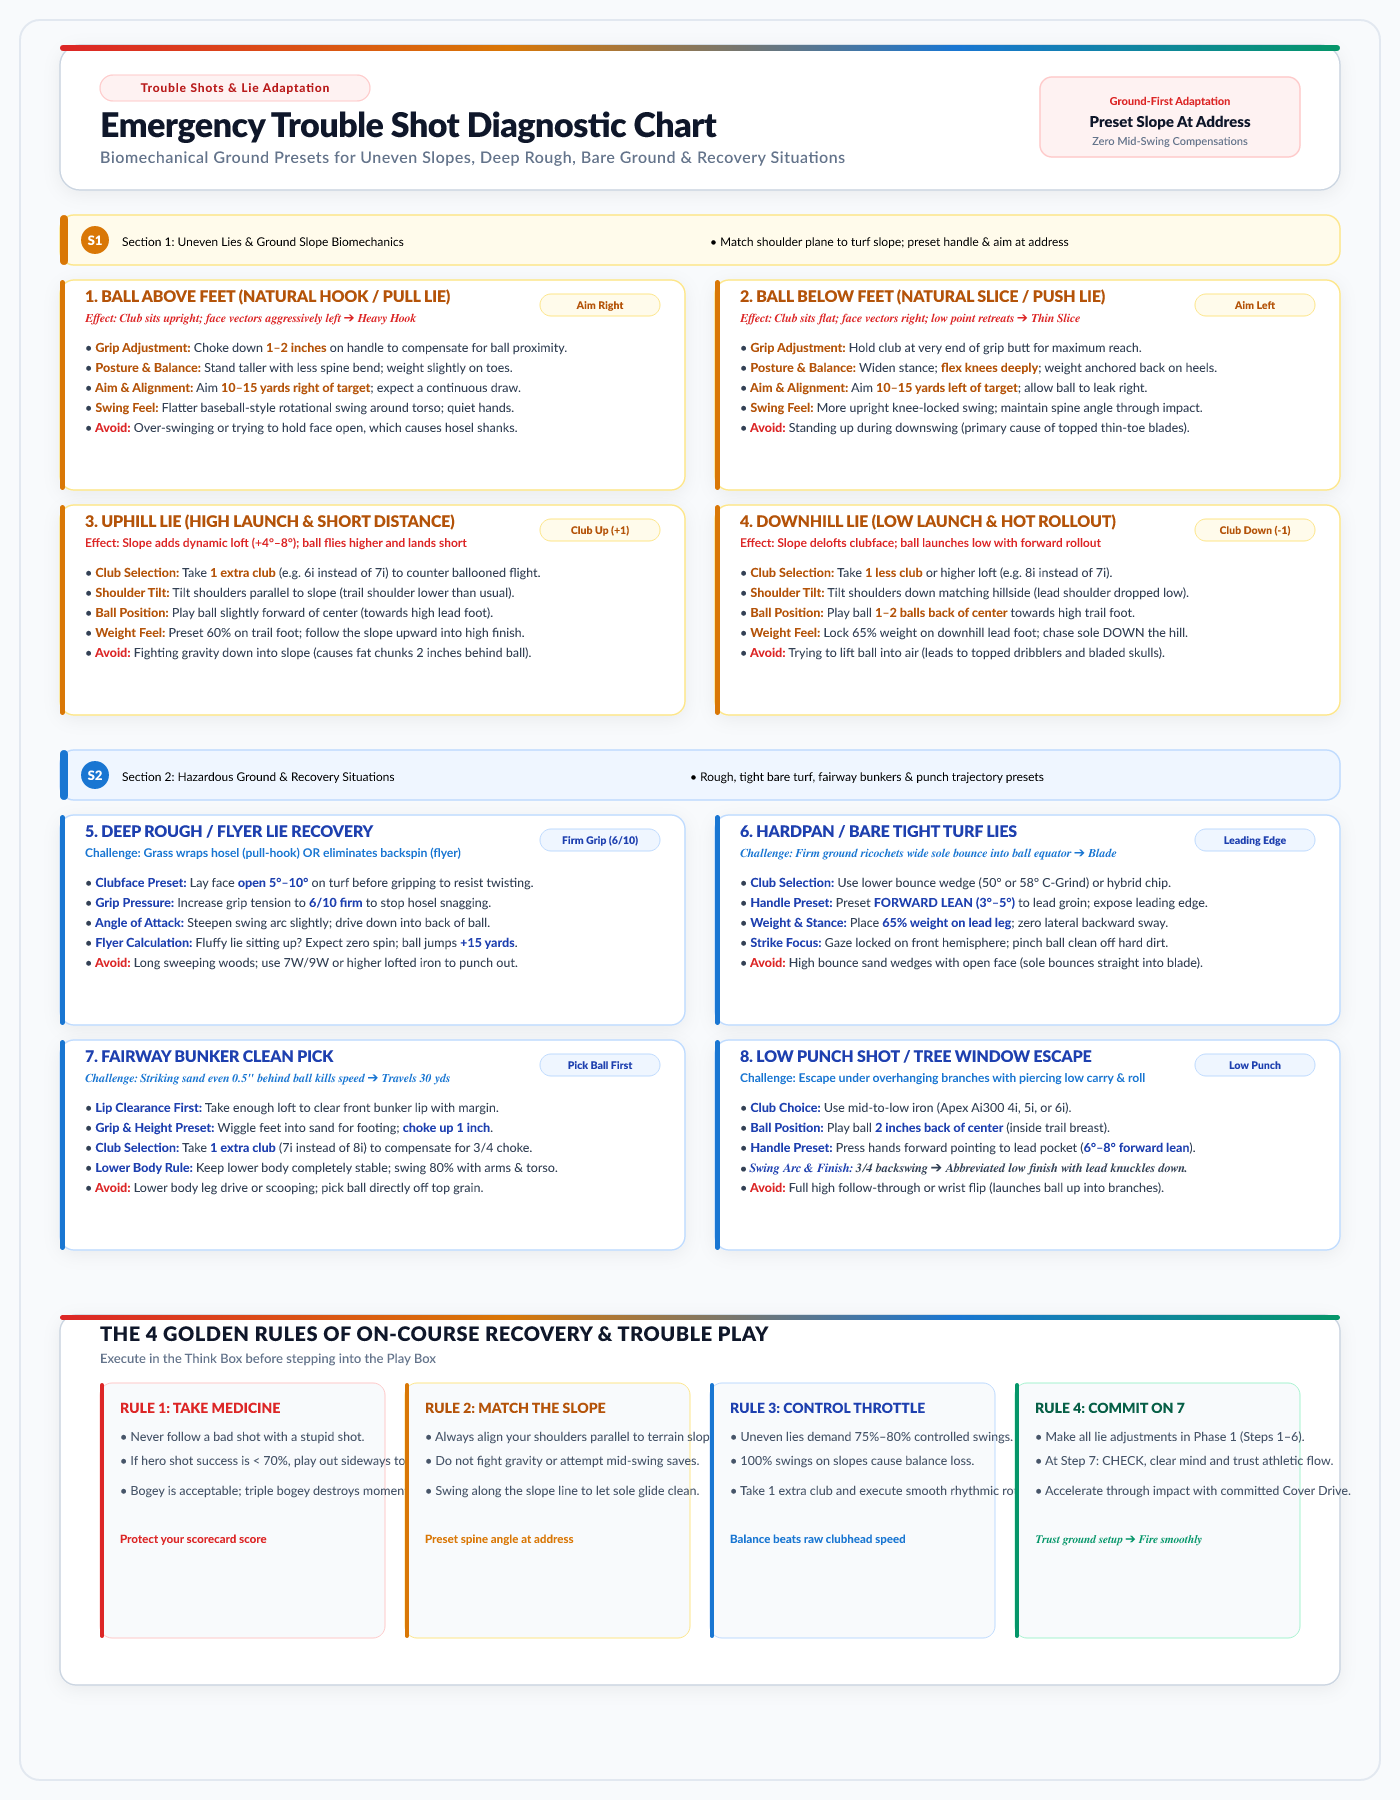
Emergency Trouble Shot Quick Chart Slopes, Deep Rough, Bare Ground, Fairway Bunkers & Punch troubleshots_diagnostic_chart.svg troubleshots_diagnostic_chart.png