The 15-Step Core Setup & Execution Checklist
Book Title: The Ground-First Golf Blueprint: Precision Setup Geometry, Progressive Offset & Dynamic Flow
Volume / Section: Part II — The 15-Step Core Setup & Execution Routine
Target Clubs: Callaway Apex Ai300 Irons (4i–PW) • PING Fairways (7W / 9W) • PING G440 Max Driver (10.5°)
Cross-References: book_index.md • part_1_foundations_and_biomechanics.md • part_3_iron_grip_and_striking.md • part_4_visual_atlas.md
Executive Summary & Neurological Architecture
The Core Routine is engineered to eliminate the "Range-to-Course Disconnect" by establishing a strict boundary between analytical calibration on the turf and athletic motor flow in motion.
Motor learning research and sports biomechanics prove that conscious analytical thoughts during dynamic movement degrade motor timing, causing deceleration, early extension, and casting. This system segregates execution into Phase 1: Static Ground Calibration (Steps 1–6), The Flow Gateway (Step 7), and Phase 2: Dynamic Execution Flow organized into 4 Synchronized Motor Pairs (Steps 8–15):
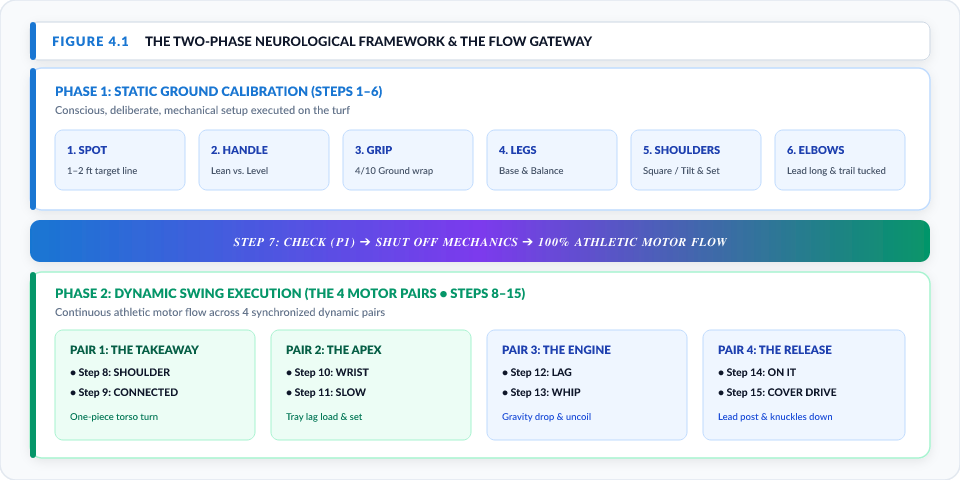
Figure 4.1: The Two-Phase Neurological Framework & The Flow Gateway. View Vector SVG
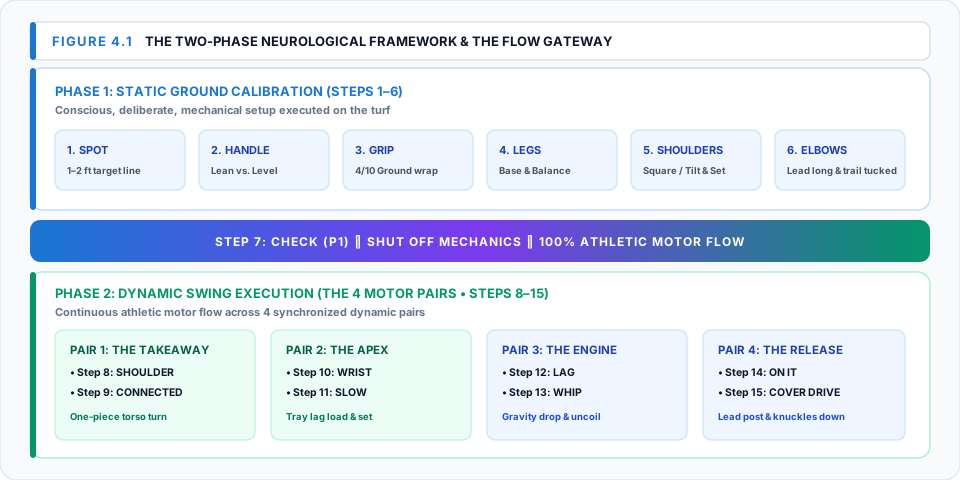
* Indicates category-specific variable adjustments.
Phase 1: Static Geometry & Setup (Steps 1–6)
Phase 1 is executed deliberately on the ground. Its objective is to mechanically remove offset illusions, dial in clubface alignment, establish correct posture, and set ground pressures before any dynamic motion begins.
Step 1: SPOT — Intermediate Target Alignment
- Action: Stand 3–6 feet behind the ball on the target line in the Think Box. Pick an exact, high-contrast intermediate mark (a discolored grass blade, old divot edge, or leaf) located 1 to 2 feet (12–24 inches) in front of the ball directly on the intended launch line.
- Biomechanical & Optical Rationale:
- Aligning a clubface to a distant target 150–250 yards away from a side-on address stance creates severe parallax error.
- Aligning to an object within immediate focal distance (1–2 ft) reduces alignment error to near zero.
- Club-Specific Calibration:
- Irons & Fairways: Align the bottom leading edge perpendicular to the intermediate spot line.
- Driver: Align the center of the clubface perpendicular to the intermediate line, with the clubhead resting or hovering lightly behind the tee.
Step 2: HANDLE* — Ground-First Handle Orientation (LEAN vs. LEVEL)
- Action: Ground the sole of the club squarely behind the ball and angle the butt of the grip to its designated anatomical checkpoint before taking your grip.
- Biomechanical Rationale:
- Modern progressive offset irons (such as the Callaway Apex Ai300) visually appear closed if grounded neutrally.
- Setting the handle orientation on the ground automatically presets forward shaft lean ($3^\circ\text{–}6^\circ$) without opening the clubface.
- Club-Specific Matrix:
- Irons (Apex Ai300 PW–4i):
LEAN— Butt of the grip points directly at the lead femoral pulse / lead groin. Presets forward shaft lean, lowers dynamic loft, and shifts low point 2–3 inches ahead of the ball. - Fairway Woods (7W & 9W):
LEVEL— Butt of the grip points directly at the belt buckle / navel. Produces a neutral shaft angle designed for a shallow turf sweep. - Driver (PING G440 Max 10.5°):
LEVEL— Butt of the grip points at the zipper / navel with the head resting lightly behind the ball.
- Irons (Apex Ai300 PW–4i):
Step 3: GRIP — Static Ground Wrap & 4/10 Pressure
- Action: With the clubhead resting naturally on the ground and the handle angled to its Step 2 checkpoint, place your hands onto the grip. Close fingers snugly without twisting or manipulating the clubface angle.
- Biomechanical Rationale:
- Gripping in the air forces the wrists into an arbitrary position that twists the clubface when lowered to address.
- Wrapping the hands around a preset handle on the ground ensures the wrists sit in their natural anatomical relationship relative to the strike angle.
- Checkpoints:
- Lead hand "V" points toward the trail collarbone (2–2.5 knuckles visible with heel pad anchored on top).
- Trail hand lifeline fits over lead thumb; middle two fingers hook into finger channel; trigger index finger curls lightly.
- Grip pressure is maintained at 4/10 ("holding a live bird") to ensure forearm muscles stay soft for dynamic lag.
Step 4: LEGS* — Stance Width, Ball Position & Pressure Distribution
- Action: Step into stance width, locate the ball relative to the lead foot, and establish baseline ground pressure.
- Club-Specific Matrix:
| Parameter | Irons (Apex Ai300) | Fairway Woods (7W / 9W) | Driver (PING G440 Max) |
|---|---|---|---|
| Stance Width | Narrow (Hip-width, inside heels) | Shoulder-width (Heels under shoulders) | Wide (Outside shoulder width) |
| Ball Position | Center to +1 ball forward (Short irons center; mid/long irons 1-ball forward) | 2–3 balls inside lead heel (Under lead logo/armpit) | Inside edge of lead heel (Opposite lead armpit/instep) |
| Pressure Bias | 60% Lead / 40% Trail | 50% / 50% Balanced | 55%–60% Trail / 40%–45% Lead |
| Ground Purpose | Encourages downward angle of attack and forward low point | Enables shallow, gliding sweep of the sole | Promotes positive angle of attack ($+2^\circ\text{ to }+4^\circ$) |
Step 5: SHOULDERS* — Alignment & Spine Angle Tilt
- Action: Align shoulder line parallel to the intermediate target line. Set club-specific spine tilt.
- Club-Specific Calibration:
- Irons & Fairways: Shoulders square and level/parallel to the target line. Natural slight spine tilt from trail hand being lower on grip.
- Driver (PING G440 Max):
Tilt & Set— Drop the trail shoulder downward until the spine is tilted $6^\circ\text{–}10^\circ$ away from the target (reverse spine tilt). This presets the upward angle of attack without requiring a dynamic slide.
Step 6: ELBOWS — Structural Arm Framework
- Action: Establish the relationship between the lead and trail arms at address.
- Biomechanical Checkpoints:
- Lead Arm: Fully extended but relaxed (never rigid), establishing the fixed swing radius.
- Trail Elbow: Soft, slightly flexed, with the inside pit of the elbow facing forward. The trail elbow sits tucked gently against the trail ribcage seam.
The Flow Gateway (Step 7)
Step 7: CHECK — Position 1 (P1) Takeaway Check
- Action: The final static gate check. Visually or kinesthetically verify Position 1 (shaft parallel to turf).
- Checkpoints:
- The leading edge of the clubface matches the forward angle of your spine (~25° tilt to ground).
- The clubhead sits directly over or slightly outside the hands (never whipped inside).
- The Flow Gateway Threshold:
- Reaching Step 7 marks the absolute end of conscious mechanical adjustment.
- Shut off all internal calculation. The brain shifts 100% into the 4 Motor Pairs.
Phase 2: Dynamic Execution Flow (Steps 8–15 in 4 Pairs)
Phase 2 is continuous, athletic, and rhythmic. It is executed via 4 sequential motor pairs:
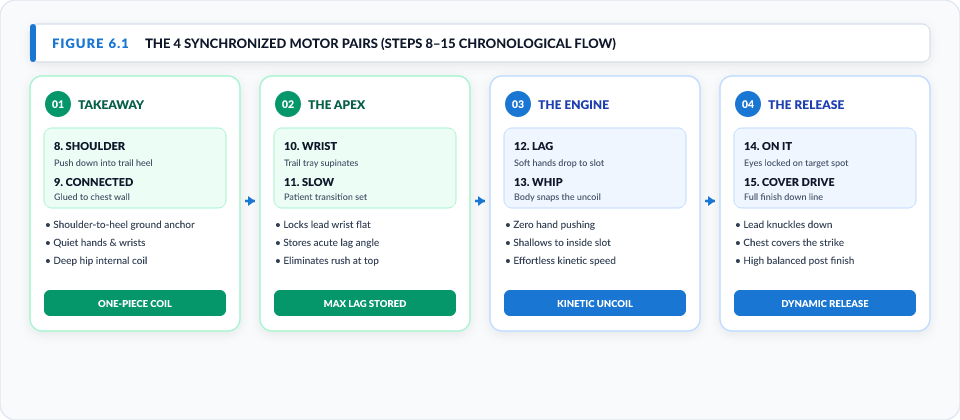
Figure 6.1: The 4 Synchronized Motor Pairs Sequence (Steps 8–15). View Vector SVG
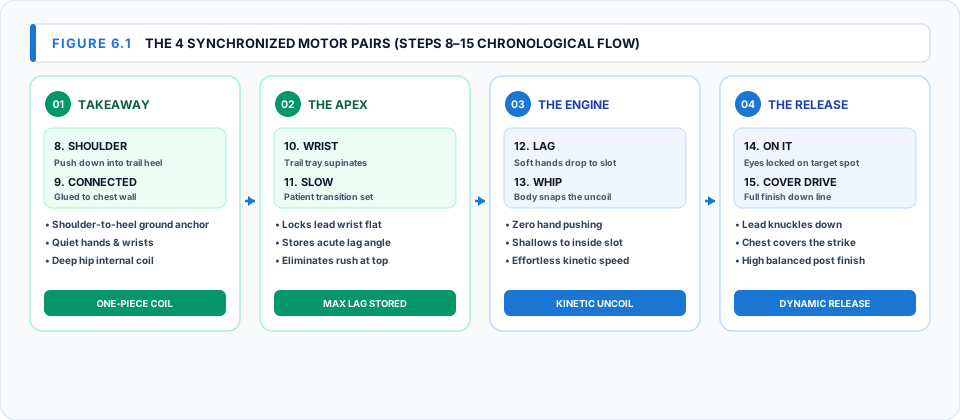
Pair 1: The Takeaway Unit (Steps 8 & 9)
Step 8: SHOULDER — Takeaway Ignition & Trail Heel Ground Load
- Action: Start the backswing by smoothly rotating the lead shoulder under the chin, feeling like you are pushing down on your left (lead) shoulder directly into your right (trail) heel.
- Kinetic & Biomechanical Rationale:
- Diagonal Ground-Force Anchor: Pressing the lead shoulder down into the trail heel activates the posterior oblique sling (connecting the lead latissimus dorsi across the spine to the trail glute and heel).
- Sway Elimination: Locks the trail hip into deep internal rotation, anchoring ground pressure securely in the trail heel rather than sliding laterally outside the foot.
- Spine Angle Preservation: Prevents lifting the chest up or standing up out of posture, ensuring the swing maintains its forward address spine tilt.
- Passive Hands: Hands and wrists remain completely quiet and passive while the large thoracic core muscles ignite the takeaway.
Step 9: CONNECTED — One-Piece Torso Connection
- Action: Keep the upper arms connected to the lateral chest wall (pecs/lats) as the lead shoulder turns.
- Biomechanical Rationale:
- Maintains the shoulder-arm triangle away from the ball.
- Prevents lifting the club with the arms or separating the trail elbow early.
Pair 2: The Apex Unit (Steps 10 & 11)
Step 10: WRIST — Lag Loading ("Waiter's Tray")
- Action: As the club ascends toward the top, feel the trail wrist supinate and extend backward under the shaft.
- Biomechanical Rationale:
- Positions the trail hand like a waiter balancing a tray.
- Mechanically locks the lead wrist flat, stabilizes the clubface square to the plane, and creates an acute angle of maximum stored lag ($<90^\circ$).
Step 11: SLOW — Patient Transition
- Action: Allow the clubhead to complete its full coil and "set" at the top before changing direction.
- Biomechanical Rationale:
- Eliminates the urge to rush with the shoulders, which causes casting and over-the-top swings.
- Gives the lower body time to shift pressure forward while the arms stay relaxed.
Pair 3: The Kinetic Engine Unit (Steps 12 & 13)
Step 12: LAG — Gravity Hand Drop
- Action: At the start of the downswing, keep hands and wrists completely soft (4/10 pressure) and let gravity drop the hands vertically into the inside slot behind the trail hip.
- Biomechanical Rationale:
- Zero pushing or chopping with the hands from the top.
- Preserves the wrist lag angle deep into the downswing and shallows the shaft plane from the inside.
Step 13: WHIP — Rotational Snap
- Action: As the lead hip and torso uncoil open toward the target, unleash the stored lag through impact.
- Biomechanical Rationale:
- The body's rotational uncoil acts as the whip handle, cracking the clubhead through the ball with effortless kinetic velocity.
- Replaces forced muscular effort with explosive centrifugal acceleration.
Pair 4: The Impact & Release Unit (Steps 14 & 15)
Step 14: ON IT* — Gaze Anchoring (Quiet Eye Focus)
- Action: Maintain a rock-steady visual fixation on a precise ball coordinate throughout the downswing and strike.
- Club-Specific Coordinates:
- Irons: Front Hemisphere (lead edge of ball) $\rightarrow$ pulls hand path forward for downward compression.
- Fairways: Back-Center of ball $\rightarrow$ promotes a level, shallow gliding sweep along the turf.
- Driver: Back/Inside Seam $\rightarrow$ keeps head anchored behind the ball for upward launch ($+2^\circ\text{ to }+4^\circ$).
Step 15: COVER DRIVE* — Lead Knuckles Down & Target Extension
- Action: Drive weight firmly into the flexed front knee, keep the lead knuckles facing down toward the turf, and extend hands long down the target corridor.
- The Cricket Front-Foot Cover Drive Analogy:
| Cricket Cover Drive Mechanic | Golf "COVER DRIVE" Equivalent | Ball Flight Consequence |
|---|---|---|
| Plant into flexed front knee | Weight firmly posted on lead heel/hip | Eliminates reverse pivot and hang-back |
| Lead with hands & drive through | Hands lead the clubhead into impact | Produces forward shaft lean & compression |
| Top hand firm, knuckles downward | Lead wrist flat/bowed, knuckles facing turf | Prevents wrist flip/cupping; squares face |
| Drive blade through extra cover | Hands release out toward right-center field | Eliminates pull-around; delivers inside-out path |
- Club-Specific Release Paths:
- Irons: Knuckles down; extend hands low and long through the turf.
- Fairways: Sweep cleanly through ball; release hands out to right-center field.
- Driver: High Cover Drive — Release hands upward and outward toward extra cover.
Core Checklist Matrix (Summary Table)
| # | Step Name | Pair / Phase | Irons (Apex Ai300) | Fairways (7W / 9W) | Driver (PING G440 Max 10.5°) |
|---|---|---|---|---|---|
| 1 | SPOT | Static Setup | 1–2 ft ahead; align leading edge | 1–2 ft ahead; align leading edge | 1–2 ft ahead; align face center |
| 2 | HANDLE* | Static Setup | LEAN: Butt to lead femoral pulse | LEVEL: Butt to navel / buckle | LEVEL: Butt to zipper / navel |
| 3 | GRIP | Static Setup | Ground wrap; 4/10 tension; 2.5 knuckles | Ground wrap; 4/10 tension; square | Ground/hover wrap; 4/10 tension |
| 4 | LEGS* | Static Setup | Narrow; Ball center/+1; 60% lead | Shoulder; Ball 2–3b in; 50/50 balance | Wide; Ball lead heel; 55–60% trail |
| 5 | SHOULDERS* | Static Setup | Square to line; level hang | Square to line; slight natural tilt | Tilt & Set: Trail shoulder down ($6^\circ\text{–}10^\circ$) |
| 6 | ELBOWS | Static Setup | Lead arm straight; trail elbow tucked | Lead arm straight; trail elbow tucked | Lead arm straight; trail elbow tucked |
| 7 | CHECK | Flow Gateway | P1: Leading edge matches spine | P1: Leading edge matches spine | P1: Wide arc, face matches spine |
| 8 | SHOULDER | Pair 1: Takeaway | Lead shoulder down into trail heel | Lead shoulder down into trail heel | Lead shoulder down into trail heel |
| 9 | CONNECTED | Pair 1: Takeaway | Upper arms sync'd to chest wall | Upper arms sync'd to chest wall | Upper arms sync'd to chest wall |
| 10 | WRIST | Pair 2: The Apex | Trail wrist sets "waiter's tray" | Trail wrist sets "waiter's tray" | Trail wrist sets "waiter's tray" |
| 11 | SLOW | Pair 2: The Apex | Patient unhurried transition at top | Patient unhurried transition at top | Patient unhurried transition at top |
| 12 | LAG | Pair 3: The Engine | Hands drop vertically in slot | Hands drop vertically in slot | Hands drop vertically in slot |
| 13 | WHIP | Pair 3: The Engine | Torso uncoils downward strike | Body uncoils shallow sweep | Body uncoils upward launch |
| 14 | ON IT* | Pair 4: The Release | Gaze locked on front hemisphere | Gaze steady on back-center | Gaze locked on inside seam |
| 15 | COVER DRIVE* | Pair 4: The Release | Knuckles down; extend low & long | Release out to right-center field | High Cover Drive: Release up & out |
On-Course Execution Rules
- Strict 8-Second Window:
From hands taking their final grip (Step 3) to takeaway initiation (Step 8), sequence must take under 8 seconds. If frozen $>4$ seconds, back out and reset. - The 4-Pair Mental Mantra:
$$\mathbf{(SHOULDER \cdot CONNECTED) \longrightarrow (WRIST \cdot SLOW) \longrightarrow (LAG \cdot WHIP) \longrightarrow (ON\ IT \cdot COVER\ DRIVE)}$$ - The 3-Point Process Scorecard:
- Handle set on turf & 4/10 grip? ($Y/N$)
- Shoulder/Connected takeaway into Wrist/Slow set? ($Y/N$)
- Soft Lag drop into Whip Cover Drive release? ($Y/N$)
3 Yeses = Flawless execution.